iOS Swift
Integration
Kumulos provides an SDK in the form of a framework to ease the integration of the Kumulos Analytics, Push Notification, Crash Reporting and Build features into your iOS app. This guide provides an overview of setting up the SDK for your project and sample usage.
Integrate SDK components
The Kumulos SDK is an open source project hosted on Github, for ease of use it is linked to from the agency console and can be found at https://github.com/Kumulos/KumulosSdkSwift.
Both Carthage and CocoaPods integration instructions are available in the GitHub repo.
Add Project Dependencies
Add the following line to your app's target in your Podfile:
pod 'KumulosSdkSwift', '~> 10.0'
Run pod install to install your dependencies.
Add the following line to your Cartfile:
github "Kumulos/KumulosSdkSwift" ~> 10.0
Run carthage update to install your dependencies then follow the Carthage integration steps to link the framework with your project.
Also link your project against:
- SystemConfiguration.framework
- MessageUI.framework (for iOS projects)
- libc++
- libz
And add the -ObjC linker flag to 'Other Linker Flags' under 'Build Settings'.
N.B. make sure to link the dynamic KSCrash.framework from the Carthage build, and not the one under Static/
In Xcode add a package dependency by selecting:
File > Swift Packages > Add Package Dependency
Choose this repository URL for the package repository and 10.0 for the version where prompted.
You can then follow the integration steps below or read the full Kumulos Swift integration guide for more information.
Initialization
To configure the SDK for use you need to initialize it with your app's API credentials, this should be done early in your application startup so that you can start using API methods and features.
import UIKit
import KumulosSDK

@UIApplicationMain
class AppDelegate: UIResponder, UIApplicationDelegate {

  var window: UIWindow?

  func application(application: UIApplication, didFinishLaunchingWithOptions launchOptions: [NSObject: AnyObject]?) -> Bool {

    let builder = KSConfigBuilder(apiKey: "your-api-key", secretKey: "your-secret-key")
    Kumulos.initialize(config: builder.build())

    // Override point for customization after application launch.
    return true
  }
}
Your API Key and Secret Key can be obtained from your App Dashboard in your agency console.
You don't need to initialize Kumulos every time you wish to make an API call. It only needs to be initialized once, after which it will remember the API key and secret key you've given it the first time.
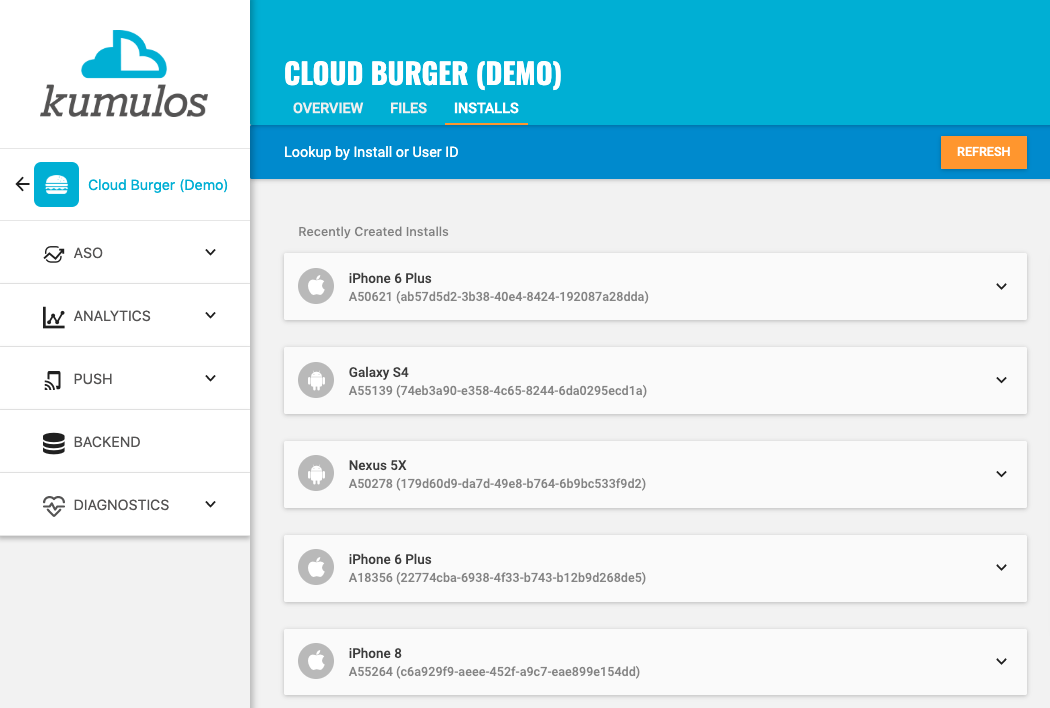
Checking installs of your App
When you run your app on a simulator or install your app on a device, you can check that the SDK has been initialized correctly by selecting the app and clicking the Installs tab to see the ten most recent installs of your app. Click on any install to see more information.
If you experience any difficulties integrating an SDK or initializing the Kumulos client, please don't hesitate to contact support who are standing by to help!
Installation ID
When initialized for the first time, the Kumulos SDK will create a unique identifier for the app installation that initialized the SDK.
This identifier can be used to target push notifications to a specific device through KScript or the Push Notifications API.
In order to retrieve this installation ID, simply access the class variable:
let installId = Kumulos.installId;
Once you have the installation ID, you can send it to your app's backend to be used later for push targeting. For more information about push targeting, please see the KScript Documentation or push notification documentation as appropriate.
Analytics
Kumulos provides concise and easy to consume analytics & reporting features. By initializing the SDK, you automatically get session & engagement reporting out the box.
Session Analytics
Kumulos records sessions based on application foreground and background events. When an app enters the background, Kumulos will wait for a configurable idle period. If there are no more foreground events during that idle period, the current session will be closed.
You can configure the idle period to suit your app's use-case. By default the idle period is 23 seconds of inactivity. The idle period does not count towards session duration calculations.
To adjust the idle period, you can configure the SDK as follows:
let builder = KSConfigBuilder(apiKey: "your-api-key", secretKey: "your-secret-key")
.setSessionIdleTimeoutSeconds(120);

Kumulos.initialize(config: builder.build())
Note that due to background task limits, in practice the idle timeout can only reasonably be up to a few minutes for iOS < 13 and up to 30 seconds for iOS 13+.
Event Tracking
Kumulos allows you to track custom analytics events that can be used as a trigger to fire automation rules (e.g. to trigger a push notification) or as steps in a funnel to track conversion through key user journeys in your app.

To track a custom analytics event, use Kumulos.trackEvent as follows:
Kumulos.trackEvent(eventType: "product.purchased", properties: [
    "productId": 404
])
Each event and its properties must be less than 250 KiB in size for the event to be tracked.
Event tracking is available offline as all events are persisted locally before being synced to the server in batches in the background.
A similar method
trackEventImmediatelywill immediately start an event sync rather than waiting for the next time the app is backgrounded.
Checking events from your App
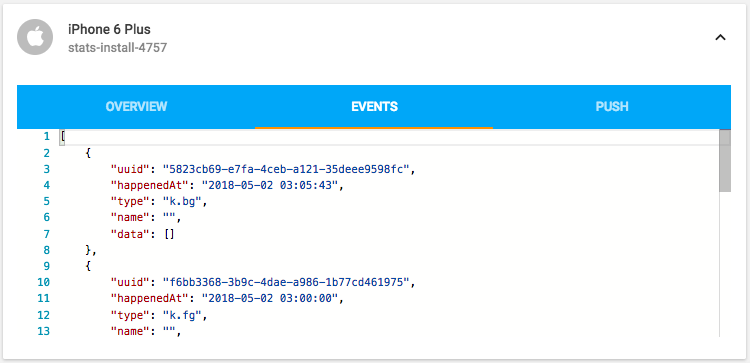
When you run your app on a simulator or install your app on a device, you can check that the SDK is recording events correctly by selecting the app and clicking the Installs tab to see the ten most recent installs of your app. Click on any install and then click on the Events tab.
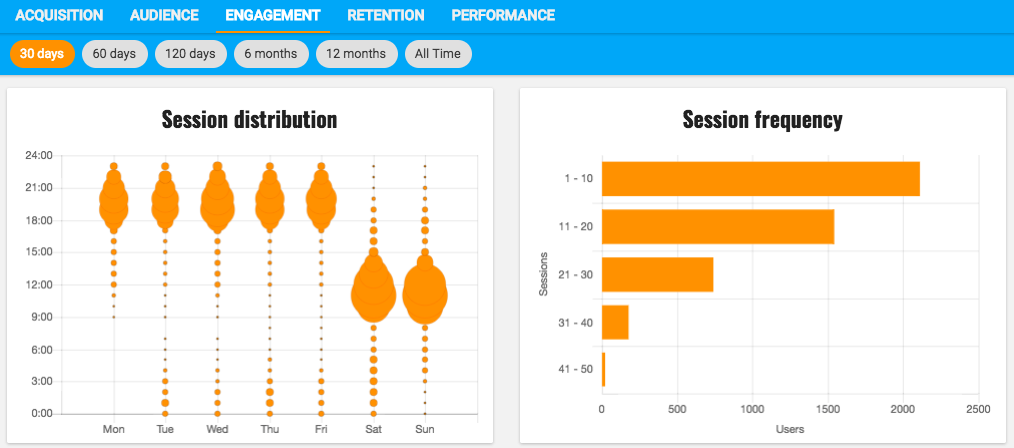
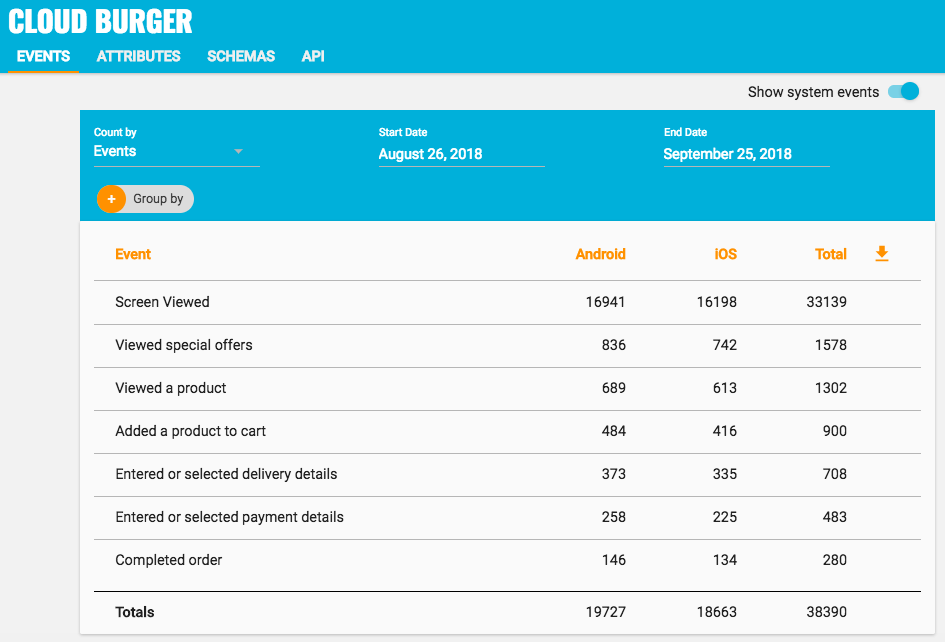
Alternatively, to see counts of all analytics events, including system events such as opened a push notification, recorded by installs of the app in the last 30 days, expand 'Analytics' and click 'Explore' in the left menu. For comparison, the total number of sessions in the same period is shown.
User Association
Kumulos allows associating a user identifier with the current installation ID. This user identifier is useful for performing analytics aggregations & analyses at the user level, for example, funnels completed by users across multiple devices. You can also optionally associate a collection of attributes with the user.
To associate the current app installation with a user, you can use the helper method as shown below:
Kumulos.associateUserWithInstall(userIdentifier: "unique-user-identifier")
User association is time-aware, so in the case of two different users sharing a device to log in to the app, their user IDs will be associated with the same install for the time between subsequent calls to the helper method. For example:
Kumulos.associateUserWithInstall(userIdentifier: "Bob")

// This event will belong to Bob
Kumulos.trackEvent(eventType: "product.purchased", properties: [
    "productId": 404
])

Kumulos.associateUserWithInstall(userIdentifier: "Alice")

// This event will belong to Alice
Kumulos.trackEvent(eventType: "product.purchased", properties: [
    "productId": 404
])
Attributes
You can optionally associate a collection of attributes with the user for targeting, personalization or attribution. To associate attributes with the user, pass a collection into the helper method as shown.
Kumulos.associateUserWithInstall(userIdentifier: "unique-user-identifier", attributes: [
   "name": "Shawn" as AnyObject,
   "age": 25 as AnyObject
])
The collection of attributes for a given user must be less than 250 KiB in size.
If you do not have a user identifier, use the installation id generated by the Kumulos SDK.
Location Tracking
You can send Kumulos location updates and use this to trigger events such as push notifications when an install enters a GeoFence.
How you configure the Core Location services for iOS depends on the specific use case of your app. You should consider both accuracy and battery life when making this decision. Refer to the Apple documentation for details of how to configure location services.
Once you have created a CLLocationManagerDelegate you can use the helper method in the Kumulos SDK to send location updates to Kumulos.
func locationManager(_ manager: CLLocationManager, didUpdateLocations locations: [CLLocation])
{
  let latestLocation: CLLocation = locations[locations.count - 1]
  Kumulos.sendLocationUpdate(location: latestLocation)
}
iBeacon Detection
You can send Kumulos beacon proximity updates and use these to trigger automations such as sending a push notification when an install is in proximity to a beacon.
How you configure the Core Location services for iOS depends on the use case for your app and you should consider throttling how regularly these events are transmitted for both battery life and network traffic.
The Kumulos SDK provides a helper method to notify our services of proximity to a detected beacon.
Kumulos.sendiBeaconProximity(beacon: beacon)
The cookbook contains example code for how to notify Kumulos when an iBeacon is relatively close.
Messaging & Push Notifications
Kumulos provides powerful multi-channel messaging services to reach your users. By initializing the SDK you can quickly and easily receive both push notifications to re-engage your users as well as feature-rich In-App messages.
Configuration & Integration
To integrate Kumulos Messaging into your iOS project, you have to complete the following steps with either Key or Certificate based credentials.
- Set up APNs credentials in your Apple Developer account
- Configure Push in the Kumulos Agency Console
- Integrate SDK components with your iOS project & enable in-app messaging
- Register for push from the client app
Configure APNs
In order to generate a P8 key for Apple services first access your account at https://developer.apple.com/ and select 'Certificates, Identifiers & Profiles', then select 'Keys' on the left.
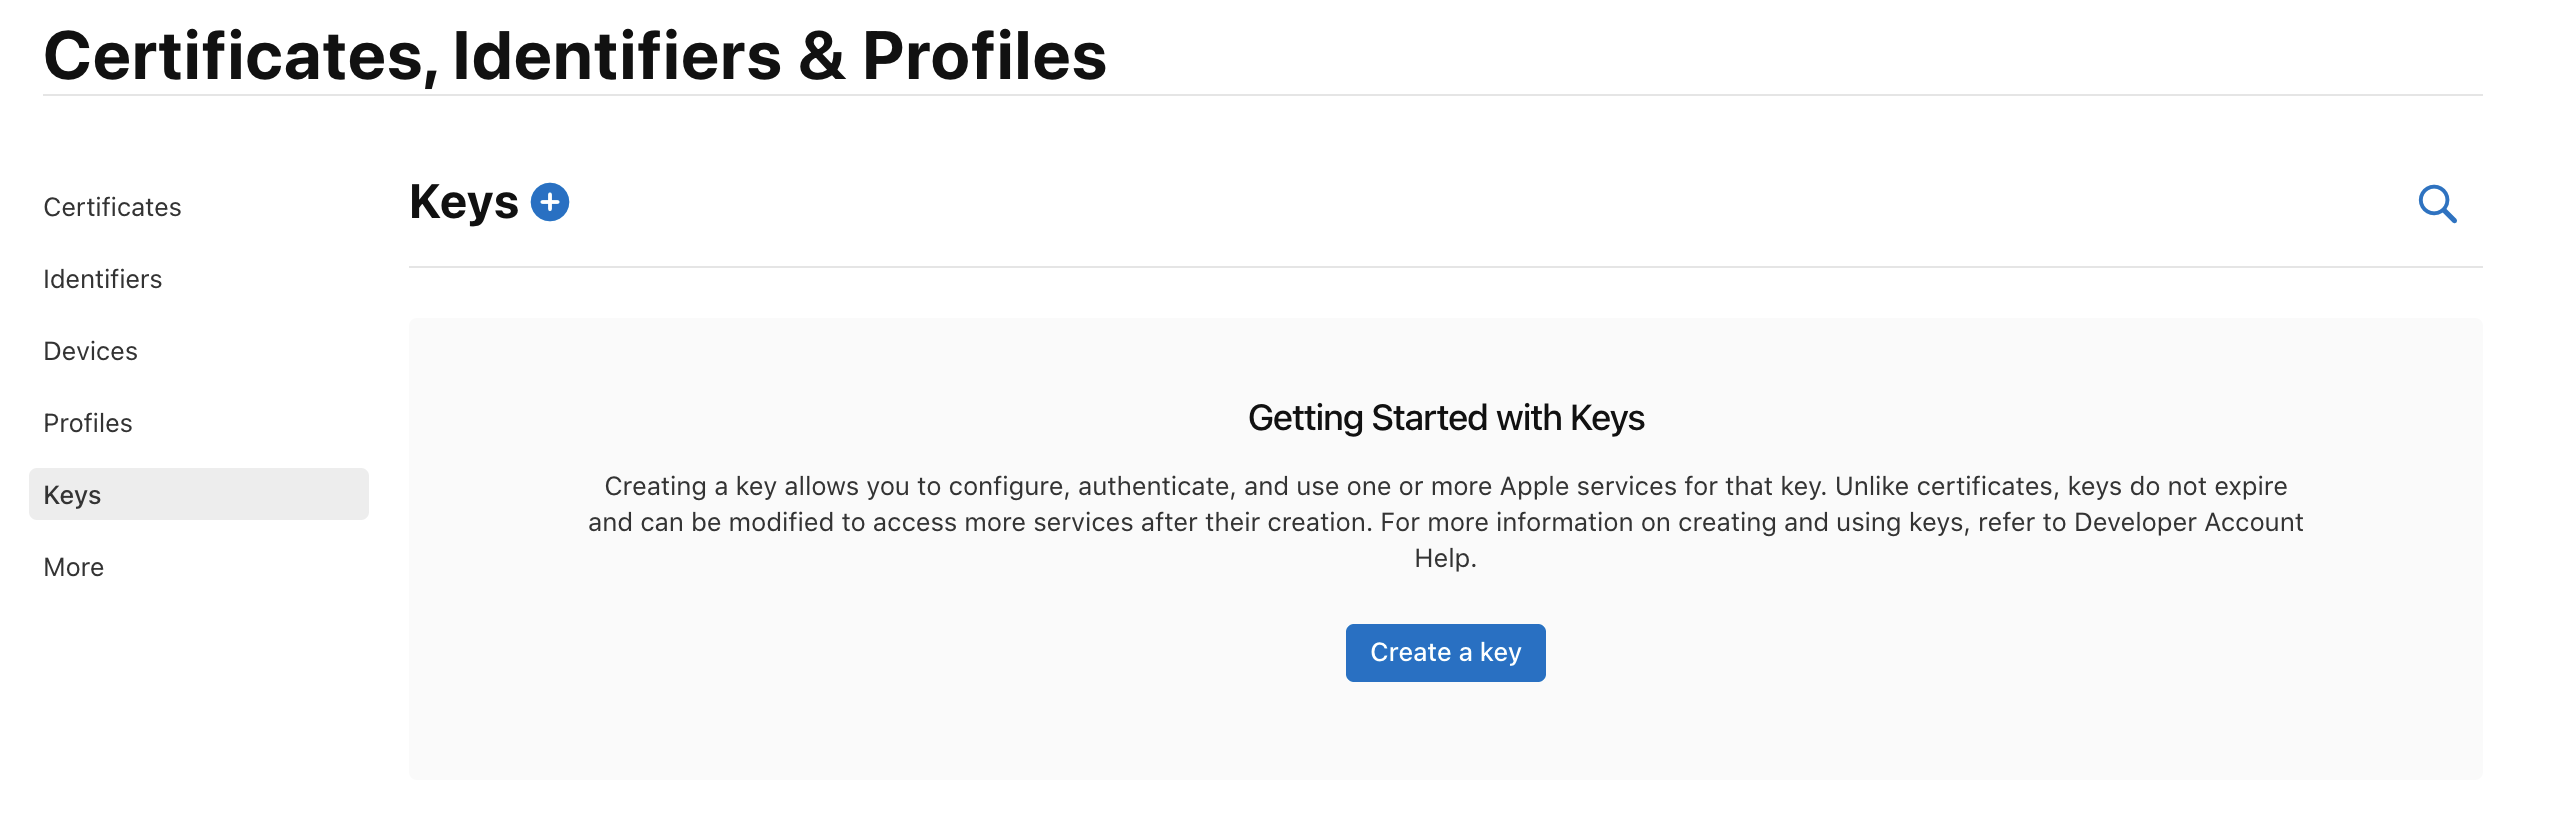
Select 'Create a Key' and on the form 'Register a New Key' enter a meaningful name such as 'APNS Access Key' and check the 'Enable' checkbox for 'Apple Push Notifications service (APNs)', click 'Continue'.
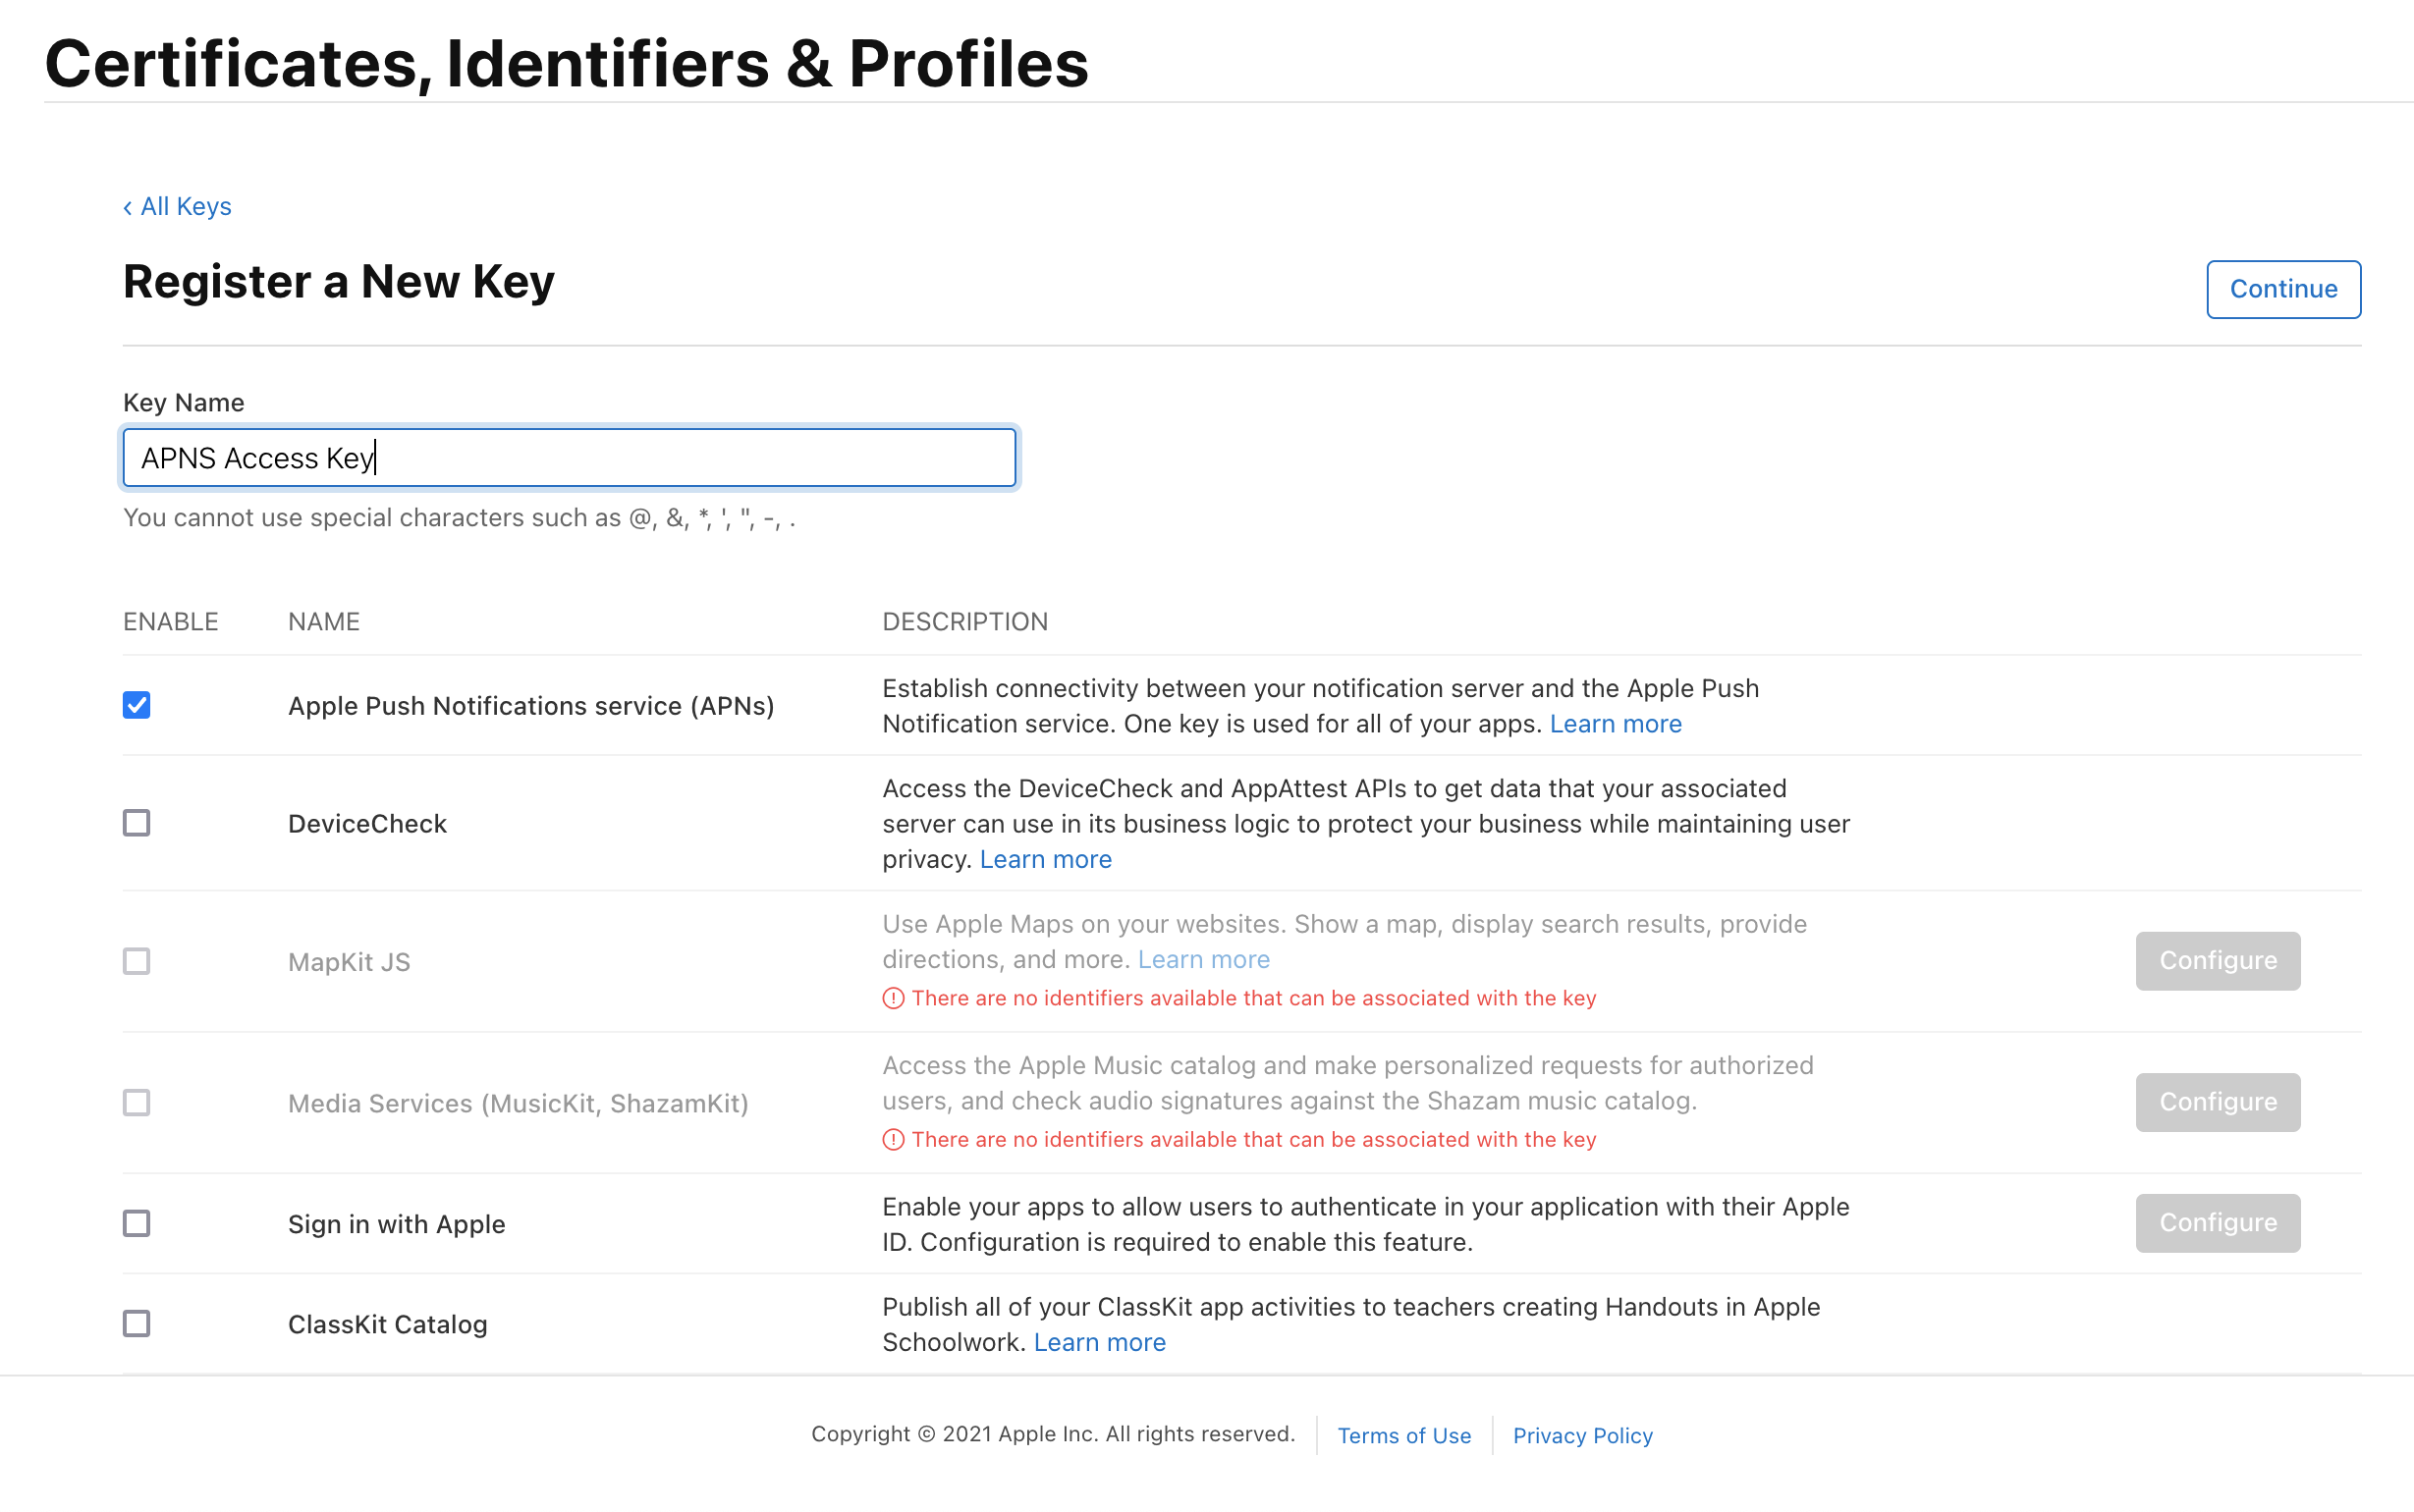
On the confirmation screen double check the APNs enablement is set then click 'Register'
On the final screen take note of your KeyID and download the key. Note that you can only download the key once, if lost the key must be revoked and re-created.
Downloading the key will save a .p8 file with the access credentials.
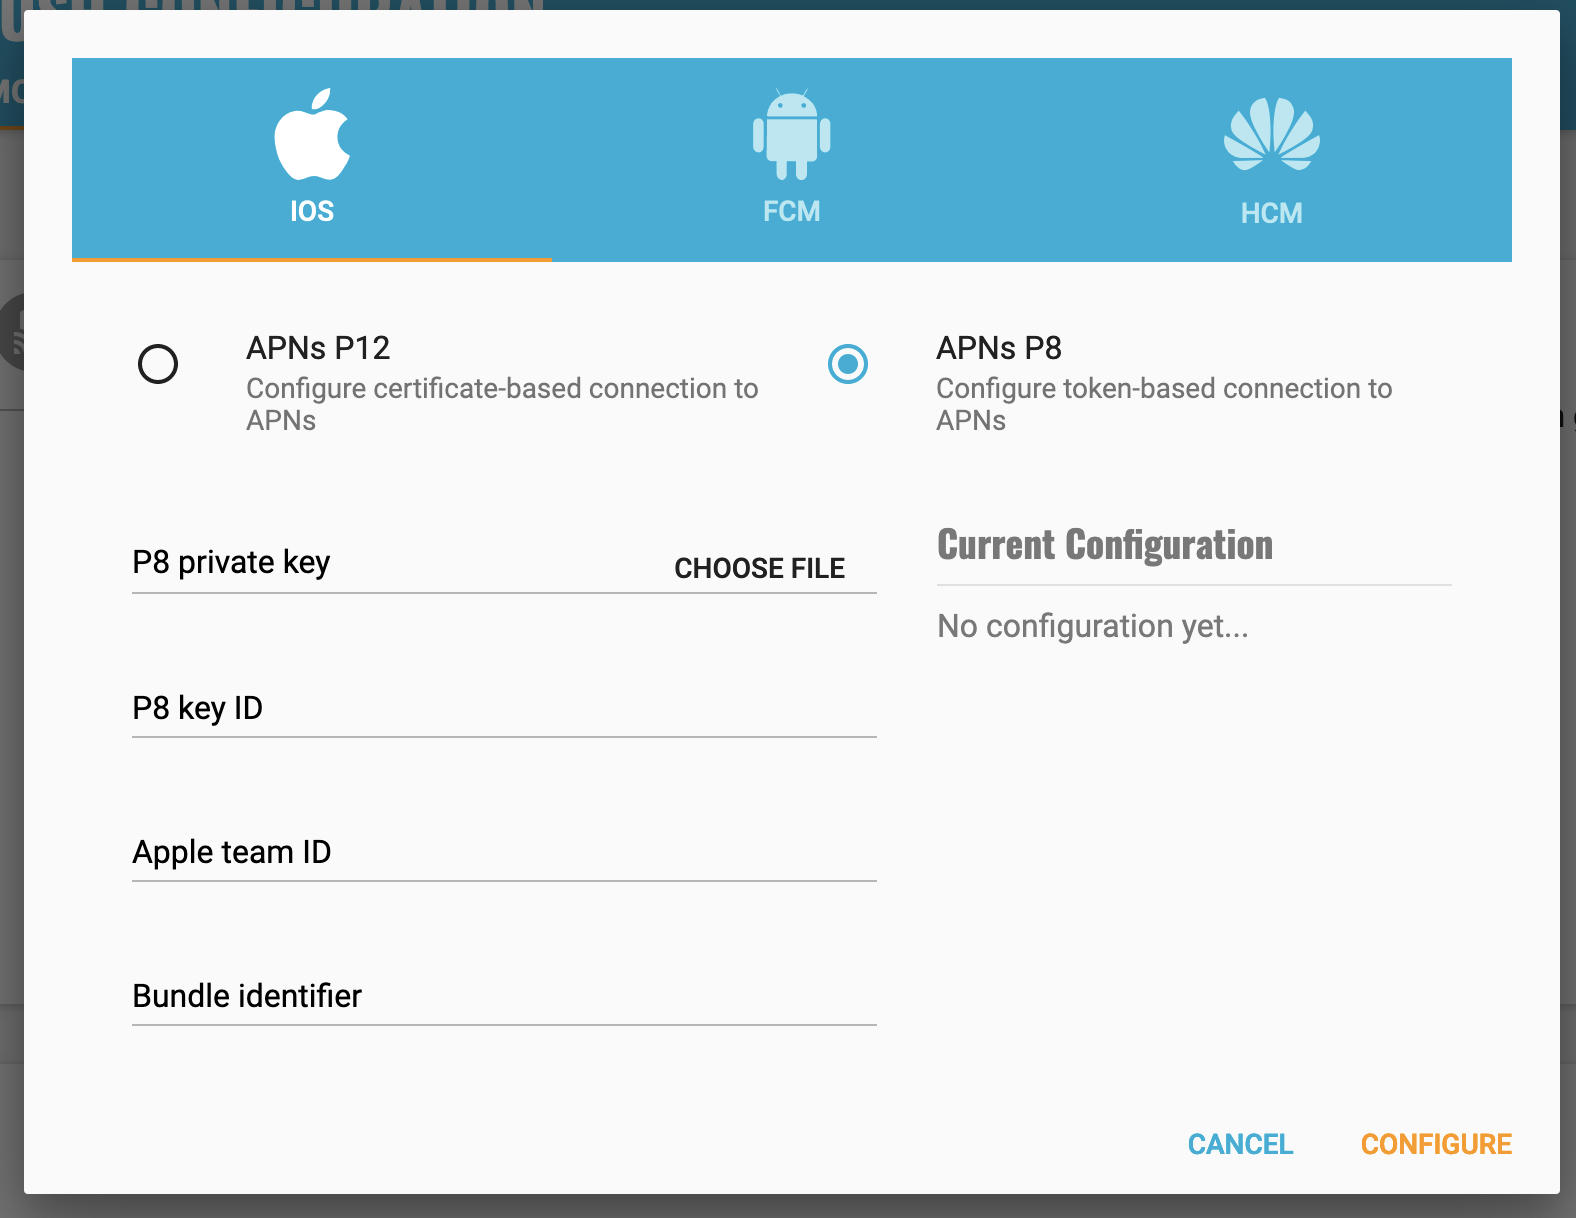
You now have all the details to configure your Kumulos App, expand 'Messaging' in the left menu, select 'Configuration' and click the cog next to the Apple icon. Select APNs P8 and select your file, enter your other details and click 'Configure'.
Configure your app capabilities and entitlements
In your app project settings use the "+ capability" button to add the App Groups, Background Modes and Push Notifications capabilities, in Background Modes you should have the "Remote Notifications" mode checked.
The video below shows how to create a push certificate on your Apple Developer portal, configure these certificates in Kumulos, and how to then configure the necessary entitlements in your iOS Xcode project.
Note you must use a real device to test push notifications on iOS because simulators cannot register for push notifications.
After configuring your project, continue to follow the steps below.
Enable In-App Messaging
Add the following to your Kumulos config:
import KumulosSDK
...
let builder = KSConfigBuilder(apiKey: "your-api-key", secretKey: "your-secret-key")
    .enableInAppMessaging(inAppConsentStrategy: InAppConsentStrategy.AutoEnroll)
Kumulos.initialize(config: builder.build())
Next, enable the 'background-fetch' Background Mode in your Xcode project's Capabilities section.
Register for Push Notifications
When you consider it appropriate, you need to request permission from the user to send them push notifications. You can potentially use a Kumulos in-app message to prompt the user to accept push at a later time.
Whilst you can handle this yourself, Kumulos provides a convenience method:
Kumulos.pushRequestDeviceToken()
This will prompt the user to accept push notifications with the badge, alert, and sound settings. When the user accepts, the Kumulos SDK will store the push token.
To remove the token from Kumulos, call this method:
Kumulos.pushUnregister()
Advanced
Checking Push Registrations
When you run your app on a simulator or install your app on a device, you can check that the install has successfully registered for push notifications by selecting the app and clicking the Installs tab to see the ten most recent installs of your app.
Click on an install, click the 'Push' tab and click Send Test Push.
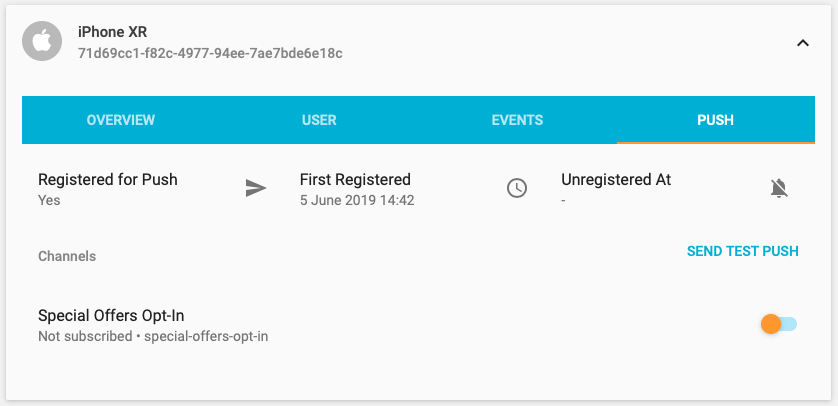
If you do not receive the push notification, check the Error Log for any errors sending the push notification to the native push gateways. If you continue to experience problems, please don't hesitate to contact support who are standing by to help!
Supporting Pictures and Action Buttons in Notifications
When sending a push notification you can attach a picture or action buttons to it. They will show on iOS 10+ devices.
The notification will expand upon swiping the notification on devices supporting 3D Touch. In order to enable this functionality you need to add a Notification Service Extension to your application.
If using CocoaPods, add the following to your Podfile and run pod install.
target 'KumulosNotificationServiceExtension' do
  pod 'KumulosSdkSwiftExtension', '~> 10.0'
end
Then replace the contents of NotificationService.swift with the following lines:
import UserNotifications
import KumulosSDKExtension

class NotificationService: UNNotificationServiceExtension {
    override func didReceive(_ request: UNNotificationRequest, withContentHandler contentHandler: @escaping (UNNotificationContent) -> Void) {
        KumulosNotificationService.didReceive(request, withContentHandler: contentHandler)
    }
}
Kumulos' helper function automatically adds picture attachments and buttons to the notification content. You can modify the content before calling didReceive or replace the implementation with your own.
Supporting push delivery tracking, dismissed tracking and badges
For push delivery tracking, dismissed tracking and badges to work correctly you need to
- Set up Notification Service Extension as described above
- Add App Groups capability to your App and Notification Service Extension targets
- Set group to
group.{your.bundle.identifier}.kumulosfor both targets
Note that due to iOS limitations badge is not set when app is in the foreground
Handling notification action buttons
When a user interacts with your push message the pushOpenedHandlerBlock will be called, in this block you can provide further behavior to handle custom actions.
 let builder = KSConfigBuilder(apiKey: "your-api-key", secretKey: "your-secret-key")
    .setPushOpenedHandler(pushOpenedHandlerBlock: { (notification : KSPushNotification) -> Void in
        //- Inspect notification data and do work.
        if let action = notification.actionIdentifier {
            print("User pressed an action button.")
            print(action)
            print(notification.data)
        } else {
            print("Just an open event.")
        }
    })

Kumulos.initialize(config: builder.build())
Managing In-App User Consent
If you would like your users to opt-in to receive In-App messages you can configure the SDK during initialization to make opt-in explicit by setting the strategy, then calling the SDK helper to manage their consent.
// Set the strategy to require explicit user consent when initializing the SDK
let builder = KSConfigBuilder(apiKey: "your-api-key", secretKey: "your-secret-key")
    .enableInAppMessaging(inAppConsentStrategy: InAppConsentStrategy.ExplicitByUser)
Kumulos.initialize(config: builder.build())

// Call this method to update consent based on user preferences / settings screen etc.
KumulosInApp.updateConsent(forUser: true)
Deep-linking for In-App
In-App messages allow you to hand-off to native application screens via deep-linking action buttons. When tapped, these buttons pass control to the defined deep-link handler, including their defined data payload (configured in the In-App message composer for the action button).
If you want to handle deep-links with custom data payloads as part of an In-App message you can add a handler block to your configuration options during SDK initialization.
let builder = KSConfigBuilder(apiKey: "your-api-key", secretKey: "your-secret-key")
    .enableInAppMessaging(inAppConsentStrategy: InAppConsentStrategy.AutoEnroll)
    .setInAppDeepLinkHandler(inAppDeepLinkHandlerBlock: { buttonPress in
        let deepLink = buttonPress.deepLinkData
        let messageData = buttonPress.messageData

        // TODO: Inspect the deep link & message data to perform relevant action
    })
Using the In-App Inbox
In-app messages can optionally be persisted in a user-level inbox for later retrieval. This allows you to build features such as loyalty rewards or expiring coupons into your app. Regardless of whether they are stored in the inbox, the maximum amount of in-apps stored on a device is 50 (the oldest messages exceeding this limit will be evicted).
Retrieve messages
To retrieve a list of messages from the user's inbox and present the first in the list, see the following example:
let inboxItems = KumulosInApp.getInboxItems()
KumulosInApp.presentInboxMessage(item: inboxItems[0])
Mark as read
To mark a single or all inbox messages as read:
//single
let inboxItems = KumulosInApp.getInboxItems()
KumulosInApp.markAsRead(item: inboxItems[0])

//all
KumulosInApp.markAllInboxItemsAsRead()
Delete message
You can also delete an in-app message from inbox:
let inboxItems = KumulosInApp.getInboxItems()
KumulosInApp.deleteMessageFromInbox(item: inboxItems[0]);
Inbox updated handler
In order to be notified when inbox changes you may set up a handler. The handler fires on the main thread when one of the following happens to an in-app with inbox:
- message fetched from server
- message opened
- message marked as read
- message deleted
- message evicted (expires or limit of stored messages exceeded)
You can use it as follows:
KumulosInApp.setOnInboxUpdated(inboxUpdatedHandlerBlock: {() -> Void in
    let inboxItems = KumulosInApp.getInboxItems()

    //refresh your inbox
});
Note, you can do
KumulosInApp.setOnInboxUpdated(inboxUpdatedHandlerBlock: nil)when you stop being interested in inbox updates.
Get inbox summary
You can retrieve inbox summary as follows:
 KumulosInApp.getInboxSummaryAsync(inboxSummaryBlock: {(summary:InAppInboxSummary?) -> Void in
    if let inboxSummary = summary {
        print("total: \(inboxSummary.totalCount) unread: \(inboxSummary.unreadCount)")
    }
});
The method runs asynchronously and calls back on the main thread.
Get inbox item's image URL
Each inbox item may have an image associated with it. getImageUrl returns a URL to the image of specified width or nil if there is no image.
let inboxItems = KumulosInApp.getInboxItems()

// Default width is 300px
let url = inboxItems[0].getImageUrl();

// Get URL to a 200px wide image
let url = items[0].getImageUrl(width: 200);
Note if the message was created through the API (as opposed to Kumulos Messaging Dashboard) and contains a full URL to an image hosted elsewhere,
getImageUrlreturns original URL without any resizing applied.
Handling Push Notification Opens for Deep Linking
If you want to implement your own deep links for push notifications, the SDK offers an integrations point which is called when the user opens a push notification.
To set up a handler, simply add the following to your config:
let builder = KSConfigBuilder(apiKey: "your-api-key", secretKey: "your-secret-key")
    .enableInAppMessaging(inAppConsentStrategy: InAppConsentStrategy.AutoEnroll)
    .setPushOpenedHandler(pushOpenedHandlerBlock: { (notification : KSPushNotification) -> Void in
                //- Inspect notification data and do work.
            })
Note you do not need to handle deep links to in-app messages yourself, the Kumulos SDK already handles these.
Handling Background Data Pushes
When you send a background data push with Kumulos, the content-available flag will be set on the notification.
This will allow your app to be woken up to process the push notification in the background.
Make sure you have enabled the "Remote notifications" background mode in your project's "Capabilities" settings
The background push notification will trigger the application:didReceiveRemoteNotification:fetchCompletionHandler: application delegate:
// iOS9 handler for push notifications
// iOS9+10 handler for background data pushes (content-available)
func application(_ application: UIApplication, didReceiveRemoteNotification userInfo: [AnyHashable: Any], fetchCompletionHandler completionHandler: @escaping (UIBackgroundFetchResult) -> Void) {
        // userInfo["aps"]["content-available"] will be set to 1
        // userInfo["custom"]["a"] will contain any additional data sent with the push

        completionHandler(UIBackgroundFetchResult.noData)
    }
Note if you set a title & message then a notification will be shown to the user. If you want the push to be silent, don't set a title or message when sending.
Channels
You can create and manage subscriptions to push notification Channels via the SDK. Channels allow your users to define preferences for the type of content they would like to receive via notifications.
You can manage all channel interactions via the KumulosPushChannels class in the Kumulos SDK.
let pushChannels = KumulosPushChannels(sdkInstance: Kumulos.getInstance())
Helper methods are then available for creating, listing and managing subscriptions to channels.
pushChannels.listChannels()
pushChannels.createChannel(uuid: String, subscribe: Bool, name: String? = nil, meta: [String:AnyObject]? = nil)
pushChannels.subscribe(uuids: [String])
pushChannels.unsubscribe(uuids: [String])
pushChannels.setSubscriptions(uuids: [String])
pushChannels.clearSubscriptions()
Each helper can then be provided a success and failure block to handle the result, for example.
pushChannels.createChannel(uuid: "the-channel-uuid", subscribe: true, name: "channel name", showInPortal: true)
.success{ (item) in
    print("create success")
    print(item)
}
.failure{ (error) in
    print("create failed")
    print(error)
}
When creating channels, the visibility and meta data can be controlled. Please make sure you understand these concepts when creating channels from the SDK.
Deferred Deep Linking
Deep linking allows users to reach app content by clicking a link. This can be achieved even if app is not installed.
Configuration & Setup
To integrate deep linking into your Swift project, you have to complete the following steps.
If your app doesn't use scenes, add to your AppDelegate.swift:
func application(_ application: UIApplication, continue userActivity: NSUserActivity, restorationHandler: @escaping ([UIUserActivityRestoring]?) -> Void) -> Bool {
    return Kumulos.application(application, continue: userActivity, restorationHandler: restorationHandler)
}
If your app uses scenes: add to SceneDelegate.swift:
func scene(_ scene: UIScene, willConnectTo session: UISceneSession, options connectionOptions: UIScene.ConnectionOptions) {
    guard let _ = (scene as? UIWindowScene) else { return }

    // Deep links from cold starts
    if let userActivity = connectionOptions.userActivities.first {
        Kumulos.scene(scene, continue: userActivity)
    }
}

func scene(_ scene: UIScene, continue userActivity: NSUserActivity) {
    Kumulos.scene(scene, continue: userActivity)
}
Configure a deep link handler:
let cfg = KSConfigBuilder(apiKey:"API_KEY", secretKey: "SECRET_KEY")
    .enableDeepLinking({ (resolution) in
        print("Deep link resolution result: \(resolution)")
    })
    .build()
Kumulos.initialize(config: cfg)
Finally, you need to associate a domain with your app. Note that the subdomain you specify here should match the one you specified on the deep link configuration page on Kumulos Dashboard.
- Add the Associated Domains capability to your main app target
- Set 'domains' to
applinks:{yourSubdomain}.lnk.click

Build
You can call API methods defined in the Kumulos Build service using the Kumulos.call method.
To talk to Kumulos, you need three things:
- your method title (in
lowerCamelCase) - a method parameters map (field names are also in
lowerCamelCase) - some response handler code
Parameters
Parameters are provided as a Dictionary
Kumulos.call("methodName", parameters: ["param1": "value", "param2": "value2"])
.success {
    (response, operation) in
    print(response.payload)
}
.failure {
    (error, operation) in
    // Handle failed call
}
Handling Results
The result of an API call will be returned as a KSResponse object, the response body can be accessed via the payload property.
if let _ = response.payload as? Array<AnyObject > {
    // Handle a select action result
    print("It's an array of objects!")
}

if let _ = response.payload as? UInt {
    // Handle a create/delete/update action result
    print("It's an integer!")
}
Handling data fields
Kumulos stores data fields as base64 encoded data, so if you receive data from Kumulos, you will have to base64 decode it to access the original data. Similarly, when you send data to Kumulos, you should base64 encode it before transport.
Crash
Crash reporting allows you to track unhandled exceptions in your app, and optionally log any caught exceptions for further investigation. Crash reporting is not enabled by default, to enable this feature, simply modify your Kumulos initialization to include enabling crash reporting.
let builder = KSConfigBuilder(apiKey: "your-api-key", secretKey: "your-secret-key")
    .enableCrash()
Kumulos.initialize(config: builder.build())
Unhandled exceptions that lead to crashes will now be recorded automatically and shown in your App Delivery Console.
Note that crash reporting is not available whilst connected to a debugger, but it does work with debug builds.
If you wish to log any caught exceptions, you can record them with the helper method:
Kumulos.logException(name, reason, language, lineOfCode, stackTrace, logAllThreads);
Ensure that crash reporting is enabled when attempting to log exceptions.
Upload dSYM Files for Symbolication
In order to ensure your stack traces are fully symbolicated, it is necessary to upload your dSYM information from your project.
To upload dSYM files for Release builds, you should add a new "Run Script Phase" to your Xcode project's "Build Phases".
For CocoaPods installations, use this script:
"$PODS_ROOT/KumulosSdkSwift/upload_dsyms.sh" API_KEY SERVER_KEY
For Carthage installations, use this script:
"$SRCROOT/Carthage/Checkouts/KumulosSdkSwift/upload_dsyms.sh" API_KEY SERVER_KEY
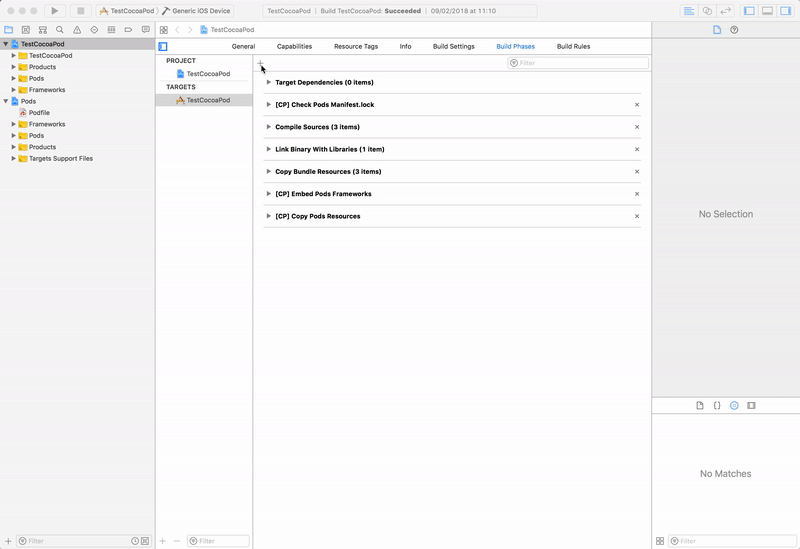
Copy the script snippet into a new Run Script Phase as shown below:
Make sure you replace the API_KEY and SERVER_KEY tokens with your app's API and server keys which can be found on the application's dashboard.
Bitcode-enabled Builds
If your project has bitcode enabled, it will be necessary to upload the dSYM files that Apple generates as part of App Store distribution step.
These generated dSYM files can be downloaded using the Xcode Organizer. Once downloaded, the generated dSYM files will be available in your app's archive.
You should follow the steps of the screen capture below to prepare your symbols for upload.
Once prepared for upload, you should upload the dSYM zip file to your App Delivery Console.
Changelog
10.0.0
- Minor fixes and updates to In-App messaging sync
- Minimum deployment target moved to iOS 10.0
9.2.1, 9.2.2, 9.2.3, 9.2.4, 9.2.5
Minor fixes & enhancements:
- Allow configuration of core Kumulos service URLs
- Expose InAppButtonPress fields
- Exclude Info.plist files from Swift package to resolve warning
- Fix deprecation warning
- Allow changing Kumulos app group suffix
- Dependency update
- Fix for SPM & Carthage Info.plist path in project settings
9.2.0
In-app enhancements:
- Track event properties with in-app button conversion events
- Improve in-app error handling for networking edge-cases
Misc:
- Add flags to stats data for notification settings & group entitlement
9.1.0
Add support for UNNotificationActionIcon on notification buttons, added with iOS 15
9.0.0
- Refactor InAppDeepLinkHandlerBlock to expose in-app message data
Upgrade Guide
Update any calls to config.setInAppDeepLinkHandler:
InAppDeepLinkHandlerBlock([AnyHashable:Any]) is now
InAppDeepLinkHandlerBlock(InAppButtonPress).
The previous block's argument can now be accessed from InAppButtonPress.deepLinkData.
8.13.0
- Add probability-based matching for Web-to-App Banners
8.12.0
- Store image for InAppInboxItem,
getImageUrlhelper method
8.11.1
- Close session after a smaller timeout
8.11.0
- Allow setting
onInboxUpdatedhandler, see docs above - Add
getInboxSummaryAsynchelper method, see docs above - Expose extra fields on InAppInboxItem:
sentAtanddata
8.10.0
- Allow marking in-app messages as read
8.9.0
- Support swift package manager
8.8.0
- Track push notification dismissed event
8.7.1
- Bugfix: DateFormatter is not parsing dates on some devices
8.7.0
- Use new channel subscription management endpoints
8.6.0
- Deep linking (see integration guide)
- Improve reliability of delivery tracking
8.5.0
- KumulosCheckinClient to interact with contact tracing checkins API
8.4.5
- Fix header conflict with gRPC library when installed through CocoaPods
8.4.4
- Guard unwrapping APNS payloads
8.4.2
- Guards against a rare exception in the session finalization codepath
8.4.1
- Only track delivery if Kumulos group defined
8.4.0
- Delivery tracking
- Incrementing badges
You need to set up App Groups and add Notification Service Extension as described above for delivery tracking and badges to work.
8.3.0
- In-App inbox deletion
8.2.0
- Minimum iOS changed to 9.0
8.1.0
- Allow handling local notifications with your own UNNotificationCenter delegate
8.0.0
- Add support for Push notification action buttons in the Service Extension
- Minimum iOS changed to 10.0
Upgrade Guide
- In order to compile your project deployment target must be iOS 10.0 or later, if you have already integrated the service extension, no further changes are required.
Otherwise:
Add a notification service extension
7.0.0
- Add support for in-app message expiry
- Split notification service helper into separate target & pod
- Fix rare in-app message display threading bug
Upgrade Guide
If you have not integrated a notification service extension, no changes are required.
Otherwise:
- Unlink the KumulosSDK.framework from your notification service extension target
- Link the KumulosSDKExtension.framework to your notification service extension (install from 'KumulosSdkSwiftExtension' pod if using CocoaPods)
- Replace the contents of your NotificationService.swift with the latest integration snippet
6.1.0
- Support pictures in push notifications
6.0.0
- Add in-app messaging support
- Handle all push lifecycle & notification delegates out the box
Updating from 5.0.0 should be simple as only minor breaking changes have been introduced.
Push Integration
-
Delegates for didRegisterForRemoteNotificationsWithDeviceToken, didFailToRegisterForRemoteNotificationsWithError, didReceiveRemoteNotification:fetchCompletionHandler, and performFetchWithCompletionHandler are no longer required, the SDK will automatically handle them.
-
Creating a
UserNotificationCenterDelegateis no longer required, the SDK will automatically create one, to customize its behavior please refer to the integration guide above.
5.0.0
- Updated to Swift 5
4.0.0
- Rename push unregister helper method for consistency
3.1.0
- Add new helper method to unsubscribe device from push notifications
3.0.0
- Update to latest Swift 4.2 syntax
- Update dependencies
- Set ObjC inference setting to default
Breaking Changes
Swift 4.2 update. If needing to support an older Swift version, please use an older SDK version.
2.4.1
- Set Swift version 3 for pod
- Update Carthage instructions for Swift 3 toolchain
2.4.0
- Persist userIdentifier to NSUserDefaults on association and add accessor
- Record current userIdentifier with events and send in server sync
- Add helper to clear any existing user association
- Define CoreData model in code
- Ensure correct thread usage for CoreData operations
2.3.1
- Add semaphore locking for installId access
2.3.0
- Add
Kumulos.trackEventImmediatelyhelper to track an event then flush to server - Flush event stream after recording notification open events
- Clean up base URL constants & usage
2.2.0
- Add iBeacon helper method
2.1.1
- Add dSYM upload script to SDK distribution
2.1.0
- Add custom event tracking
- Capture session analytics events
- Add user association helper
- Fix intermittent build issues due to scheme setup
2.0.2
- Move KSConfig.swift to Sources
2.0.1
- Fix Podspec dependencies
2.0.0
- Add crash reporting
- Change to builder pattern for SDK configuration
1.4.0
- Add geolocation update helper method
- Add locale & bundle to stats payload
- Fix SDK type in stats payload
1.3.0
- Add CocoaPods support
1.2.0
- Add push channel & push subscription management
- Mark blocks with
@discardableResultto tidy up warnings on unused results
1.1.0
- Swift 3 conversion
- Add iOS10 push notifications support
1.0.1
- Fixed issue with push token registration to allow use of combined certificates for push auth
1.0.0
- Initial release with RPC & Kumulos Push Notification support