Android
Integration
Kumulos provides an SDK to ease the integration of the Kumulos Analytics, Push Notification, Crash Reporting and Build features into your Android app. This guide provides an overview of setting up the SDK for your project and sample usage.
This Kumulos SDK can be used with Android apps developed in Java and Kotlin.
Project Setup
The Kumulos libraries are distributed through JCenter. To install the libraries, edit your app's build.gradle file to add the following:
- Exclude conflicting meta data files from the build
- Declare source & target compile options
- Add the Kumulos library dependencies
A sample build.gradle can be seen below.
android {
    // Exclude duplicate files from the build
    packagingOptions {
        exclude 'META-INF/NOTICE'
        exclude 'META-INF/ASL2.0'
        exclude 'META-INF/LICENSE'
    }

    compileOptions {
        sourceCompatibility JavaVersion.VERSION_1_8
        targetCompatibility JavaVersion.VERSION_1_8
    }
}

dependencies {
    // Kumulos debug & release libraries
    debugImplementation 'com.kumulos.android:kumulos-android-debug:15.0.0'
    releaseImplementation 'com.kumulos.android:kumulos-android-release:15.0.0'
}
The debugImplementation will have logging enabled with a tag matching com.kumulos.*. When running in debug mode, the log messages should be visible in LogCat.
Run a Gradle sync to install the Kumulos libraries and build your project.
Initialization
To initialize the SDK, we recommend subclassing the Application class and initializing Kumulos in its onCreate method.
Create an Application class
package com.example;

import android.app.Application;
import com.kumulos.android.Kumulos;
import com.kumulos.android.KumulosConfig;

public class ExampleApp extends Application {

    @Override
    public void onCreate() {
        super.onCreate();

        KumulosConfig config = new KumulosConfig.Builder("YOUR_API_KEY", "YOUR_SECRET_KEY").build();
        Kumulos.initialize(this, config);
    }
}
Your API key and secret key can be found on the app dashboard in Kumulos' control panel.
You don't need to initialize Kumulos every time you wish to make an API call. It only needs to be initialized once, after that it will remember the API key and secret key you've given it the first time.
Add your Application to the AndroidManifest
<?xml version="1.0" encoding="utf-8"?>
<manifest xmlns:android="http://schemas.android.com/apk/res/android"
    package="com.example">

    <!-- Set the android:name to your custom Application class -->
    <application
        android:name=".ExampleApp"
        android:allowBackup="true"
        android:icon="@mipmap/ic_launcher"
        android:label="@string/app_name"
        android:supportsRtl="true"
        android:theme="@style/AppTheme">
        ...
    </application>

</manifest>
Checking installs of your App
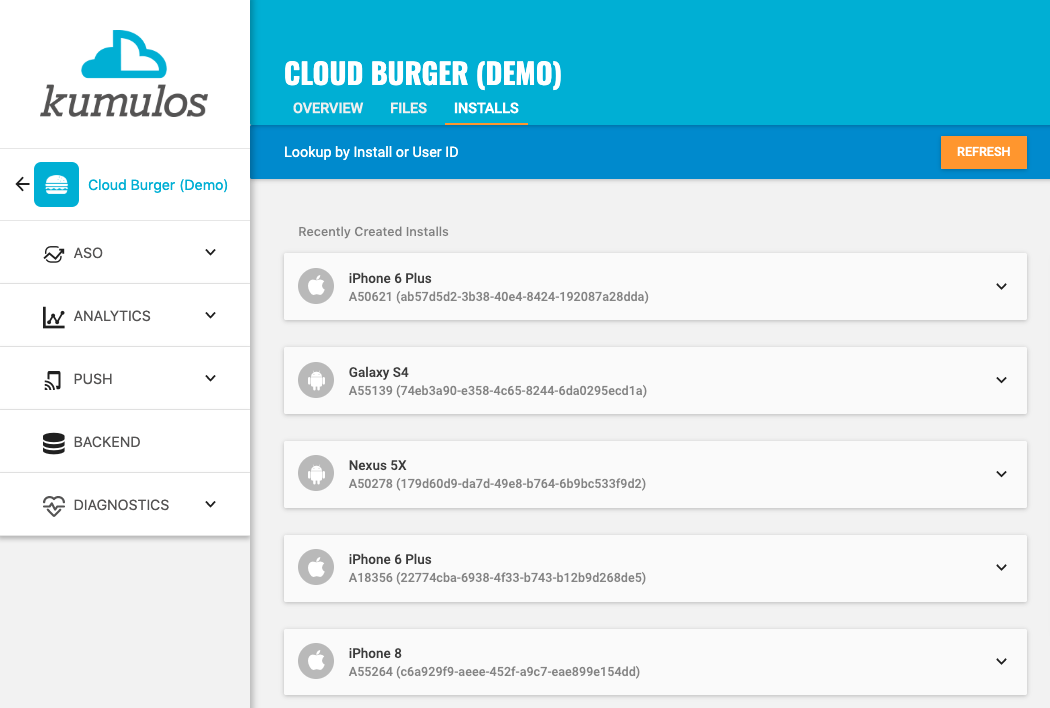
When you run your app on a simulator or install your app on a device, you can check that the SDK has been initialized correctly by selecting the app and clicking the Installs tab to see the ten most recent installs of your app. Click on any install to see more information.
If you experience any difficulties integrating an SDK or initializing the Kumulos client, please don't hesitate to contact support who are standing by to help!
Installation ID
When initialized for the first time, the Kumulos SDK will create a unique identifier for the app installation that initialized the SDK.
This identifier can be used to target push notifications to a specific device through KScript or the Push Notifications API.
In order to retrieve this installation ID, simply access the class variable:
String id = com.kumulos.android.Installation.id(context);
Once you have the installation ID, you can send it to your app's backend to be used later for push targeting. For more information about push targeting, please see the KScript Documentation or push notification documentation as appropriate.
Analytics
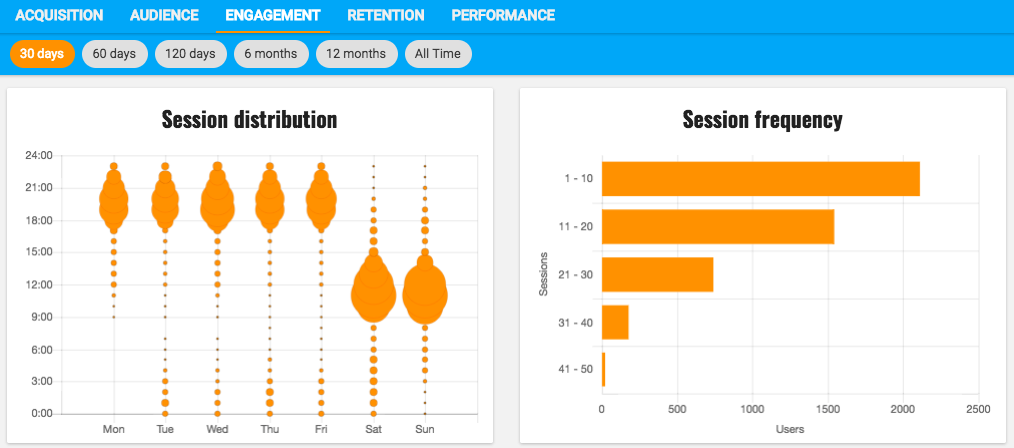
Kumulos provides concise and easy to consume analytics & reporting features. By initializing the SDK, you automatically get session & engagement reporting out the box.
Session Analytics
Kumulos records sessions based on application foreground and background events. When an app enters the background, Kumulos will wait for a configurable idle period. If there are no more foreground events during that idle period, the current session will be closed.
You can configure the idle period to suit your app's use-case. By default the idle period is 23 seconds of inactivity. The idle period does not count towards session duration calculations.
To adjust the idle period, you can configure the SDK as follows:
KumulosConfig config = new KumulosConfig.Builder("YOUR_API_KEY", "YOUR_SECRET_KEY")
    .setSessionIdleTimeoutSeconds(120)
    .build();
Kumulos.initialize(this, config);
Event Tracking
Kumulos allows you to track custom analytics events that can be used as a trigger to fire automation rules (e.g. to trigger a push notification) or as steps in a funnel to track conversion through key user journeys in your app.

To track a custom analytics event, use Kumulos.trackEvent as follows:
JSONObject props = new JSONObject();
props.put("productId", 404);
Kumulos.trackEvent(context, "product.purchased", props);
Each event and its properties must be less than 250 KiB in size for the event to be tracked.
Event tracking is available offline as all events are persisted locally before being synced to the server in batches in the background.
A similar method
trackEventImmediatelywill immediately start an event sync rather than waiting for the next time the app is backgrounded.
Checking events from your App
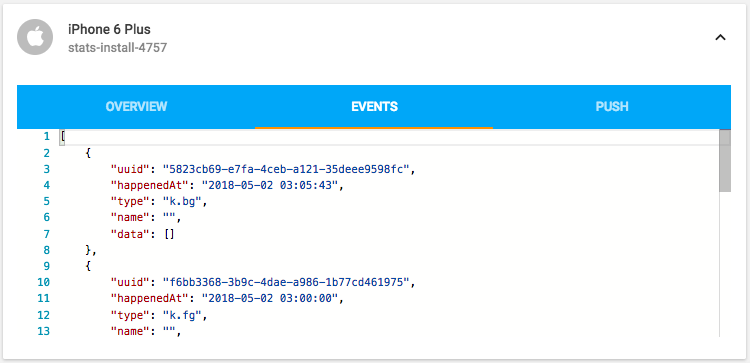
When you run your app on a simulator or install your app on a device, you can check that the SDK is recording events correctly by selecting the app and clicking the Installs tab to see the ten most recent installs of your app. Click on any install and then click on the Events tab.
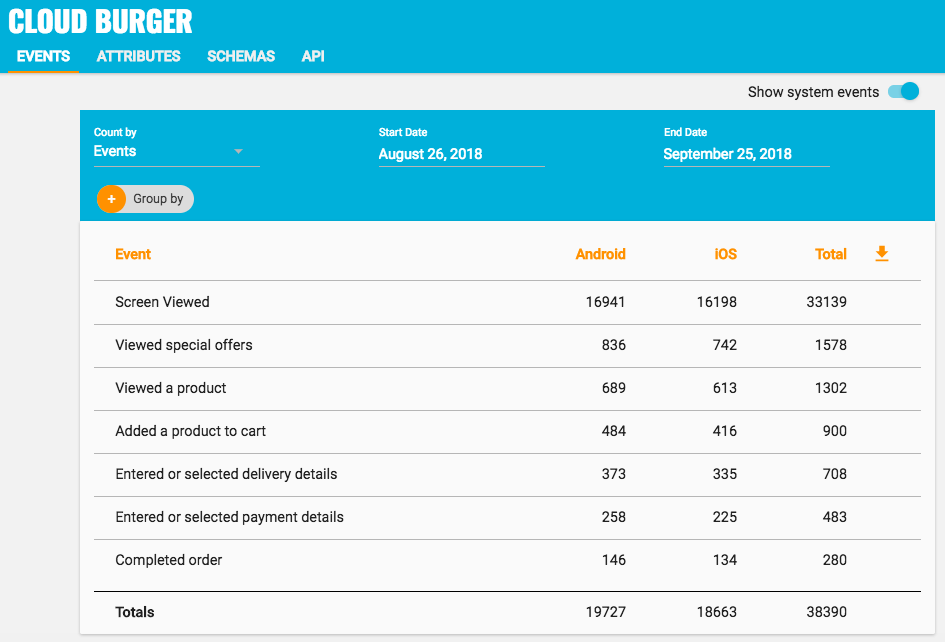
Alternatively, to see counts of all analytics events, including system events such as opened a push notification, recorded by installs of the app in the last 30 days, expand 'Analytics' and click 'Explore' in the left menu. For comparison, the total number of sessions in the same period is shown.
User Association
Kumulos allows associating a user identifier with the current installation ID. This user identifier is useful for performing analytics aggregations & analyses at the user level, for example, funnels completed by users across multiple devices. You can also optionally associate a collection of attributes with the user.
To associate the current app installation with a user, you can use the helper method as shown below:
Kumulos.associateUserWithInstall(context, "unique-user-id");
User association is time-aware, so say two different users log in to the app, their user IDs will be associated with the same install for the time between subsequent calls to the helper method. For example:
Kumulos.associateUserWithInstall(context, "Bob");
// This event will belong to Bob
Kumulos.trackEvent(context, "product.purchased", null);
Kumulos.associateUserWithInstall(context, "Alice");
// This event will belong to Alice
Kumulos.trackEvent(context, "product.purchased", null);
Attributes
You can optionally associate a collection of attributes with the user for targeting, personalization or attribution. To associate attributes with the user, pass a collection into the helper method as shown.
JSONObject attributes = new JSONObject();
props.put("name", "Shawn");
props.put("age", 25);

Kumulos.associateUserWithInstall(context, "unique-user-id", attributes);
The collection of attributes for a given user must be less than 250 KiB in size.
If you do not have a user identifier, use the installation ID generated by the Kumulos SDK.
Location Tracking
You can send Kumulos location updates and use this to trigger events such as push notifications when an install enters a GeoFence.
How you configure location updates depends on the specific use case of your app. You should consider both accuracy and battery life when making this decision. Refer to the Android developer guide for further information.
Once you have set up location updates from the OS, you can send them to Kumulos like so:
Kumulos.sendLocationUpdate(context, location);
Beacon Detection
You can send Kumulos beacon proximity updates and use these to trigger automations such as sending a push notification when an install is in proximity to a beacon.
Eddystone Beacon Detection
The Kumulos SDK provides a helper method to notify our services of proximity to a detected Eddystone beacon.
Kumulos.trackEddystoneBeaconProximity(context, hexNamespace, hexInstance);
Beacon monitoring on Android typically requires a device with BLE, and API level 18+. You can read more about detecting beacons in the Android Nearby reference.
iBeacon Detection
You can also manually notify our services of proximity to a detected iBeacon as follows.
JSONObject props = new JSONObject();
props.put("type", 1);
props.put("uuid", [iBeacon UUID]);
props.put("major", [iBeacon Major ID]);
props.put("minor", [iBeacon Minor ID]);
props.put("proximity", [iBeacon Proximity]);
Kumulos.trackEventImmediately(context, "k.engage.beaconEnteredProximity", props);
Messaging & Push Notifications
Kumulos provides powerful multi-channel messaging services to reach your users. By initializing the SDK you can quickly and easily receive both push notifications to re-engage your users as well as feature-rich In-App messages.
Configuration & Setup (FCM)
To integrate into your Android project, you have to complete the following steps:
- Set up a Firebase Project & enable FCM
- Configure Push in the Kumulos Agency Console
- Integrate SDK components with your Android project
- Register to receive push and in-app messages from your app
In order to enable push notifications for Android with Kumulos, you'll need to set up an FCM project and configure push for your app. These steps are shown in the following video guide.
Enabling Push Notifications for Android
Please note it is the Google Service Account private key JSON file that needs to be uploaded to Kumulos, not the Google Services JSON file you include in your app project. The Google Service Account JSON file can be generated from the 'Service Accounts' section of the Firebase Developer console as is shown in the relevant section of the video above.
After configuring Kumulos & FCM, simply follow the SDK integration steps below.
To begin, ensure you have added the Firebase components to your app as shown below.
In the root build.gradle, ensure the Google repository is enabled and the google-services plugin is on the classpath:
buildscript {
    // ...
    dependencies {
        // ...
        classpath 'com.google.gms:google-services:4.3.10' // google-services plugin
    }
}

allprojects {
    // ...
    repositories {
        google() // Google's Maven repository
        // ...
    }
}
Next, in your app module's build.gradle add FCM dependency and apply the google-services plugin. Kumulos supports [19.0.0, 22.99.99] Firebase Messaging version range, which corresponds to [20.0.0, 28.99.99] Bill of Materials version range.
apply plugin: 'com.android.application'

dependencies {
    ...
    // Kumulos debug & release libraries
    debugImplementation 'com.kumulos.android:kumulos-android-debug:15.0.0'
    releaseImplementation 'com.kumulos.android:kumulos-android-release:15.0.0'
    // Add library dependency for Kumulos to retrieve FCM push tokens
    implementation platform('com.google.firebase:firebase-bom:28.2.0')
    implementation 'com.google.firebase:firebase-messaging'
}

// ADD THIS AT THE BOTTOM
apply plugin: 'com.google.gms.google-services'
Download the google-services.json file from your Firebase app 'General' settings, and add it to your app/ folder.
Now you can add the Kumulos FirebaseMessagingService and PushBroadcastReceiver to your AndroidManifest.xml.
<?xml version="1.0" encoding="utf-8"?>
<manifest xmlns:android="http://schemas.android.com/apk/res/android"
    package="com.example">

    <!-- Optionally add the wake lock permission to stop the CPU from sleeping when a message is received -->
    <!-- <uses-permission android:name="android.permission.WAKE_LOCK" /> -->
    <!-- Optionally add the boot completed permission to allow periodic tasks to persist across phone reboots -->
    <!-- <uses-permission android:name="android.permission.RECEIVE_BOOT_COMPLETED" /> -->

    <application
        android:name=".ExampleApp"
        android:allowBackup="true"
        android:icon="@mipmap/ic_launcher"
        android:label="@string/app_name"
        android:supportsRtl="true"
        android:theme="@style/AppTheme">

        ...

        <!-- Kumulos FCM handler -->
        <service android:name="com.kumulos.android.FirebaseMessagingService" android:exported="false">
            <intent-filter>
                <action android:name="com.google.firebase.MESSAGING_EVENT" />
            </intent-filter>
        </service>

        <!-- Kumulos Push receiver -->
        <receiver android:name="com.kumulos.android.PushBroadcastReceiver" android:exported="false">
            <intent-filter>
                <action android:name="com.kumulos.push.RECEIVED" />
                <action android:name="com.kumulos.push.OPENED" />
                <action android:name="com.kumulos.push.DISMISSED" />
                <action android:name="com.kumulos.push.BUTTON_CLICKED" />
            </intent-filter>
        </receiver>
    </application>

</manifest>
Finally configure your SDK for In-App and opt-in the device for Push notifications:
KumulosConfig config = new KumulosConfig.Builder("YOUR_API_KEY", "YOUR_SECRET_KEY")
    .enableInAppMessaging(KumulosConfig.InAppConsentStrategy.AUTO_ENROLL)
    .build();

Kumulos.initialize(this, config);

Kumulos.pushRequestDeviceToken(context);
N.B. make sure to call after the SDK has been initialized
If you want to unregister the installation, you can use Kumulos.pushUnregister(context).
Configuring HCM for Huawei Devices
The latest Huawei handsets such as the P40 family of phones do not use FCM for push notifications and instead use Huawei Cloud Messaging (HCM). If you want to message all of your Android users, including those using Huawei phones, then in addition to FCM you also need to configure HCM as described in this section. After completing the above FCM configuration, you also need to:
- Set up an app on the Huawei Mobile Developer Console
- Configure Push in the Kumulos Agency Console
- Add Huawei Mobile Services dependencies, files, and plugins to your project
- Add Huawei-specific manifest entries
All other push behavior & customization works identically to FCM.
To begin, configure a project on the Huawei Developer Console, and enable the Push feature by following the Push Kit developer guide step 1.
Note that your app needs a valid signing configuration for both debug and release builds. The SHA-256 fingerprint of your signing key is required to match the Huawei app configuration prior to continuing.
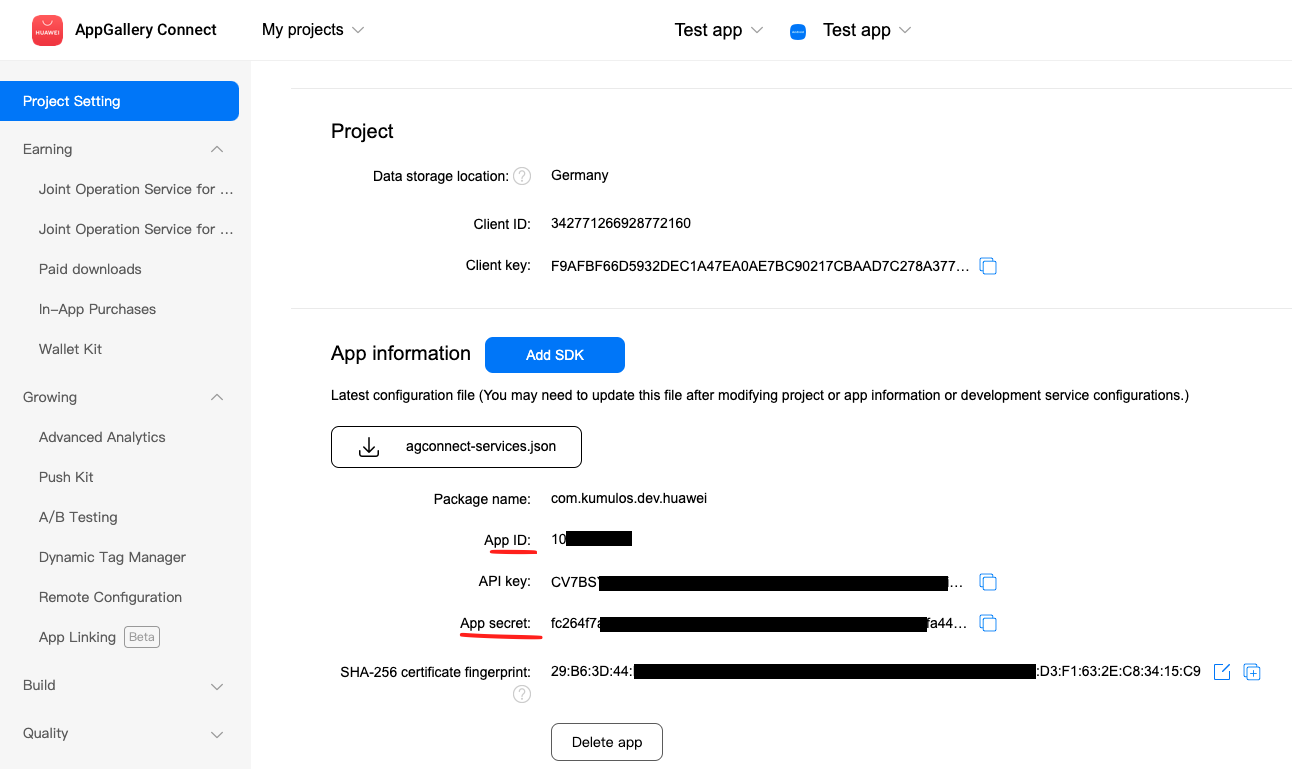
Once you have created the app, configure the HCM gateway in Kumulos. Expand 'Messaging' in the left menu and select 'Configuration' and click the cog next to the Huawei icon. You need to enter the App ID and App Secret from the Huawei Developer Console.
Once configured, now add the agconnect-services.json file (downloaded from the Huawei developer console) to your Android application directory.
Next, add the Huawei repository and plugin dependency to your root build.gradle:
buildscript {
    repositories {
        ...
        maven {
            url 'https://developer.huawei.com/repo/'
        }
    }
    dependencies {
        ...
        classpath 'com.huawei.agconnect:agcp:1.2.1.301'
    }
}

allprojects {
    repositories {
        ...
        maven {
            url 'http://developer.huawei.com/repo/'
        }
    }
}
Next, in your app-level build.gradle, add the HMS Push Kit dependency and apply the HMS plugin:
dependencies {
    ...
    implementation 'com.huawei.hms:push:6.1.0.300'
}

// Add to bottom of file
apply plugin: 'com.huawei.agconnect'
Finally, add the HMS push service to your AndroidManifest.xml:
<!-- Kumulos HMS Messaging Service -->
<service
    android:name="com.kumulos.android.HmsMessagingService"
    android:exported="false">
    <intent-filter>
        <action android:name="com.huawei.push.action.MESSAGING_EVENT" />
    </intent-filter>
</service>
Push registration should be performed as with FCM.
Huawei Troubleshooting
- Whilst the Kumulos SDK minSdk is 16, when you use the HMS Push Kit, the minSdk will need to be 17 for your app
- Ensure the app signing key fingerprint matches in the Huawei developer console
- Ensure the app package matches the configuration in the Huawei developer console
- Ensure the Push Kit service is enabled for your app in AppGallery Connect > App > Develop > Grow > Push Kit. You must enable the service and choose a data storage location.
Advanced
Checking Integration Status
When you run your app on a simulator or install your app on a device, you can check that the integration has been successful using the install browser by selecting the app in the Kumulos Console and clicking the Installs tab to see the ten most recent installs of your app.
Click on an install, click the 'Push' tab and click Send Test Push.
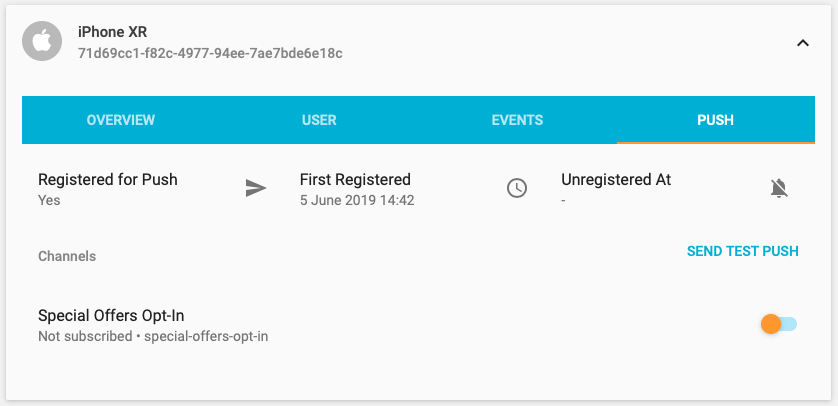
If you do not receive the push notification, check the Error Log for any errors sending the push notification to the native push gateways. If you continue to experience problems, please don't hesitate to contact support who are standing by to help!
Managing In-App User Consent
If you would like your users to opt-in to receive In-App messages you can configure the SDK during initialization to make opt-in explicit by setting the strategy, then calling the SDK helper to manage their consent.
// Set the strategy to require explicit user consent
KumulosConfig config = new KumulosConfig.Builder("YOUR_API_KEY", "YOUR_SECRET_KEY")
    .enableInAppMessaging(KumulosConfig.InAppConsentStrategy.EXPLICIT_BY_USER);
    .build();

// Call this method to update consent based on user preferences / settings screen etc.
KumulosInApp.updateConsentForUser(true);
Deep-linking for In-App
In-App messages allow you to hand-off to native application screens via deep-linking action buttons. When tapped, these buttons pass control to the defined deep-link handler, including their defined data payload (configured in the In-App message composer for the action button).
If you want to handle deep-links with custom data payloads as part of an In-App message you can create a class that implements the InAppDeepLinkHandlerInterface and add it to your configuration options during SDK initialization:
KumulosInApp.setDeepLinkHandler((context, buttonPress) -> {
    JSONObject deepLink = buttonPress.getDeepLinkData();
    JSONObject messageData = buttonPress.getMessageData();

    // TODO: Inspect the deep link & message data to perform relevant action
});
Using the In-App Inbox
In-app messages can optionally be persisted in a user-level inbox for later retrieval. This allows you to build features such as loyalty rewards or expiring coupons into your app. Regardless of whether they are stored in the inbox, the maximum amount of in-apps stored on a device is 50 (the oldest messages exceeding this limit will be evicted).
Retrieve messages
To retrieve a list of messages from the user's inbox and present the first in the list, see the following example:
List<InAppInboxItem> items = KumulosInApp.getInboxItems(context);
KumulosInApp.presentInboxMessage(context, items.get(0));
Mark as read
To mark a single or all inbox messages as read:
//single
List<InAppInboxItem> items = KumulosInApp.getInboxItems(context);
KumulosInApp.markAsRead(context, items.get(0));

//all
KumulosInApp.markAllInboxItemsAsRead(context);
Delete message
You can also delete an in-app message from inbox:
List<InAppInboxItem> items = KumulosInApp.getInboxItems(context);
KumulosInApp.deleteMessageFromInbox(context, items.get(0));
Inbox updated handler
In order to be notified when inbox changes you may set up a handler. The handler fires on the UI thread when one of the following happens to an in-app with an inbox configuration:
- message fetched from server
- message opened
- message marked as read
- message deleted
- message evicted (expires or limit of stored messages exceeded)
You can use it as follows:
KumulosInApp.setOnInboxUpdated(() -> {
    List<InAppInboxItem> items = KumulosInApp.getInboxItems(context);

    //refresh your inbox
});
Note, you can do
KumulosInApp.setOnInboxUpdated(null)when you stop being interested in inbox updates.
Get inbox summary
You can retrieve an inbox summary as follows:
KumulosInApp.getInboxSummaryAsync(context, (InAppInboxSummaryInfo summary) -> {
    if (summary != null){
        summary.getTotalCount();
        summary.getUnreadCount();
    }
});
The method runs asynchronously and calls back on the UI thread.
Get inbox item's image URL
Each inbox item may have an image associated with it. getImageUrl returns a URL to the image of specified width or null if there is no image.
List<InAppInboxItem> items = KumulosInApp.getInboxItems(context);

// Default width is 300px
URL u = items.get(0).getImageUrl();

// Get URL to a 200px wide image
URL u = items.get(0).getImageUrl(200);
Note if the message was created through the API (as opposed to Kumulos Messaging Dashboard) and contains a full URL to an image hosted elsewhere,
getImageUrlreturns original URL without any resizing applied.
Handling Push Action Buttons
Push messages allow you to hand-off to native application screens via deep-linking push action buttons. When tapped, these buttons pass control to the defined push action handler.
If you want to handle deep-links as part of a Push message you can create a class that implements the PushActionHandlerInterface and assign it during SDK initialization.
Kumulos.setPushActionHandler(new MyPushActionHandler());
A stub implementation of the handler could be as follows:
public class MyPushActionHandler implements PushActionHandlerInterface {
    public void handle(Context context, PushMessage pushMessage, String actionId){
       //- actionId is the button id you set when creating the notification
       //- Note, that when action button is clicked your app's activity is not launched -- you have to do it yourself in this handler.
    }
}
Default Push Behavior
By default, the Kumulos PushBroadcastReceiver can show a notification on the notification area of the device, or as a heads-up notification when a content push is received with the appropriate setting selected.
Tapping this notification will open the main launcher activity of your application and track the push open conversion for you.
Your main activity will receive the push contents in its options bundle under the PushMessage.EXTRAS_KEY.
Changing the Push Icon
To change the icon shown in the status bar on Android, you can configure Kumulos with a drawable at initialization time:
KumulosConfig config = new KumulosConfig.Builder("API_KEY", "SECRET_KEY")
    .setPushSmallIconId(R.id.my_push_small_icon)
    .build();
Kumulos.initialize(this, config);
Make sure to comply with the status bar icon guidelines so the icon renders correctly on all devices. For help preparing assets, we suggest checking out the Android Asset Studio
Customizing Push Behavior
To customize the behavior of the SDK when a push is received or its notification is tapped, we suggest subclassing the PushBroadcastReceiver and overriding its base methods depending on what you want to customize.
Example extension class:
package com.example;

import com.kumulos.android.PushBroadcastReceiver;

public class MyPushReceiver extends PushBroadcastReceiver {

}
Make sure to change the AndroidManifest.xml receiver:
<receiver android:name="com.example.MyPushReceiver" android:exported="false">
    <intent-filter>
        <action android:name="com.kumulos.push.RECEIVED" />
        <action android:name="com.kumulos.push.OPENED" />
        <action android:name="com.kumulos.push.DISMISSED" />
        <action android:name="com.kumulos.push.BUTTON_CLICKED" />
    </intent-filter>
</receiver>
Changing the Launched Activity
To change which activity will be launched when the user taps a notification, you can override the PushBroadcastReceiver#getPushOpenActivityIntent(Context, PushMessage).
package com.example;

import android.content.Context;
import android.content.Intent;

import com.kumulos.android.PushBroadcastReceiver;
import com.kumulos.android.PushMessage;

public class MyPushReceiver extends PushBroadcastReceiver {

    @Override
    protected Intent getPushOpenActivityIntent(Context context, PushMessage pushMessage) {
        // TODO implement your own logic here
        return super.getPushOpenActivityIntent(context, pushMessage);
    }
}
The PushMessage model will not be added to the Intent by default, it is up to you to add it as an extra if desired:
Intent launchIntent = new Intent(context, MyActivity.class);
launchIntent.putExtra(PushMessage.EXTRAS_KEY, pushMessage);
You can return null to track the push conversion and do nothing when the notification is tapped.
If the
Intentreturned does not describe anActivity, it will be ignored
Customizing the Notification
To customize the notification shown to the user for content pushes, you can override PushBroadcastReceiver#getNotificationBuilder(Context, PushMessage).
package com.example;

import android.app.Notification;
import android.content.Context;

import com.kumulos.android.PushBroadcastReceiver;
import com.kumulos.android.PushMessage;

public class MyPushReceiver extends PushBroadcastReceiver {
    @Override
    protected @Nullable Notification.Builder getNotificationBuilder(Context context, PushMessage pushMessage) {
        // get builder with Kumulos intents set up
        Notification.Builder builder = super.getNotificationBuilder(context, pushMessage);
        // TODO customize the notification
        builder.setContentTitle("custom: " + pushMessage.getTitle());

        return builder;
    }
}
If you want to handle the open/dismissal with the broadcast receiver, and decide to use your new, custom Notification.Builder (not advisable), be sure to set up the intents of the notification correctly. Refer to PushBroadcastReceiver source. This will ensure that the notification conversion is tracked in Kumulos, Kumulos push action handler is fired and prevent possible android 12 trampoline issues.
If you want to do something else, you can manually track push open conversion using Kumulos#pushTrackOpen(Context, int) and track dismissed event using Kumulos#pushTrackDismissed(Context, int). Additionally, you would have to add deep link extras for in-app message deep links to keep working.
Kumulos.pushTrackOpen(context, pushMessage.getId());
Kumulos.pushTrackDismissed(context, pushMessage.getId());
//call in the scope of MyPushReceiver
addDeepLinkExtras(pushMessage, launchIntent);
Launching a Service for Background Data Pushes
To perform work when a background data push is received, you can override PushBroadcastReceiver#onBackgroundPush.
package com.example;

import android.content.Context;
import android.content.Intent;

import com.kumulos.android.PushBroadcastReceiver;
import com.kumulos.android.PushMessage;

public class MyPushReceiver extends PushBroadcastReceiver {

    @Override
    protected void onBackgroundPush(Context context, PushMessage pushMessage) {
        WorkManager workManager = WorkManager.getInstance(context);
        workManager.enqueue(new OneTimeWorkRequest.Builder(MyWorker.class).build());
    }

}
URL Pushes
Push notifications sent to open a URL will, by default, track the push open if the user taps the notification, and then open the default web browser.
Overriding All Behaviors
If you want to completely replace the logic for handling pushes, you can override PushBroadcastReceiver#onPushReceived(Context, PushMessage).
Bear in mind you will be responsible for all aspects of the push process such as showing a notification to the user, tracking an open conversion using Kumulos#pushTrackOpen(Context, int) and dismissed events using Kumulos#pushTrackDismissed(Context, int), or launching any activities or services.
In addition, you may need to implement behaviors for:
- Delivery tracking:
pushTrackDelivered(context, pushMessage) - In-App message sync:
maybeTriggerInAppSync(context, pushMessage) - Clearing notifications for in-app messages requires presenting with the Kumulos tag like so:
notificationManager.notify(KUMULOS_NOTIFICATION_TAG, this.getNotificationId(pushMessage) , notification)
Using Your Own FirebaseMessagingService with Kumulos
If you already consume FCM push notifications with your own FirebaseMessagingService but you want to also enjoy the benefits of the Kumulos push service, you can use the SDK's helper methods in your own implementation. For example:
public class MyAppFirebaseMessagingService extends com.google.firebase.messaging.FirebaseMessagingService {

    @Override
    public void onNewToken(String token) {
        // Handle token for your purposes
        // ...
        // Also pass token to Kumulos for registration
        Kumulos.pushTokenStore(this, token);
    }

    @Override
    public void onMessageReceived(RemoteMessage remoteMessage) {
        // Handle message as you wish
        // ...
        // Hand over to Kumulos if not of interest / came from the Kumulos push service
        com.kumulos.android.FirebaseMessageHandler.onMessageReceived(this, remoteMessage);
    }
}
Channels
You can create and manage subscriptions to channels from the SDK. Channels allow you to send messaging content to certain interest groups.
All channel management is performed with an instance of the PushSubscriptionManager class.
You can create an instance using the default constructor:
PushSubscriptionManager manager = new PushSubscriptionManager();
This constructor requires the Kumulos SDK to be initialized as described in the Initialization section of this guide
The push manager exposes several methods to manage subscriptions:
public interface PushSubscriptionManagerInterface {
    void subscribe(Context c, String[] uuids, Kumulos.Callback callback);

    void unsubscribe(Context c, String[] uuids, Kumulos.Callback callback);

    void setSubscriptions(Context c, String[] uuids, Kumulos.Callback callback);

    void clearSubscriptions(Context c, Kumulos.Callback callback);

    void listChannels(Context c, Kumulos.ResultCallback<List<PushChannel>> callback);

    void createChannel(Context c, String uuid, boolean subscribe, Kumulos.ResultCallback<PushChannel> callback);

    void createChannel(Context c, String uuid, boolean subscribe, @Nullable String name, boolean showInPortal, @Nullable JSONObject meta, Kumulos.ResultCallback<PushChannel> callback);
}
Results are handled with instances of the Kumulos.Callback or Kumulos.ResultCallback<ResultType> classes. For example:
PushSubscriptionManager manager = new PushSubscriptionManager();
manager.listChannels(this, new Kumulos.ResultCallback<List<PushChannel>>() {
    @Override
    public void onSuccess(List<PushChannel> result) {
        // Handle the result
    }

    // Optional error override
    @Override
    public void onFailure(Exception e) {
        // Handle the error
    }
});
When creating channels, the visibility and meta data can be controlled. Please make sure you understand these concepts when creating channels from the SDK.
Deferred Deep Linking
Deep linking allows users to reach app content by clicking a link. This can be achieved even if app is not installed.
Configuration & Setup
To integrate deep linking into your Android project, you have to complete the following steps.
Add an intent filter to your main activity:
<intent-filter android:label="deepLabel" android:autoVerify="true">
    <action android:name="android.intent.action.VIEW" />
    <category android:name="android.intent.category.DEFAULT" />
    <category android:name="android.intent.category.BROWSABLE" />
    <!-- Specify which URIs should be matched. Note, domain should be .lnk.click -->
    <data android:scheme="https" android:host="subdomain.lnk.click"/>
</intent-filter>
Note that the subdomain you specify above should match the one you specified on the deep link configuration page on the Kumulos Dashboard.
Note that setting
android:autoVerify="true"will verify ownership of the domain, so, instead of offering a list of apps to select from your app will open automatically. No further actions are needed to enable this.
Add following overrides to the main activity:
@Override
protected void onCreate(Bundle savedInstanceState) {
    super.onCreate(savedInstanceState);
    Kumulos.seeIntent(this, getIntent(), savedInstanceState);
}

@Override
public void onWindowFocusChanged(boolean hasFocus) {
    super.onWindowFocusChanged(hasFocus);
    Kumulos.seeInputFocus(this, hasFocus);
}

/*
 * If the main activity in AndroidManifest has android:launchMode="singleTop", add following lines as well.
 * It is advisable to have launch mode single top, as otherwise app link will create another copy of the
 * activity on top of the stack if activity is already running.
 */

//@Override
//protected void onNewIntent(Intent intent) {
//    super.onNewIntent(intent);
//    Kumulos.seeIntent(this, intent);
//}
Configure a deep link handler:
KumulosConfig config = new KumulosConfig.Builder(BuildConfig.K_API_KEY, BuildConfig.K_SECRET_KEY)
                .enableDeepLinking(null, new MyDeferredDeepLinkHandler())
                .build();
Kumulos.initialize(this, config);
A stub implementation of the handler could be as follows:
public class MyDeferredDeepLinkHandler implements DeferredDeepLinkHandlerInterface {
    void handle(Context context, DeferredDeepLinkHelper.DeepLinkResolution resolution, String link, @Nullable DeferredDeepLinkHelper.DeepLink data){
       //- Inspect the data payload and run code as needed.
   }
}
Build
You can call API methods defined in the Kumulos Build service using the Kumulos.call method.
To talk to Kumulos, you need three things:
- your method title (in
lowerCamelCase) - a method parameters map (field names are also in
lowerCamelCase) - some response handler code
Parameter maps
Parameters are constructed as a standard Java HashMap<String, String>.
HashMap<String, String> params = new HashMap<String, String>();
params.put("PARAM_NAME_1", "PARAM_VALUE_1");
You can use the static String.ValueOf() method to convert numbers to strings, for example:
int selectedUser=3;
HashMap<String, String> params = new HashMap<String, String>();
params.put("userID", String.valueOf(selectedUser));
Response Handler
As for the response handler, we create an anonymous extension of the com.kumulos.android.ResponseHandler class and override its didCompleteWithResult method.
Kumulos.call("YOUR_METHOD_TITLE", params, new ResponseHandler() {
    @Override
    public void didCompleteWithResult(Object result) {
        // Process the results
        // Do updates to the UI by calling back to the main UI thread with a Handler or posted Runnable
    }
});
And you're done! You can now make calls to Kumulos from your android application. Read on for a little more information about result handling.
If you are making the request from a background thread, such as an
IntentService, you should use theKumulos#callSyncblocking method.
Handling Results
The Object passed in to your response handler will take different forms based on what type of action the API method returns.
Select Actions
Select actions will return an ArrayList of LinkedHashMap<String, Object> and can be cast as such to allow iteration like so:
Kumulos.call("YOUR_METHOD_TITLE", params, new ResponseHandler() {
    @Override
    public void didCompleteWithResult(Object result) {
        ArrayList<LinkedHashMap<String, Object>> objects = (ArrayList<LinkedHashMap<String,Object>>) result;
        for (LinkedHashMap<String, Object> item : objects) {
            String field1 = (String) item.get("NAME_OF_FIELD1");
            Integer field2 = (Integer) item.get("NAME_OF_FIELD2");
            //...
        }
    }
});
The objects in the array list are LinkedHashMap<String,Object> instances where the types of the values have been converted to regular Java types such as String, Integer, and Double.
Any nested objects in the object will also be of the LinkedHashMap<String,Object> type.
We would recommend you which you create model instances (e.g. POJO) to suit your client app by casting the HashMap fields to client model fields.
All Other Actions
All other actions in Kumulos currently return number values, either integers of doubles. Therefore, the result value may be either an Integer, or Double.
Please note it is possible that the result will be null in some cases and your code should take this into account.
Handling Data Fields
Kumulos stores data fields as base64 encoded data, so if you receive data from Kumulos, you will have to base64 decode it to access the original data. Similarly, when you send data to Kumulos, you should base64 encode it before transport.
To achieve this, please refer to the Android SDK Base64 utility.
Crash
Crash reporting allows you to track unhandled exceptions in your app, and optionally log any caught exceptions for further investigation. Crash reporting is not enabled by default. To enable this feature, simply modify your Kumulos configuration as follows:
KumulosConfig config = new KumulosConfig.Builder("YOUR_API_KEY", "YOUR_SECRET_KEY")
    .enableCrashReporting()
    .build();
Kumulos.initialize(this, config);
That's it! Unhandled exceptions that lead to crashes will now be recorded automatically and shown in your App Delivery Console.
Note that crash reporting is not available whilst connected to a debugger, but it does work with debug builds.
If you wish to log any caught exceptions, you can record them with the Kumulos#logException(e) helper method:
try {
    ...
}
catch (Throwable e) {
    Kumulos.logException(e);
}
Ensure that crash reporting is enabled when attempting to log exceptions.
Troubleshooting
If you are using ProGuard to optimize your Java code and you are having issues with push registration, then you need to ensure that your proguard.cfg file includes the Kumulos SDK and required components, something like:
-keep class com.google.android.gms.** { *; }
-dontwarn com.google.android.gms.
-keep class com.google.firebase.** { *; }
-dontwarn com.google.firebase.
-keep class android.support.v7.widget.** { *; }
-dontwarn android.support.v7.widget.
-keep class android.support.v4.widget.Space { *; }
-dontwarn android.support.v4.widget.Space
-keep class com.kumulos.** { *; }
-dontwarn com.kumulos.**
-keep class okhttp3.** { *;}
-dontwarn okhttp3.**
-keep class oikio.** { *;}
-dontwarn okio.**
-keep class com.huawei.hms.** { *; }
-dontwarn com.huawei.hms.
Proguard is also very sensitive to UTF-8 with BOM encoding, whereas Android tooling will only accept UTF-8. Therefore, an easy way to ensure you don't inadvertently have UTF-8 byte-order-marks in your proguard.cfg is to use vim via the terminal as follows:
$ vim proguard.cfg
:set nobomb
:wq!
Changelog
15.0.0
Starting from Android 13, notifications permission is off by default. We have changed our existing API method Optimove.pushRegister() to Optimove.pushRequestDeviceToken(). In case the app is running on Android 13 and higher, the notifications are off and were never explicitly turned off, this new method is now causing the notification permission request prompt to appear. Consider calling this method when it is most appropriate to request the notification permission.
14.0.2
- Fix IllegalStateException when reading clipboard (Android 12, DDL)
14.0.1
- Minor bug fix: in rare cases reading notch insets for in-apps results in NullPointerException.
14.0.0
- Support android 12 (API 31)
- In-app refactoring: simplify lifecycle management. Presentation will now only be triggered for 'next open' messages when the app enters the foreground, not on every activity change.
- Track event properties with in-app button conversion events.
- Clear DDL from clipboard after processed.
Upgrade Guide
- If overriding
getBackgroundPushServiceIntentin your custom class extendingPushBroadcastReceiver, you should instead override overrideonBackgroundPush, see docs above. - If overriding
buildNotificationin your custom class extendingPushBroadcastReceiver, you should instead overridegetNotificationBuilder, see docs above.
13.0.3
- Fix
IndexOutOfBoundsException
13.0.1 & 13.0.2
- Fix rare edge cases leading to in-app spinner being left on screen
13.0.0
- Refactor InAppDeepLinkHandlerInterface to expose in-app message data
Upgrade Guide
Update any calls to KumulosInApp.setDeepLinkHandler():
InAppDeepLinkHandlerInterface#handle(Context,JSONObject) is now
InAppDeepLinkHandlerInterface#handle(Context,InAppButtonPress).
The previous interface's second argument of JSONObject can now be accessed from InAppButtonPress#getDeepLinkData().
12.1.3
- Fix in-app buttons launching URLs on apps targeting API level 30+
12.1.2
- Add probability-based matching for Web-to-App Banners
12.1.1
- Fix ANR when loading push media over slow/unstable connections
12.1.0
- Added support for notification channels
12.0.0
- Depend on FM BoM added by SDK consumers instead of FM version range.
Upgrade Guide
- Add the following lines to your app module's
build.gradle. Check supported version range in the integration guide above.
dependencies {
    ...
    implementation platform('com.google.firebase:firebase-bom:28.2.0')
    implementation 'com.google.firebase:firebase-messaging'
}
11.7.1
- Revert specification FCM library versions as a range as this caused dependency resolution issues in some projects
- Clean up WebView resources after in-app message presentation
11.7.0
- Store image for InAppInboxItem,
getImageUrlhelper method - Close session after a smaller timeout
- Fix rare InAppMessagePresenter crashes
- Update FirebaseMessaging version. Supported version range is [19.0.0, 22.99.99]. Remove firebase-core dependency.
Upgrade Guide
com.google.firebase:firebase-coredependency is no longer required, you can remove it from your app module'sbuild.gradle- Remove
<meta-data android:name="firebase_analytics_collection_deactivated" android:value="true" />from your app'sAndroidManifest.xml - If you want to keep google analytics, add
com.google.firebase:firebase-analyticsto your app module'sbuild.gradle
11.6.0
- Allow setting
onInboxUpdatedhandler, see docs above - Add
getInboxSummaryAsynchelper method, see docs above - Expose extra fields on InAppInboxItem:
sentAtanddata - Expose extra field on PushMessage:
collapseKey - Fix bug introduced in 11.5.0: in-app messages not always saving
11.5.0
- Allow marking in-app messages as read
11.4.0
- Track push notification dismissed event
11.3.1
- Don't process deep links when activity is recreated
11.3.0
- Improve reliability of channel subscription
11.2.0
- Deep linking (see integration guide)
11.1.1
- Bug fix: in-app messages containing videos occasionally closing
11.1.0
- Vibrate and play default notification sound when notification received. Sound can be overridden or disabled by user, custom sound can be set by API request.
11.0.0
- Add a client to support contact tracing notifications with Kumulos.
Breaking changes
Kumulos.UninitializedExceptionnow extendsRuntimeExceptionso it no longer requires checkingPushSubscriptionManagerwill no longer check for uninitialised states and won't propagateonFailure(Kumulos.UninitializedException)
10.0.0
- Add ability to receive pushes through HCM for Huawei devices without Google Play Services
- Update to depend on WorkManager library for background tasks
Upgrade Guide
No code-level changes are required, but the dependency change may cause resolution errors which need resolved by updating your WorkManager library version.
9.0.0
- Update to depend on AndroidX modules directly
- Update Firebase packages to latest versions
- Update ACRA to latest version
- minSDK raised from 14 to 16
Upgrade Guide
- Raise your minSdk version to 16 in your build.gradle, if not already set
- Upgrade your app to use AndroidX dependencies
8.5.0
- Support custom sounds for notification
- Show "sent when" on notification
- Set long text style for allowing reading longer messages
- Inbox deletion
8.4.1
- Minor push action button bugfix
8.4.0
- Support push action buttons. To enable new functionality add
<action android:name="com.kumulos.push.BUTTON_CLICKED" />to PushBroadcastReceiver's actions in your application'sAndroidManifest.xml. To handle action button clicks set push action handler as described in the user-guide.
8.3.0
- Support for in-app message expiry
8.2.0
- Support pictures in push notifications
8.0.0
- Use KumulosInApp.setDeepLinkHandler() rather than KumulosConfig.Builder#setInAppDeepLinkHandler (#25)
- InAppDeepLinkHandlerInterface now injects a Context into the handle method (#24)
- Minor in-app bug fixed (#24)
7.0.2
- Remove key listener when dialog dismissed (#23)
7.0.1
- Add media playback setting for in-app (#22)
7.0.0
- Add in-app messaging feature
Migration Guide
Updating from version 6.x should be simple as only minor breaking API changes were introduced:
PushMessage.getId()now returns an int, not a StringKumulos.pushTrackOpen(Context,int)updated to take int message IDPushMessage.isBackgroundPush()has been renamedPushMessage.runBackgroundHandler()- Additional behaviors to support In-App messaging are now required in PushBroadcastReceiver, if you have overridden any base methods please review the Messaging integration section concerning push customization
6.1.0
- Fix issue if location updated events are sent in batches, they may have the same timestamp. Use more correct timestamp from Location object
6.0.1
- Fix issue if pushRegister is called too early in the application lifecycle, registration can fail
- Use new event for push unregistration to benefit from retry on next sync
6.0.0
- Don't register the Kumulos
FirebaseMessagingServicein the SDK manifest - Expose the
Kumulos#pushTokenStore(Context, String)method - Add a
FirebaseMessageHandlerutility class
Migration Guide
After updating to this release from version 5.x, and if you consume push notifications, you must register the default FirebaseMessagingService from the SDK in your application's AndroidManifest.xml:
<!-- Kumulos FCM handler -->
<service android:name="com.kumulos.android.FirebaseMessagingService">
    <intent-filter>
        <action android:name="com.google.firebase.MESSAGING_EVENT" />
    </intent-filter>
</service>
5.1.1
- Persist userIdentifier in shared preferences when associated
- Record current user identifier with events and send in server sync
- Add helper to clear any existing user association
5.1.0
This release was removed due to an issue identified during testing.
5.0.0
- Replace deprecated GCM push features with FCM
- Update GCM to 16.0.0
Note the non-deprecated
GcmNetworkManagerclass is still used by this SDK, but all deprecated push features have been updated to use FCM.
FCM Migration Guide
If you are using Kumulos for push notifications, you will need to perform the steps below, which are described in more detail in our migration guide:
- Update the Kumulod dependency to version 5.0.0
- Remove the
kumulos_gcm_sender_idmanifest placeholder from your app'sbuild.gradlefile - Add the Firebase components & google-services plugin to your project
- Download the
google-services.jsonfile from your Firebase console and add it to yourapp/folder
All existing push tokens and Kumulos configuration remains valid and requires no action to update.
4.1.1
Update ACRA to 5.2 to resolve an issue with FCM token registration.
See https://github.com/ACRA/acra/issues/662 for further context.
4.1.0
Allow customizing ACRA report content by exposing the ACRA configuration builder used by the Kumulos SDK.
Now a KumulosConfig has a getAcraConfigBuilder(Application) method which allows changing fields in the report.
Note if you wish to access this method, it will require adding a compileOnly 'ch.acra:acra-http:5.1.3' dependency to your app's Gradle dependencies.
4.0.4
- Add support for storing user attributes when associating an install with a user
4.0.3
- Add event tracking helper which flushes events immediately
- Embed config in analytics upload task arguments
- Build config & dependency updates
4.0.2
Fix creation of release lib POM with dependencies
4.0.1
- Update dependencies
4.0.0
- Add beacon tracking helper
- Record push events, location updates, and user associations locally in the event DB
Breaking changes
The following helper methods now take a Context as their first parameter:
- pushTrackOpen(Context, int)
- sendLocationUpdate(Context, Location)
- associateUserWithInstall(Context, String)
3.3.2
- Update ACRA to version 5
3.3.1
- Prevent
IllegalStateExceptionfrom push intents started in the background
3.3.0
- Add custom event tracking for analytics
- Add session event recording for session analytics
- Add user association helper method
3.2.1
- Add default notification channel "General" for Android 8+
- Fix reading of sender ID from merged manifest on some devices
3.2.0
- Add crash reporting with ACRA
3.1.0
- Add geolocation update helper method
- Add locale & bundle to stats payload
- Expose
Kumulos.UninitializedExceptionto allow catching this specific exception
3.0.0
- Use OkHttp instead of Android AsyncHttpClient
- Add config builder for initialization
- Add default push notification small icon
- Allow configuration of push small icon
- Raise minimum API level to 14
Breaking Changes
- Removed
Kumulos.initWithAPIKeyAndSecretKey, useKumulos.initializeinstead - Removed
ResponseHandler.onStartandResponseHandler.onFinish - Callbacks are no longer called on the main thread
Migration Guide
In order to initialize Kumulos, you should change your initWithAPIKeyAndSecretKey call to the following:
KumulosConfig config = new KumulosConfig.Builder("API_KEY", "SECRET_KEY").build();
Kumulos.initialize(this, config);
Note this should be done in your application class's
onCreatemethod as specified in the integration guide
To migrate any calls that update the UI from a callback, you should post the UI update back to the main thread as follows:
Kumulos.call("getThings", new ResponseHandler() {
    @Override
    public void didCompleteWithResult(@Nullable Object result) {
        // Process the result
        String newText = ...;

        // Post UI updates back to the UI thread
        runOnUiThread(new Runnable() {
            @Override
            public void run() {
                // Example update to UI component
                mEditText.setText(result);
            }
        });
    }
});
For more information, see the Android developer guide
2.4.3
- Prevent
IllegalStateExceptionwhen running on Android O
2.4.2
- Guard against null actions in stats service
2.4.1
- Guard against null actions in GCM registration
2.4.0
- Add push notification URL open handling
- Add background data push notification handling
2.3.0
- Add
PushSubscriptionManagerto allow management of push channels & subscriptions - Make constructor of
PushMessagepackage-visible instead of public
2.2.0
- Allow overriding of
ResponseHandler#onSuccessto access raw JSON response from API calls - Fix occasional authentication header issues from networking library
2.1.0
- Fix usage of Kumulos from an arbitrary Thread in a Service where no Looper is bound
- Add
Kumulos#callSyncmethod to perform blocking networking requests, suitable for use in background threads such as anIntentService - Fix NullPointerExceptions in some IntentServices
- Ignore GCM payloads from other push services if used instead of Kumulos
2.0.1
- Fix
java.lang.NullPointerExceptionin response handler if the JSON response fails to parse. In this case,ResponseHandler#didFailWithErrorwill be called. - Remove logging of full response body in response parser to prevent cluttering LogCat when data fields are used
2.0.0
- Move all classes to the
com.kumulos.androidpackage - Change debug log tags to match
com.kumulos.* - Add support for push notifications with GCM
- Bring minimum SDK to API level 11
1.0.0
- Add session support to Android
- Update to
android-async-http1.4.9
Thanks
We would like to thank Aamir Latif, Alex Eskandari, and David Montiel for their contributions to the Android libraries.
Additionally we'd like to thank the Jackson JSON Parser and OkHttp projects for their excellent work on which we build our library.