Cordova & Ionic
Integration
Kumulos provides an SDK in the form of a Cordova plugin to ease the integration of the Kumulos Analytics, Push Notification, Crash Reporting and Build features into your hybrid app. This guide provides an overview of setting up the SDK for your project and sample usage.
Prerequisites
- iOS plugin installation requires CocoaPods (
sudo gem install cocoapods) - The plugin depends on Promises. Ensure you have a suitable promise polyfill available in your app runtime if required
Getting Started
cordova plugin add cordova-plugin-kumulos-sdk
Add https://*.kumulos.com to the Content-Security-Policy meta tag in your app, for example in www/index.html:
<meta http-equiv="Content-Security-Policy" content="default-src 'self' data: gap: https://ssl.gstatic.com 'unsafe-eval'; style-src 'self' 'unsafe-inline'; media-src *; img-src 'self' data: content:; connect-src 'self' https://*.kumulos.com;">
ionic cordova plugin add cordova-plugin-kumulos-sdk
Next, add the Kumulos type definitions to your tsconfig.json file:
{
  "files": [
    "node_modules/cordova-plugin-kumulos-sdk/index.d.ts"
  ],
}
If you are using Ionic V4 and you're receiving a compiling error
ERROR in /src/*.ts, you will also need to add"include": ["src/**/*.ts"],into yourtsconfig.jsonfile.
You may also need to add connect-src 'self' https://*.kumulos.com; to the Content-Security-Policy meta tag in your app in www/index.html if there is one present.
npm install cordova-plugin-kumulos-sdk@latest
Next, add the Kumulos type definitions to your tsconfig.json file:
{
  "files": [
    "node_modules/cordova-plugin-kumulos-sdk/index.d.ts"
  ],
}
Initialization
In your main app javascript (for example, www/index.js), add the JavaScript:
document.addEventListener('deviceready', function () {
    if (typeof Kumulos === 'undefined') {
      console.info('Kumulos plugin not found, assuming browser environment & skipping init...');
      return;
    }

    Kumulos.initialize({
        apiKey: 'YOUR_API_KEY',
        secretKey: 'YOUR_SECRET_KEY'
    });
}, false);
If you are using typescript add
declare var Kumulos: KumulosSdk;to the top of the file.Your API Key and Secret Key can be obtained from your App Dashboard in your agency console.
To set up the SDK for your Kumulos app, you must create a kumulos.json file in your project root with Kumulos configuration:
{
    "apiKey": "YOUR_API_KEY",
    "secretKey": "YOUR_SECRET_KEY",
    "enableCrashReporting": false,
    "inAppConsentStrategy": "in-app-disabled"
}
Further integration is necessary for each platform.
Android
npx cap add android(adds android project)- To fix support library issues (if any), do
npm install jetifierandnpx jetify npx cap sync android(updates dependencies, copies web assets)- add
kumulos.xmltoandroid/app/src/main/res/valueswith contents
<?xml version="1.0" encoding="utf-8"?>
<resources xmlns:tools="http://schemas.android.com/tools">
    <string name="kumulos_api_key" tools:ignore="TypographyDashes">YOUR_API_KEY</string>
    <string name="kumulos_secret_key" tools:ignore="TypographyDashes">YOUR_SECRET_KEY</string>
    <bool name="kumulos_enable_crash_reporting">false</bool>
    <string name="kumulos_in_app_consent_strategy" tools:ignore="TypographyDashes">auto-enroll</string>
</resources>
Make sure to set YOUR_API_KEY and YOUR_SECRET_KEY above.
If dependencies are not found, in AndroidStudio you need to invalidate cache and restart.
Troubleshooting for other common issues can be found in Capacitor docs
iOS
npx cap add ios(adds ios project)npx cap sync ios(updates dependencies, copies web assets)- Edit contents of
ios/capacitor-cordova-ios-plugins/resources/kumulos.plistfilling values as below
<?xml version="1.0" encoding="UTF-8"?>
<!DOCTYPE plist PUBLIC "-//Apple//DTD PLIST 1.0//EN" "http://www.apple.com/DTDs/PropertyList-1.0.dtd">
<plist version="1.0">
<dict>
    <key>apiKey</key>
    <string>API_KEY</string>
    <key>secretKey</key>
    <string>SECRET_KEY</string>
    <key>enableCrashReporting</key>
    <false/>
    <key>inAppConsentStrategy</key>
    <string>in-app-disabled</string>
</dict>
</plist>
Note, after every
npx cap sync iosvalues in thekumulos.plistabove get overwritten, so, you need to set them again.
Checking installs of your App
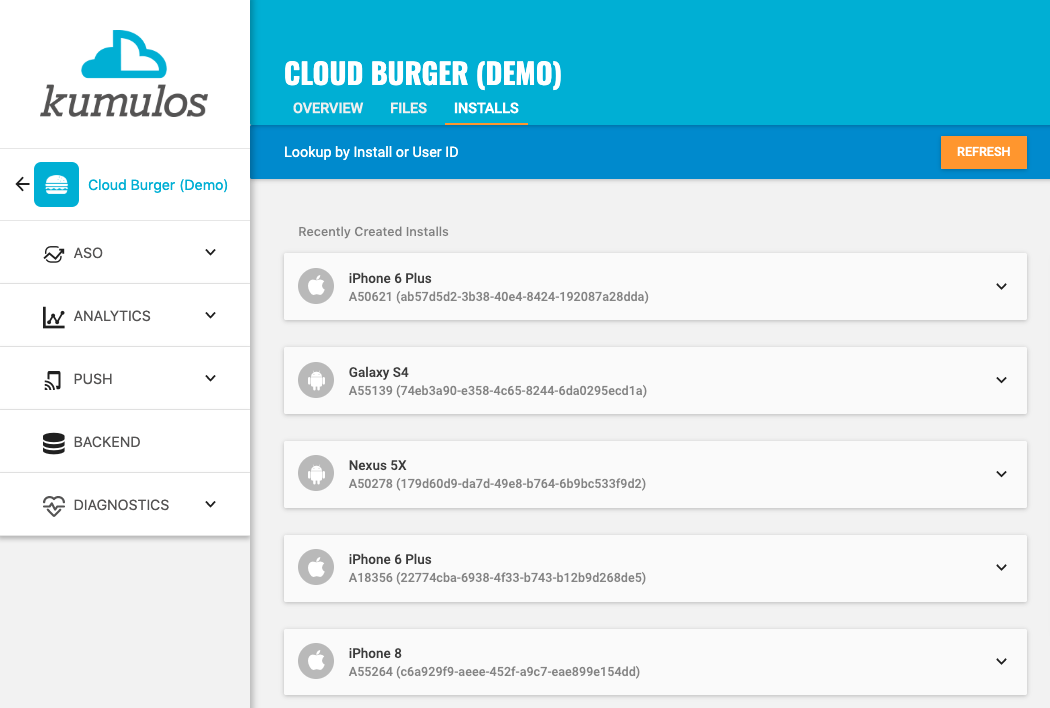
When you run your app on a simulator or install your app on a device, you can check that the SDK has been initialized correctly by selecting the app and clicking the Installs tab to see the ten most recent installs of your app. Click on any install to see more information.
If you experience any difficulties integrating an SDK or initializing the Kumulos client, please don't hesitate to contact support who are standing by to help!
Installation ID
When initialized for the first time, the Kumulos SDK will create a unique identifier for the app installation that initialized the SDK.
This identifier can be used to target push notifications to a specific device through KScript or the Push Notifications API.
In order to retrieve this installation ID, simply access the getter method:
Kumulos.getInstallId().then(function (id) {
    console.log('Install id: ' + id);
});
Once you have the installation ID, you can send it to your app's backend to be used later for push targeting. For more information about push targeting, please see the KScript Documentation or push notification documentation as appropriate.
Analytics
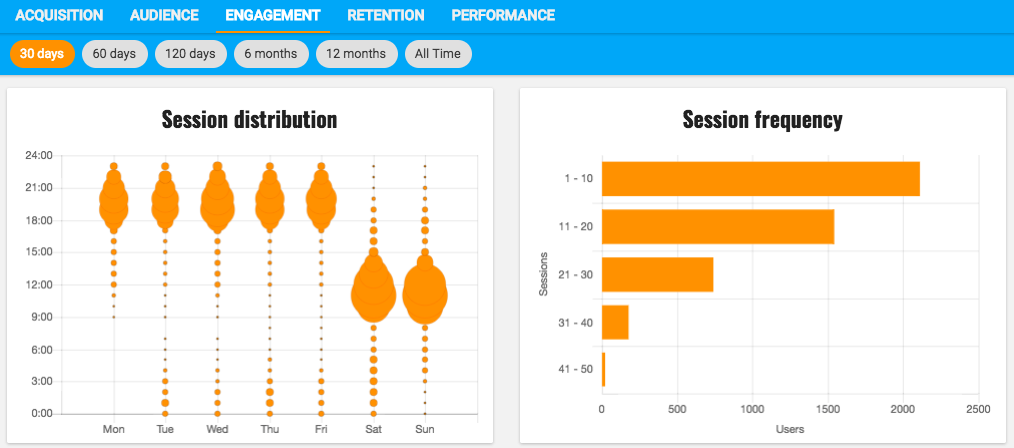
Kumulos provides concise and easy to consume analytics & reporting features. By initializing the SDK, you automatically get session & engagement reporting out the box.
Session Analytics
Kumulos records sessions based on application foreground and background events. When an app enters the background, Kumulos will wait for an idle period (defaulted to 40 seconds). If there are no more foreground events during that idle period, the current session will be closed.
Event Tracking
Kumulos allows you to track custom analytics events that can be used as a trigger to fire automation rules (e.g. to trigger a push notification) or as steps in a funnel to track conversion through key user journeys in your app.

To track a custom analytics event, use Kumulos.trackEvent as follows:
Kumulos.trackEvent('product.purchased', {
    productId: 404
});
Each event and its properties must be less than 250 KiB in size for the event to be tracked.
Event tracking is available offline as all events are persisted locally before being synced to the server in batches in the background.
A similar method
trackEventImmediatelywill immediately start an event sync rather than waiting for the next time the app is backgrounded.
Checking events from your App
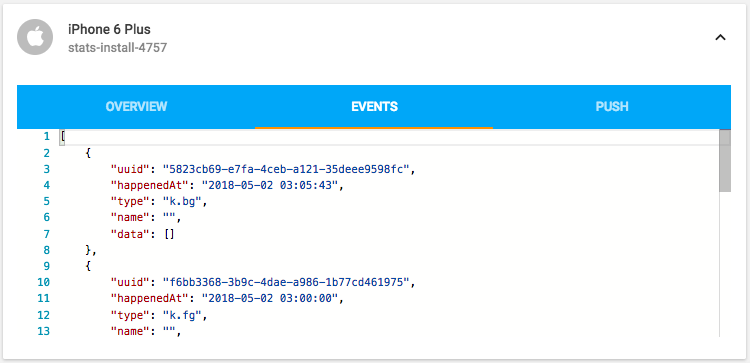
When you run your app on a simulator or install your app on a device, you can check that the SDK is recording events correctly by selecting the app and clicking the Installs tab to see the ten most recent installs of your app. Click on any install and then click on the Events tab.
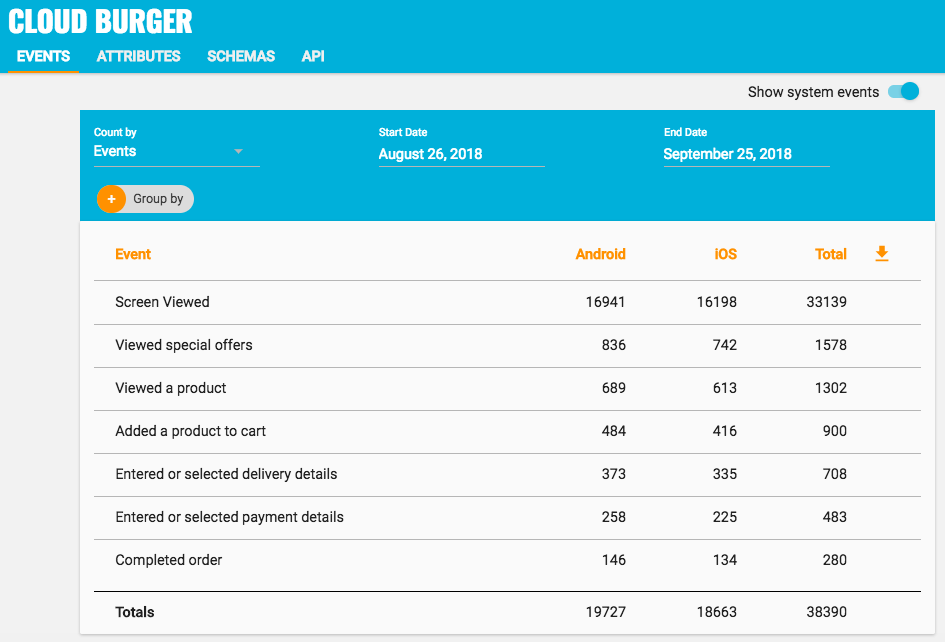
Alternatively, to see counts of all analytics events, including system events such as opened a push notification, recorded by installs of the app in the last 30 days, expand 'Analytics' and click 'Explore' in the left menu. For comparison, the total number of sessions in the same period is shown.
User Association
Kumulos allows associating a user identifier with the current installation ID. This user identifier is useful for performing analytics aggregations & analyses at the user level, for example, funnels completed by users across multiple devices. You can also optionally associate a collection of attributes with the user.
To associate the current app installation with a user, you can use the helper method as shown below:
Kumulos.associateUserWithInstall("unique-user-id");
User association is time-aware, so say two different users log in to the app, their user IDs will be associated with the same install for the time between subsequent calls to the helper method. For example:
Kumulos.associateUserWithInstall('Bob');
// This event will belong to Bob
Kumulos.trackEvent('product.purchased');
Kumulos.associateUserWithInstall('Alice');
// This event will belong to Alice
Kumulos.trackEvent('product.purchased');
Attributes
You can optionally associate a collection of attributes with the user for targeting, personalization or attribution. To associate attributes with the user, pass a collection into the helper method as shown.
Kumulos.associateUserWithInstall("unique-user-id", {
    "name": "Shawn",
    "age": 25
});
The collection of attributes for a given user must be less than 250 KiB in size.
If you do not have a user identifier, use the installation id generated by the Kumulos SDK.
Location Tracking
You can send Kumulos location updates and use this to trigger events such as push notifications when an install enters a GeoFence.
How you configure location updates depends on the specific use case of your app. You should consider both accuracy and battery life when making this decision.
Once you have set up location updates from the OS, you can send them to Kumulos like so:
Kumulos.sendLocationUpdate({lat: 0, lng: 0});
Plugins which can provide location updates include:
- cordova-plugin-background-geolocation (commercially supported)
- cordova-plugin-background-geolocation (OSS fork)
Beacons
You can send Kumulos beacon proximity updates and use these to trigger automations such as sending a push notification when an install is in proximity to a beacon.
The Kumulos SDK provides helper methods to notify our services of proximity to a detected beacon. Helpers for Eddystone beacons on Android and iBeacons on iOS are provided. However, it is also possible to manually notify our services of iBeacon proximity events on Android as well.
You will need to integrate a suitable plugin to detect the beacon proximity events (for example, https://github.com/petermetz/cordova-plugin-ibeacon).
Eddystone Beacon Detection
Kumulos.trackEddystoneBeaconProximity({
    hexNamespace: 'namespace',
    hexInstance: 'instance',
    distanceMetres: 10
});
Beacon monitoring on Android typically requires a device with BLE, and API level 18+. You can read more about detecting beacons in the Android Nearby reference.
iBeacon Detection
iOS
Kumulos.trackiBeaconProximity({
    uuid: 'vendor-uuid',
    major: 1,
    minor: 2
});
Android
Kumulos.trackEventImmediately('k.engage.beaconEnteredProximity', {
    type: 1,
    uuid: 'iBeacon UUID',
    major: 1,
    minor: 2,
    proximity: 'iBeacon Proximity'
});
Messaging & Push Notifications
Kumulos provides powerful multi-channel messaging services to reach your users. By initializing the SDK you can quickly and easily receive both push notifications to re-engage your users as well as feature-rich In-App messages.
Configuration & Integration
The Kumulos SDK provides all functionality to handle push registration & notifications using FCM and APNS.
To fully integrate this, there are some steps required for each platform before you can consume pushes from the JS layer. The steps required for each platform are documented below.
Configuring APNS for iOS
To integrate Kumulos Messaging into your iOS project, you have to complete the following steps with either Key or Certificate based credentials.
- Set up APNs credentials in your Apple Developer account
- Configure Push in the Kumulos Agency Console
- Integrate SDK components with your iOS project & enable in-app messaging
- Register for push from the client app
Configure APNs
In order to generate a P8 key for Apple services first access your account at https://developer.apple.com/ and select 'Certificates, Identifiers & Profiles', then select 'Keys' on the left.
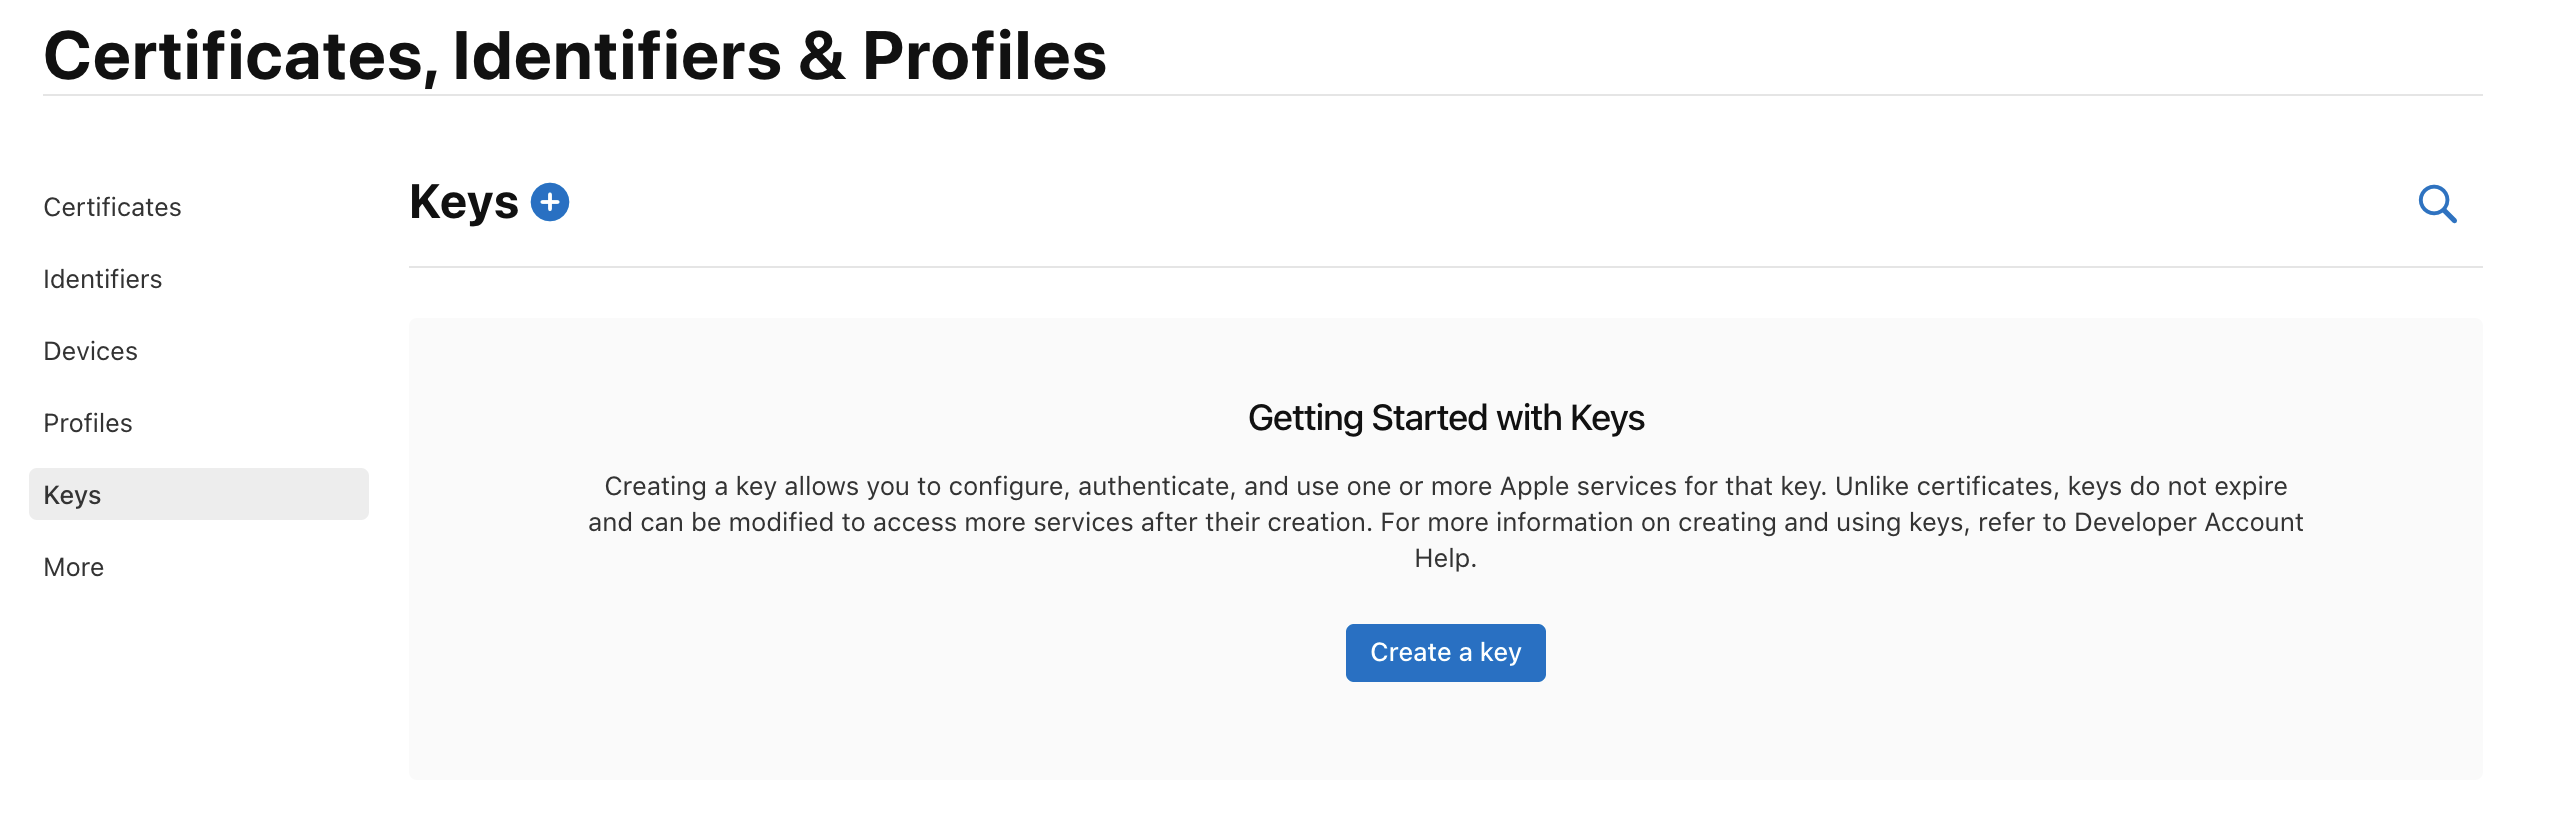
Select 'Create a Key' and on the form 'Register a New Key' enter a meaningful name such as 'APNS Access Key' and check the 'Enable' checkbox for 'Apple Push Notifications service (APNs)', click 'Continue'.
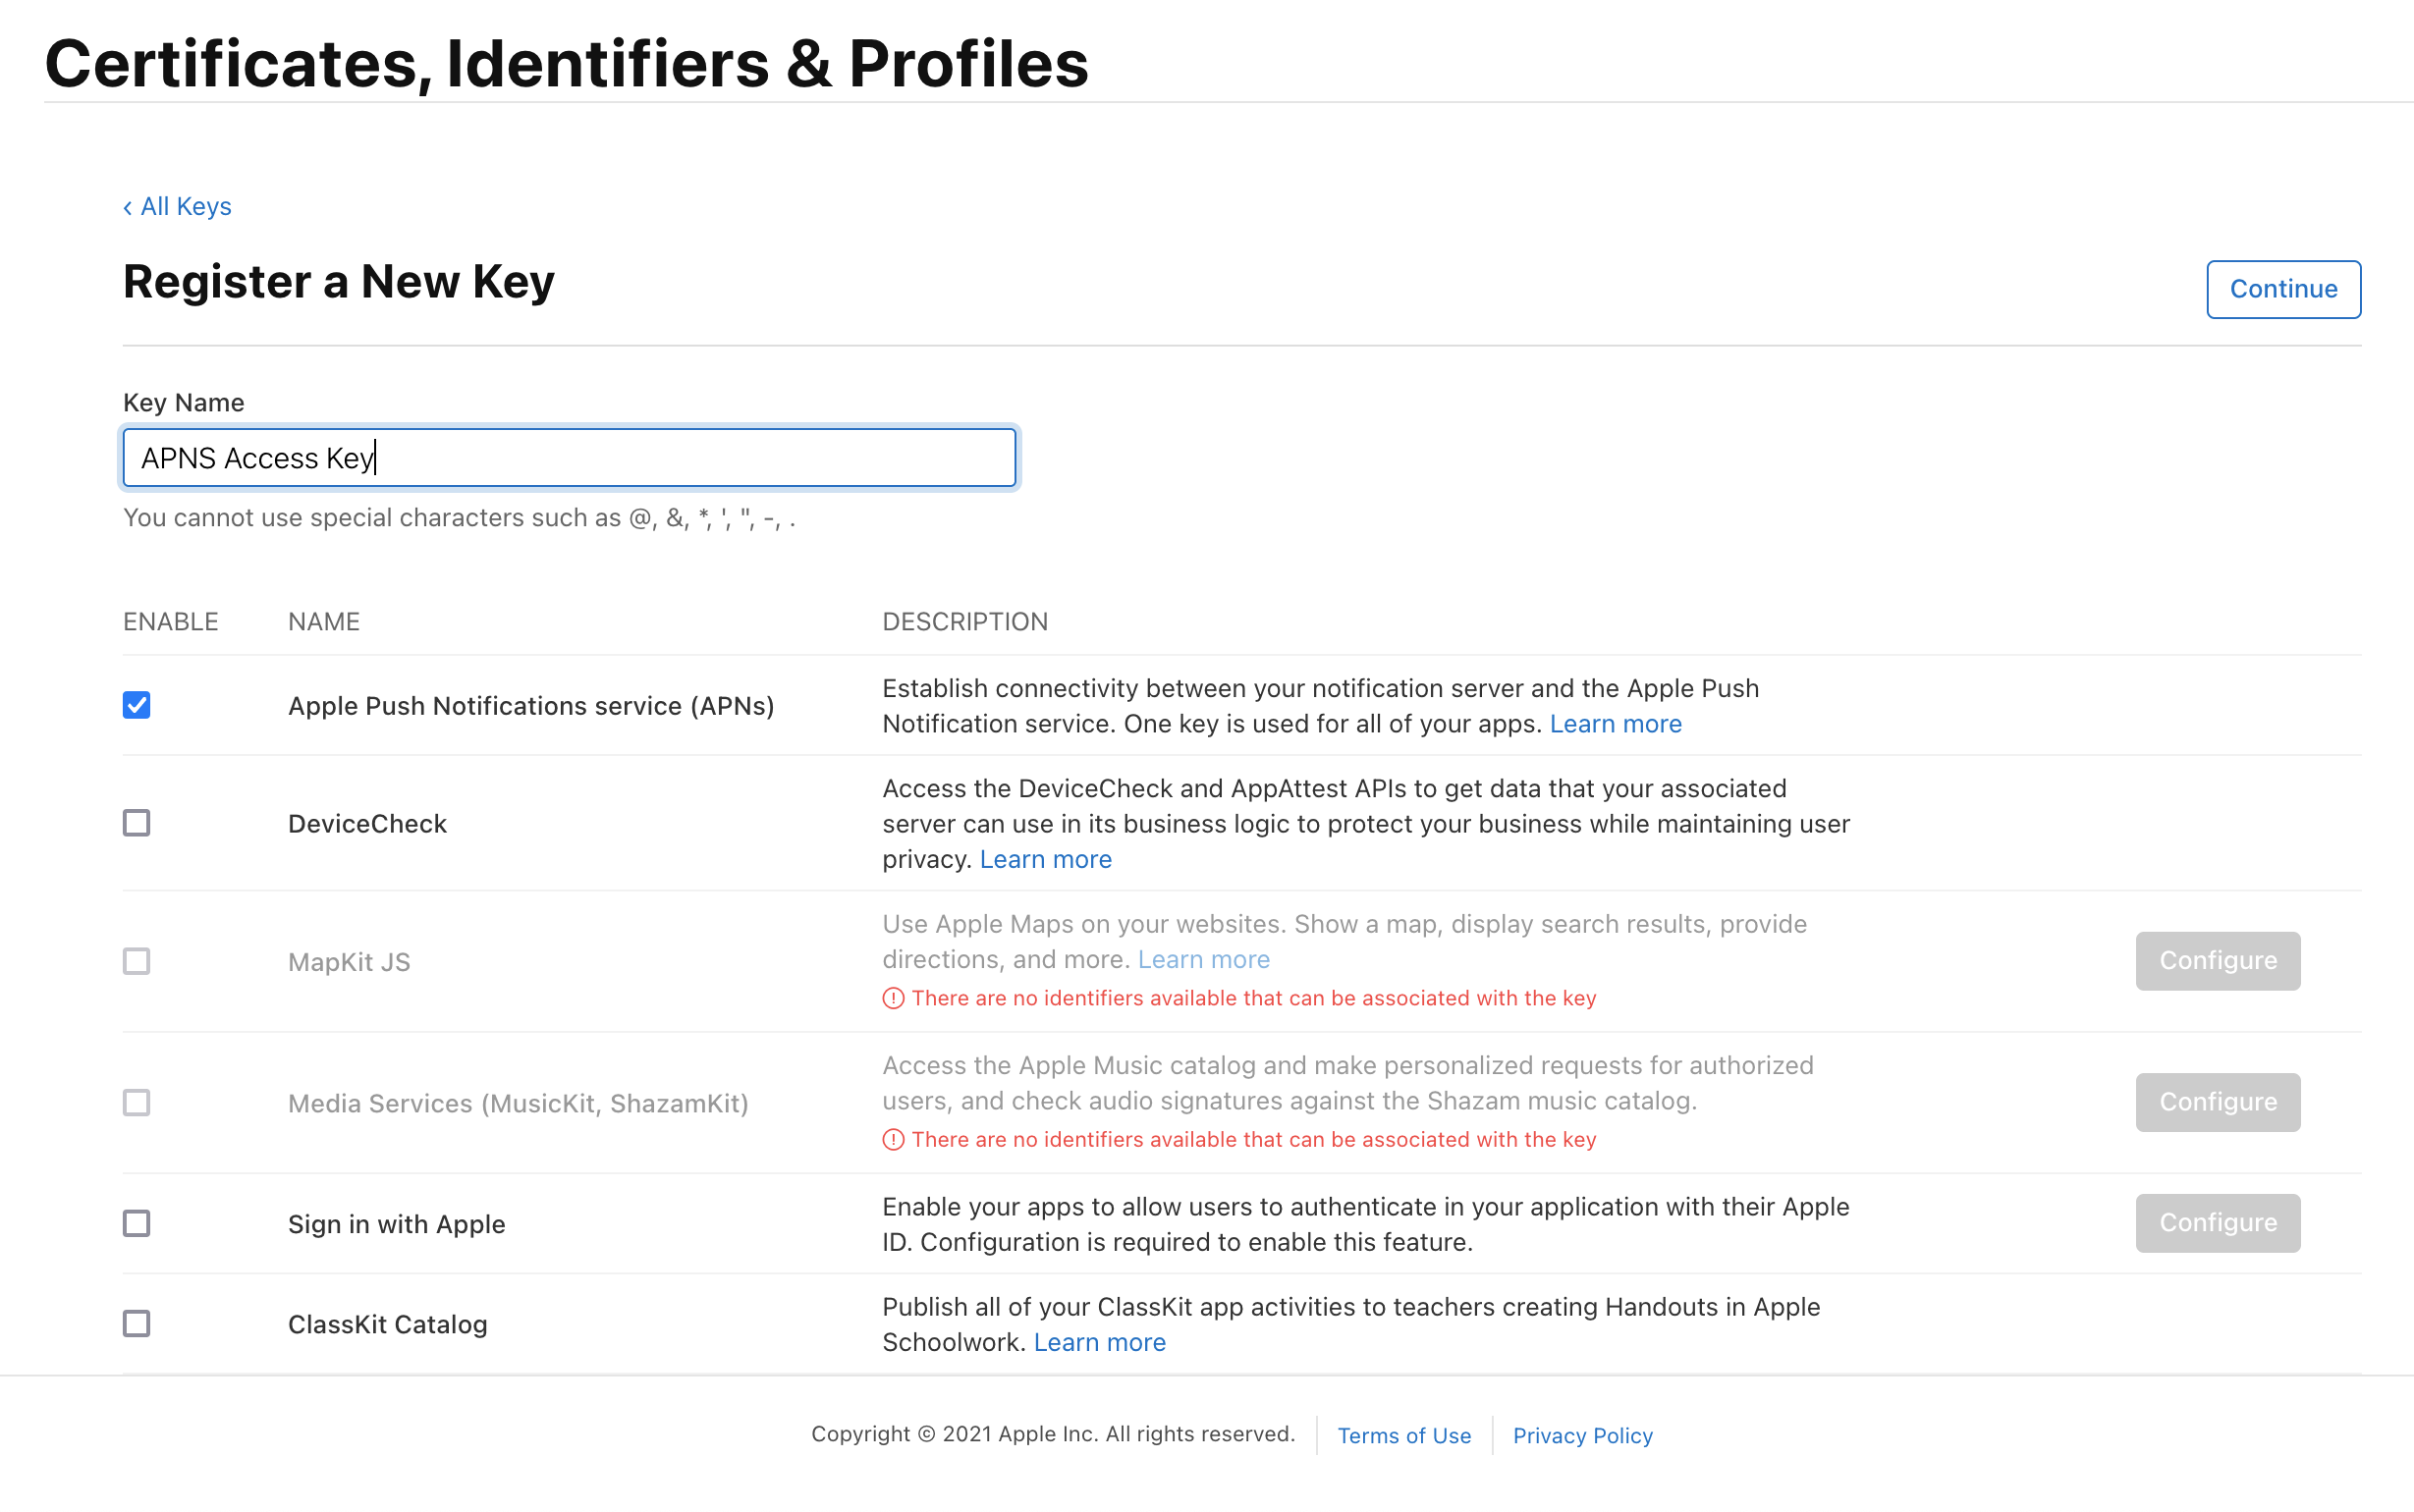
On the confirmation screen double check the APNs enablement is set then click 'Register'
On the final screen take note of your KeyID and download the key. Note that you can only download the key once, if lost the key must be revoked and re-created.
Downloading the key will save a .p8 file with the access credentials.
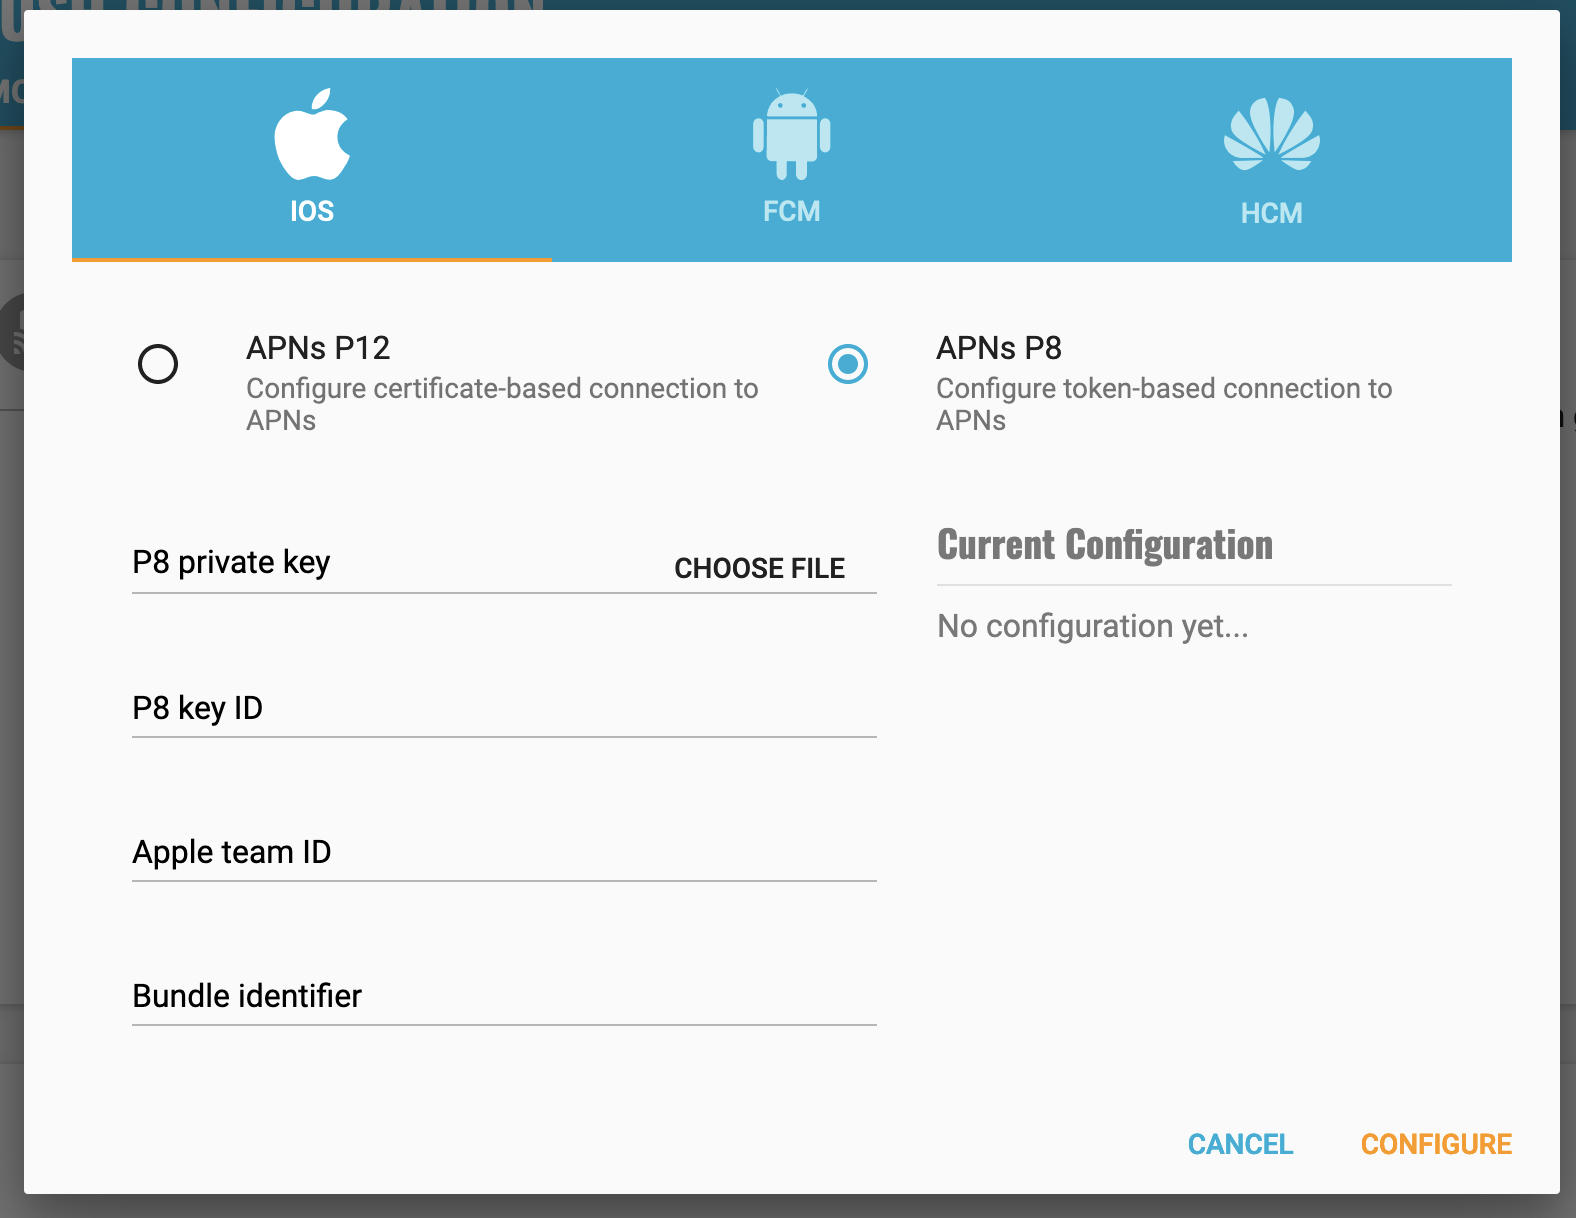
You now have all the details to configure your Kumulos App, expand 'Messaging' in the left menu, select 'Configuration' and click the cog next to the Apple icon. Select APNs P8 and select your file, enter your other details and click 'Configure'.
Configure your app capabilities and entitlements
In your app project settings use the "+ capability" button to add the App Groups, Background Modes and Push Notifications capabilities, in Background Modes you should have the "Remote Notifications" mode checked.
The video below shows how to create a push certificate on your Apple Developer portal, configure these certificates in Kumulos, and how to then configure the necessary entitlements in your iOS Xcode project.
Note, Capabilities and Background modes are especially relevant for Capacitor as these must be added manually.
Note you must use a real device to test push notifications on iOS because simulators cannot register for push notifications.
Configuring FCM for Android
The video below shows how to create a Firebase project configuration to make use of FCM to send push notifications to Android devices.
Enabling Push Notifications for Android
The key points are:
- Create a Firebase project for FCM
- Upload FCM credentials to Kumulos via the
your-project-firebase-adminsdk.jsonfile - Cordova, Ionic: Download the
google-services.jsonand add it to your project's root directory - Capacitor: Download the
google-services.jsonand add it to your project'sandroid/appdirectory - (Optional) Kumulos SDK includes Firebase Bill of Materials. You may override BoM version by adding
build-extras.gradletoplatforms/android/appwith the following content.
ext {
    // Kumulos supports [19.0.0, 22.99.99] Firebase Messaging version range,
    // which corresponds to [20.0.0, 28.99.99] Bill of Materials version range.
    KumulosFirebaseBoMVersion = "28.2.0"
}
Please note it is the Google Service Account private key JSON file that needs to be uploaded to Kumulos, not the Google Services JSON file you include in your app project. The Google Service Account JSON file can be generated from the 'Service Accounts' section of the Firebase Developer console as is shown in the relevant section of the video above.
After this setup has been completed, you can continue with the client registration.
Enabling In-App Messaging
To enable in-app messaging, edit your kumulos.json configuration as follows:
{
    "apiKey": "YOUR_API_KEY",
    "secretKey": "YOUR_SECRET_KEY",
    "enableCrashReporting": false,
    "inAppConsentStrategy": "auto-enroll"
}
To enable in-app messaging, set
- iOS:
inAppConsentStrategyinios/capacitor-cordova-ios-plugins/resources/kumulos.plisttoauto-enroll. - Android:
kumulos_in_app_consent_strategyinandroid/app/src/main/res/values/kumulos.xmltoauto-enroll.
Registering for & Handling Push Notifications
The following sample code shows how to use Kumulos to handle push notifications for deep-linking and other common messaging tasks.
Kumulos.initialize({
    apiKey: 'YOUR_API_KEY',
    secretKey: 'YOUR_SECRET_KEY',
    pushReceivedHandler: (notification) => {
        // Called when a push is received with your app in the foreground
    },
    pushOpenedHandler: (notification) => {
        // Called when a user taps on a push notification
    },
    inAppDeepLinkPressedHandler: (data) => {
        // Called when a user taps a deep-link action button from an in-app message
    }
});

// When you are ready to request the push token from the user, you would then call:
Kumulos.pushRegister();
If you want to unregister the token for the current installation, you can use Kumulos.pushUnregister().
Advanced
Checking Push Registrations
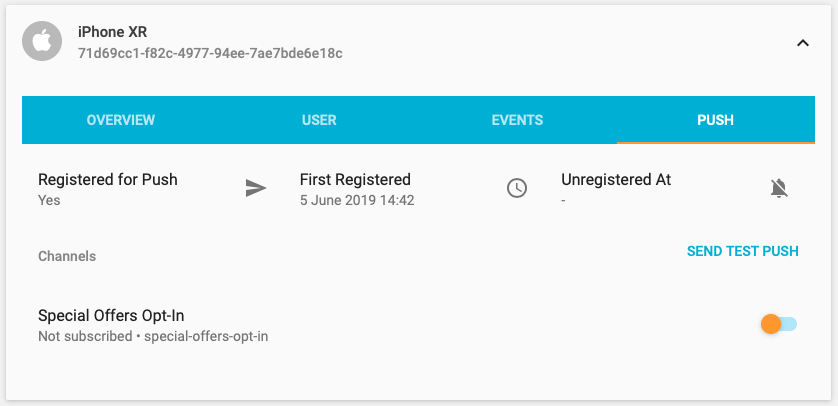
When you run your app on a simulator or install your app on a device, you can check that the install has successfully registered for push notifications by selecting the app and clicking the Installs tab to see the ten most recent installs of your app.
Click on an install, click the 'Push' tab and click Send Test Push.
If you do not receive the push notification, check the Error Log for any errors sending the push notification to the native push gateways. If you continue to experience problems, please don't hesitate to contact support who are standing by to help!
Supporting Pictures and Action Buttons in Notifications
When sending a push notification you can attach a picture or action buttons to it. They will show on iOS 10+ devices and Android devices with API level 16+.
Integrating Android
No extra steps needed.
Integrating iOS
The notification will expand upon swiping the notification on devices supporting 3D Touch. In order to enable this functionality you need open your iOS project located in platforms/ios in Xcode and add a Notification Service Extension to your application.
Make sure to correctly set up signing for the extension target.
Add the following to the Podfile generated by Cordova and run pod install.
target 'KumulosNotificationServiceExtension' do
  pod 'KumulosSdkObjectiveCExtension', '4.5.2'
end
Note the Podfile generated by Cordova may get overwritten if you install other plugins with pod dependencies. If this happens add the above lines and run
pod installagain.
Then replace the contents of NotificationService.m with the following lines:
#import "NotificationService.h"
#import <KumulosSDKExtension/KumulosNotificationService.h>

@interface NotificationService ()
@end

@implementation NotificationService
- (void)didReceiveNotificationRequest:(UNNotificationRequest *)request withContentHandler:(void (^)(UNNotificationContent * _Nonnull))contentHandler {
   [KumulosNotificationService didReceiveNotificationRequest:request withContentHandler: contentHandler];
}
@end
Supporting push delivery tracking and badges
For push delivery tracking and badges to work correctly you need to
- Set up Notification Service Extension as described above
- Add App Groups capability to your App and Notification Service Extension targets
- Set group to
group.{your.bundle.identifier}.kumulosfor both targets
Note that due to iOS limitations badge is not set when app is in the foreground
Handling notification action buttons
When a user interacts with your push message the pushOpenedHandler defined as above is called. If a button was tapped, the notification object will contain an actionId property:
Kumulos.initialize({
    ...
    pushOpenedHandler: (notification) => {
        console.log(notification.actionId);
    },
});
Managing In-App User Consent
If you would like your users to opt-in to receive In-App messages you can configure the SDK during initialization to make opt-in explicit by setting the strategy, then calling the SDK helper to manage their consent.
Edit your kumulos.json configuration as follows:
{
    "apiKey": "YOUR_API_KEY",
    "secretKey": "YOUR_SECRET_KEY",
    "enableCrashReporting": false,
    "inAppConsentStrategy": "explicit-by-user"
}
To enable explicit opt-in, set
- iOS:
inAppConsentStrategyinios/capacitor-cordova-ios-plugins/resources/kumulos.plisttoexplicit-by-user. - Android:
kumulos_in_app_consent_strategyinandroid/app/src/main/res/values/kumulos.xmltoexplicit-by-user.
Once the configs have been set, you can now manage consent from the JS layer:
Kumulos.inAppUpdateConsentForUser(true);
Note managing consent explicitly with the 'auto-enroll' strategy is not supported and will result in a runtime exception
Deep-linking for In-App
In-App messages allow you to hand-off to cordova application screens via deep-linking action buttons. When tapped, these buttons pass control to the defined deep-link handler, including their defined data payload (configured in the In-App message composer for the action button).
Kumulos.initialize({
    ...,
    inAppDeepLinkPressedHandler: (data) => {
        // Called when a user taps a deep-link action button from an in-app message
    }
});
Using the In-App Inbox
In-app messages can optionally be persisted in a user-level inbox for later retrieval. This allows you to build features such as loyalty rewards or expiring coupons into your app. Regardless of whether they are stored in the inbox, the maximum amount of in-apps stored on a device is 50 (the oldest messages exceeding this limit will be evicted).
Retrieve messages
To retrieve a list of messages from the user's inbox and present the first in the list, see the following example:
Kumulos.inAppGetInboxItems().then(function (items) {
  Kumulos.inAppPresentInboxMessage(items[0]);
});
Mark as read
To mark a single or all inbox messages as read:
//single
Kumulos.getInboxItems().then(function (items) {
  Kumulos.markAsRead(items[0]);
});

//all
Kumulos.markAllInboxItemsAsRead();
Delete message
You can also delete an in-app message from inbox:
Kumulos.inAppGetInboxItems().then(function (items) {
  Kumulos.inAppDeleteMessageFromInbox(items[0]);
});
Inbox updated handler
In order to be notified when inbox changes you may set up a handler. The handler fires when one of the following happens to an in-app with an inbox configuration:
- message fetched from server
- message opened
- message marked as read
- message deleted
- message evicted (expires or limit of stored messages exceeded)
You can use it as follows:
Kumulos.setOnInboxUpdatedHandler(() => {
  //refresh your inbox
});
Note, you can do
Kumulos.setOnInboxUpdatedHandler(null)when you stop being interested in inbox updates.
Get inbox summary
You can retrieve an inbox summary as follows:
Kumulos.getInboxSummary()
  .then((summary) => {
    console.log(
      "total: " + summary.totalCount + " unread: " + summary.unreadCount
    );
  })
  .catch(() => {
    console.log("failed to get inbox summary!");
  });
Get inbox item's image URL
Each inbox item may have an image associated with it. imageUrl returns a URL to the image resized to 300px width or null if there is no image.
Kumulos.getInboxItems().then(function (items) {
    // Image resized to 300px width
    const url = items[0].imageUrl;
}
Note if the message was created through the API (as opposed to Kumulos Messaging Dashboard) and contains a full URL to an image hosted elsewhere,
imageUrlcontains original URL without any resizing applied.
Channels
The SDK provides methods for subscribing the app installation to push notification channels. These methods are accessed from the client's pushChannels manager property. The interface is declared as follows:
interface PushChannel {
    uuid: String;
    name?: String;
    subscribed: Boolean;
    meta?: any;
}

interface ChannelSpec {
    uuid: String;
    subscribe: Boolean;
    meta?: any;
    name?: String;
    showInPortal?: Boolean;
}

interface PushChannelManager {
    subscribe(uuids: String[]): Promise<Response>;
    unsubscribe(uuids: String[]): Promise<Response>;
    setSubscriptions(uuids: String[]): Promise<Response>;
    clearSubscriptions(): Promise<Response>;
    listChannels(): Promise<PushChannel[]>;
    createChannel(channelSpec: ChannelSpec): Promise<PushChannel>;
}
For example, to list push channels:
Kumulos.getPushSubscriptionManager()
    .listChannels()
    .then(channels => console.log(channels))
    .catch(err => console.error(err));
This will return a list of all public channels (as well as any private channels this install is subscribed to) along with a boolean for whether or not this install is subscribed to that channel. For each channel, you will get:
{
    'uuid',
    'name',
    'meta',
    'subscribed'
}
When creating channels, you can control the visibility and add meta-data.
Build
You can call API methods defined in the Kumulos Build service using the Kumulos.call method.
To talk to Kumulos, you need three things:
- your method title (in
lowerCamelCase) - a method parameters map (field names are also in
lowerCamelCase) - some response handler code
Example code to make an API call is shown below:
var params = {}
params.name = $('#name').val()
params.email = $('#email').val()
params.password = $('#password').val()

Kumulos.call('createCustomer', params).then(function (result) {
    // Handle result
});
Crash
Crash reporting allows you to track unhandled exceptions in your app, and optionally log any caught exceptions for further investigation. Crash reporting is not enabled by default. To enable this feature, modify your Kumulos configuration as follows.
Edit your kumulos.json configuration:
{
    "apiKey": "YOUR_API_KEY",
    "secretKey": "YOUR_SECRET_KEY",
    "enableCrashReporting": true,
    "inAppConsentStrategy": "in-app-disabled"
}
To enable crash reporting, set
- iOS:
enableCrashReportinginios/capacitor-cordova-ios-plugins/resources/kumulos.plisttotrue. - Android:
kumulos_enable_crash_reportinginandroid/app/src/main/res/values/kumulos.xmltotrue.
In your app's JavaScript:
Kumulos.initialize({
    apiKey: 'YOUR_API_KEY',
    secretKey: 'YOUR_SECRET_KEY',
    enableCrashReporting: true
});
That's it! Unhandled exceptions that lead to crashes will now be recorded automatically and shown in your App Delivery Console.
For Cordova & Ionic & Capacitor, the crash reporting feature includes both native code crash reporting, and JavaScript error reporting. Native code crash reporting would catch crashes of the Cordova host process, whilst JavaScript error reporting catches unhandled errors in your application source code.
Source Mapping
If you use a bundling or minification step for your JavaScript sources, you can upload source maps to allow us to show source file locations in your error reports rather than the position in the minified bundle.
In order to use source maps you must take the following actions:
- Configure your build tool to output source maps for your bundle
- Set the
sourceMapTagfield in the Kumulos initialization options - Upload source maps matching the version of the configured
sourceMapTag
For example:
Kumulos.initialize({
    apiKey: 'YOUR_API_KEY',
    secretKey: 'YOUR_SECRET_KEY',
    enableCrashReporting: true,
    // Configure the version for the source maps
    sourceMapTag: '1.0.0-rc1'
});
Now you would upload the source maps for version 1.0.0-rc1 to the Crash Dashboard in your App Delivery Console.
If you are automating your builds, you can upload the source maps from your CI environment. See the following sample script for reference.
#!/bin/sh
## TODO set version to match the configured sourceMapTag in the SDK init options
VERSION=''

## TODO set up the keys from your App Dashboard
API_KEY='YOUR_API_KEY'
SERVER_KEY='YOUR_SERVER_KEY'

## TODO customize the archiving step to include your source maps
zip -r maps.zip sourcemaps

UPLOAD_URL='https://crash.kumulos.com/sourcemaps'

curl --fail --retry 3 --retry-delay 3 --user "$API_KEY:$SERVER_KEY" -X POST -F version="$VERSION" -F file="@maps.zip" "$UPLOAD_URL"
rm maps.zip
Ionic Error Reporting
To integrate JavaScript error reporting with your Ionic project, you need to define a custom error handler in src/app/app.module.ts.
export class KumulosErrorHandler implements ErrorHandler {
  handleError(err: any): void {
    Kumulos.logUncaughtException(err);
  }
}
In the NgModule configuration, you would then set the error provider item as follows:
{provide: ErrorHandler, useClass: KumulosErrorHandler}
Troubleshooting
iOS: Plugin Installation Code 31
CocoaPods dependency installation can fail if the target build environment has out of date local pod spec definitions. To remedy this, simply run pod repo update prior to executing the Cordova plugin setup.
Add the following script to your project root as pods_update.sh and make it executable:
#!/bin/sh
## This script ensures the local CocoaPods spec repo is up to date
## before installing plugins. It is run as a cordova platform hook.
pod repo update
Add the hook to your config.xml:
...
<platform name="ios">
    <hook src="pods_update.sh" type="before_platform_add" />
...
iOS: Build Failure, Linker Error
If your iOS app builds fail due to missing libraries during the link step, it may be necessary to run the CocoaPods dependency installation step during your build script.
Add the following script to your project root as pods_install.sh and make it executable:
#!/bin/sh
## This script ensures CocoaPods are correctly set up in the iOS project
## when installing plugins which depend on pods.
pod install --project-directory=/platforms/ios
Add the hook to your config.xml:
...
<platform name="ios">
    <hook src="pods_install.sh" type="after_platform_add" />
...
Android: Requesting WAKE_LOCK permission on API level 26+
Due to an issue with ACRA (a dependency used for crash reporting features), requesting the WAKE_LOCK permission on Android API level 26+ may cause crashes in your application.
The solution is to replace the permission request ACRA makes in your manifest with one which targets all API levels.
For example, you can use the cordova config-file entry in config.xml to replace the permission:
<platform name="android">
    <config-file target="AndroidManifest.xml" parent="/manifest">
        <uses-permission android:name="android.permission.WAKE_LOCK" tools:node="replace" />
    </config-file>
</platform>
Changelog
5.1.0
- Added support for notification channels on Android
5.0.0
- Allow marking in-app messages as read
- Allow setting
onInboxUpdatedhandler, see docs above - Add
getInboxSummaryhelper method, see docs above - Expose extra fields on InAppInboxItem:
sentAt,dataandimagePath - Use latest base SDKs. On android it means relying on androidx
- On Android depend on FM BoM added by SDK, consumers can override used version
Upgrade Guide (Android)
- Update your project to use androidx. Follow android migration guides.
- Minimal supported Cordova version is 9.0.0, consequently minSdkVersion is 22. Update your project if necessary.
4.2.0
- In-App inbox deletion
iOS
- Delivery tracking
- Incrementing badges
You need to set up App Groups and add Notification Service Extension as described above for delivery tracking and badges to work.
Android
- Support custom sounds for notification
- Show "sent when" on notification
- Set long text style for allowing reading longer messages
4.1.0
- Support for in-app message expiry
- Support pictures in push notifications
- Support push action buttons
4.0.0
- Add In-App Messaging feature
- Add native Push Notifications support
- Update base SDKs
Upgrade Guide
- Initialization now requires a
kumulos.jsonfile in addition to the JS initialization code Kumulos.pushTrackOpenhas been removed (now handled by the SDK)Kumulos.pushRequestDeviceTokenhas been renamedKumulos.pushRegisterKumulos.pushRemoveDeviceTokenhas been renamedKumulos.pushUnregister- Push registrations & notifications are now handled by the SDK so existing 3rd-party push plugins are no longer required
3.2.0
- Add helper to get currently associated user identifier
- Add helper to clear any current user association
- Update to Kumulos Android SDK 6.0.0
- Update to Kumulos Objective-C SDK 1.7.0
3.1.2
- Record exceptions occurring during lazy init of crash reporting service
3.1.1
- Record foreground events from initializer where native listeners are too early
3.1.0
- Add JavaScript error reporting support
- New config option to support source maps in JS error reporting
- Fix header search paths issue with iOS builds when built from the CLI instead of Xcode
3.0.0
- Analytics event tracking with batched background sync
- Session analytics events
- Beacon proximity event tracking helpers
- User association helper
Also publish TypeScript source files.
2.1.0
- Add helper to send geolocation updates
- Add additional fields to stats payloads
- Add convenience for getting install ID
2.0.2
- Add type definitions file for easier integration with TypeScript projects
2.0.1
- Remove
base64-js
2.0.0
- Removes the
es6-promisepolyfill from the plugin bundle to reduce bundle size & improve interoperability for environments that include their own polyfilled or native Promise implementations.
1.1.0
- Add the ability to create push channels and manage subscription to push channels
1.0.2
- Set correct SDK version in stats module
1.0.1
- Fix issue with parameter encoding for RPC API calls
1.0.0
- Initial SDK release
Acknowledgements
We would like to thank to Travis Kriel from Sketch Advertising in South Africa for diligently correcting a mistake in this guide.