Xamarin
Integration
Kumulos provides an SDK in the form of a NuGet package to ease the integration of the Kumulos Analytics, Push Notification, Crash Reporting and Build features into your Xamarin apps. This guide provides an overview of setting up the SDK for your project and sample usage.
Integrate SDK components
The Kumulos SDK is an open source project hosted on Github. You can find a link to the project in your agency console and here: https://github.com/Kumulos/KumulosSdkXamarin. It is distributed via a NuGet package for referencing in your apps.
Initialization
To configure the SDK for use you need to initialize it with your app's API credentials, and configure it for the features you wish to use.
Your API Key and Secret Key can be obtained from the App Dashboard in your agency console.
iOS
The initialization should be performed early in your FinishedLaunching method in AppDelegate.cs
Android
Initialization should be performed by overriding the MainActivity class and adding extra initialization after the framework OnCreate method has completed.
using KumulosSDK.DotNet;
using KumulosSDK.DotNet.Abstractions;

...

Kumulos.CurrentConfig.AddKeys("YOUR_API_KEY", "YOUR_SECRET_KEY")
    .EnableInAppMessaging(InAppConsentStrategy.AutoEnroll);

Kumulos.Current.Initialize(Kumulos.CurrentConfig);
You don't need to initialize the Kumulos SDK every time you wish to make an API call. It only needs to be initialized once, after which it will remember the API key and secret key you've given it the first time.
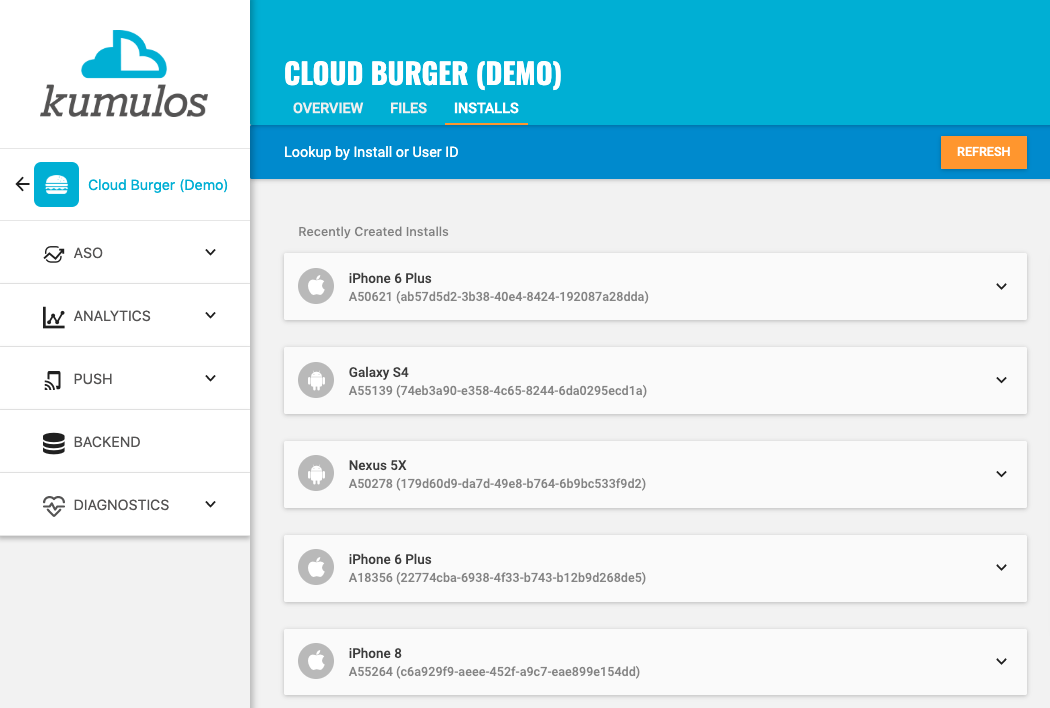
Checking installs of your App
When you run your app on a simulator or install your app on a device, you can check that the SDK has been initialized correctly by selecting the app and clicking the Installs tab to see the ten most recent installs of your app. Click on any install to see more information.
If you experience any difficulties integrating an SDK or initializing the Kumulos client, please don't hesitate to contact support who are standing by to help!
Installation ID
When initialized for the first time, the Kumulos SDK will create a unique identifier for the current installation. This identifier can be used to target push notifications to a specific device via KScript or the Push Notifications API.
In order to retrieve this identifier, simply access the property from the SDK:
string id = Kumulos.Current.InstallId
Once you have the installation ID, you can send it to your app's backend to be used later for push targeting. For more information about push targeting, please see the KScript Documentation or push notification documentation as appropriate.
Analytics
So long as you initialize the SDK at some point in your app's lifecycle, Kumulos will automatically record analytics data such as the device model, operating system version and more, available in Analytics & Reporting for your app.
Session Analytics
Kumulos records sessions based on application foreground and background events. When an app enters the background, Kumulos will wait for a configurable idle period. If there are no more foreground events during that idle period, the current session will be closed.
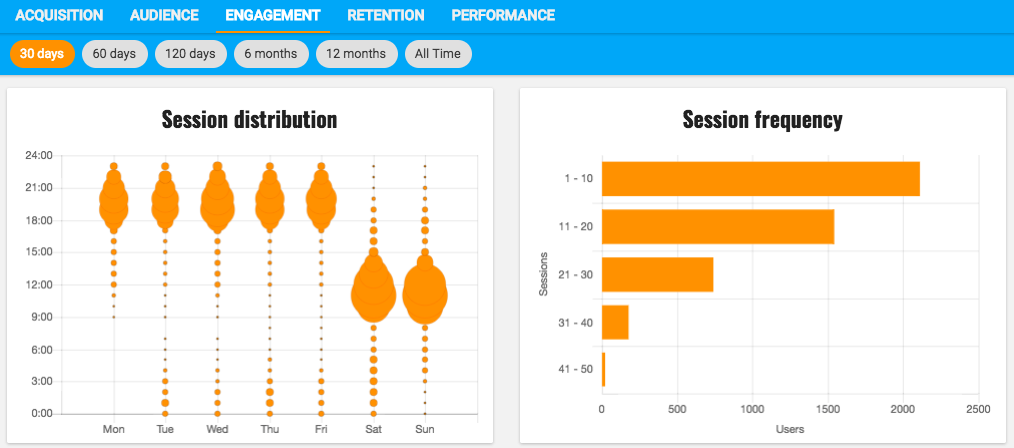
You can configure the idle period to suit your app's use-case. By default the idle period is 40 seconds of inactivity. The idle period does not count towards session duration calculations.
To adjust the idle period, you can configure the SDK as follows:
Kumulos.CurrentConfig.AddKeys("YOUR_API_KEY", "YOUR_SECRET_KEY")
    .SetSessionIdleTimeout(120);

Kumulos.Current.Initialize(Kumulos.CurrentConfig);
Note that due to background task limits, in practise the idle timeout can only reasonably be up to a few minutes
Event Tracking
Kumulos allows you to track custom analytics events that can be used as a trigger to fire automation rules (e.g. to trigger a push notification) or as steps in a funnel to track conversion through key user journeys in your app.

To track a custom analytics event, use Kumulos.Current.TrackEvent as follows:
var props = new Dictionary<string, object>
{
   { "productId", 404 }
};
Kumulos.Current.TrackEvent("product.purchased", props);
Each event and its properties must be less than 250 KiB in size for the event to be tracked.
Event tracking is available offline as all events are persisted locally before being synced to the server in batches in the background.
A similar method
TrackEventImmediatelywill immediately start an event sync rather than waiting for the next time the app is backgrounded.
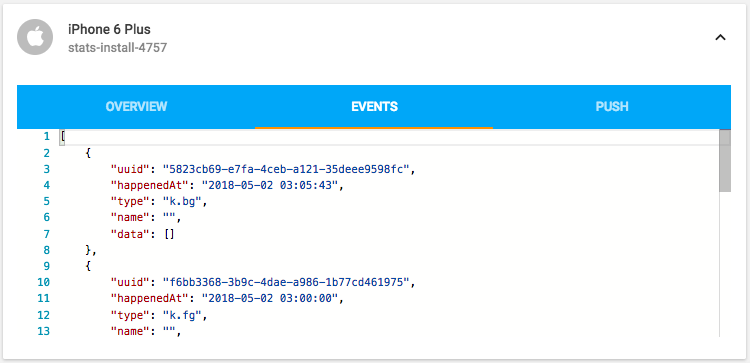
Checking events from your App
When you run your app on a simulator or install your app on a device, you can check that the SDK is recording events correctly by selecting the app and clicking the Installs tab to see the ten most recent installs of your app. Click on any install and then click on the Events tab.
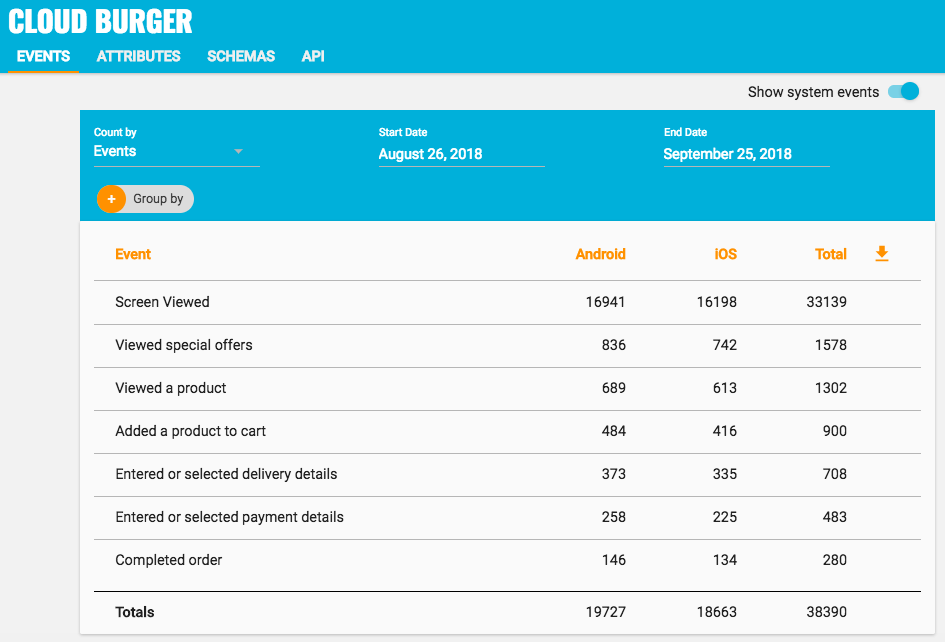
Alternatively, to see counts of all analytics events, including system events such as opened a push notification, recorded by installs of the app in the last 30 days, expand 'Analytics' and click 'Explore' in the left menu. For comparison, the total number of sessions in the same period is shown.
User Association
Kumulos allows associating a user identifier with the current installation ID. This user identifier is useful for performing analytics aggregations & analyses at the user level, for example, funnels completed by users across multiple devices. You can also optionally associate a collection of attributes with the user.
To associate the current app installation with a user, you can use the helper method as shown below:
Kumulos.Current.AssociateUserWithInstall("unique-user-identifier");
User association is time-aware, so in the case of two different users sharing a device to log in to the app, their user IDs will be associated with the same install for the time between subsequent calls to the helper method. For example:
Kumulos.Current.AssociateUserWithInstall("Bob")

// This event will belong to Bob
var firstProps = new Dictionary<string, object>
{
   { "productId", 404 }
};
Kumulos.Current.TrackEvent("product.purchased", firstProps);
Kumulos.Current.AssociateUserWithInstall("Alice")

// This event will belong to Alice
var secondProps = new Dictionary<string, object>
{
   { "productId", 405 }
};
Kumulos.Current.TrackEvent("product.purchased", secondProps);
User Identifier
When initialized for the first time, the Kumulos SDK will create an unauthenticated user for the current device based on the installation Id. This can be updated at any time by associating your own user identifier as seen above, in order to retrieve this identifier, simply access the property from the SDK:
string identifier = Kumulos.Current.UserIdentifier;
Clearing association
If your app supports signing out or you wish to clear the current user association from the device then you can call the helper method, any subsequent events occurring on the device will be attributed to an anonymous user until the next association occurs.
Kumulos.Current.ClearUserAssociation();
Location Tracking
You can send Kumulos location updates and use this to trigger automations such as sending push notifications when an install enters a GeoFence.
iOS
Once you have created a CLLocationManagerDelegate you can use the helper method in the SDK to send location updates to Kumulos, a reference implementation of a LocationManager has been provided.
CLLocation location;
Kumulos.Current.SendLocationUpdate(location.Coordinate.Latitude, location.Coordinate.Longitude);
How you configure the Core Location services for iOS depends on the specific use case of your app. You should consider both accuracy and battery life when making this decision. Refer to the Apple documentation for details of how to configure location services.
To use the reference implementation simply construct a LocationManager and maintain a reference to it for the lifetime of your app.
using KumulosSDK.DotNet;
...
public class AppDelegate : UIApplicationDelegate
{
...
    public static LocationManager Manager { get; set; }
...
    Manager = new LocationManager();
    Manager.StartLocationUpdates();
...
}
Android
A helper method is supplied in the SDK to send a location update to Kumulos.
Kumulos.Current.SendLocationUpdate(double lat, double lng);
Beacons
You can send Kumulos beacon proximity updates and use these to trigger automations such as sending a push notification when an install is in proximity to a beacon.
iBeacon
iOS
The Kumulos SDK provides a helper method to notify our services of proximity to a detected beacon.
How you configure the Core Location services for iOS depends on the use case for your app and you should consider throttling how regularly these events are transmitted for both battery life and network traffic.
Kumulos.Current.TrackiBeaconProximity(CLBeacon beacon);
The SDK includes a reference implementation of setting up and tracking beacons, although this does not feature any throttling and is designed to provide a quick start for development.
Android
On Android, you can manually notify Kumulos of proximity to a detected iBeacon as follows.
var props = new Dictionary<string, object>
{
    { "type", 1 },
    { "uuid", [iBeacon UUID] },
    { "major", [iBeacon Major ID] },
    { "minor", [iBeacon Minor ID] },
    { "proximity", [iBeacon Proximity] }
};
Kumulos.Current.TrackEventImmediately("k.engage.beaconEnteredProximity", props);
Eddystone Beacon Detection
On Android, you can send Kumulos Eddystone proximity updates via the helper method in the SDK.
Kumulos.Current.TrackEddystoneBeaconProximity(string namespaceHex, string instanceHex, double distanceMetres);
Messaging & Push Notifications
Kumulos provides powerful multi-channel messaging services to reach your users. By initializing the SDK you can quickly and easily receive both push notifications to re-engage your users as well as feature-rich In-App messages.
Configuration & Setup
To integrate into your Xamarin project, you have to complete the following steps:
- Integrate and Initialize the Kumulos SDK
- Set up FCM and APNS
- Configure Push in the Kumulos Agency Console
- Integrate SDK components with your Xamarin project
- Register to receive push and in-app messages from your app
APNs setup
To integrate Kumulos Messaging into your iOS project, you have to complete the following steps with either Key or Certificate based credentials.
Configure APNs
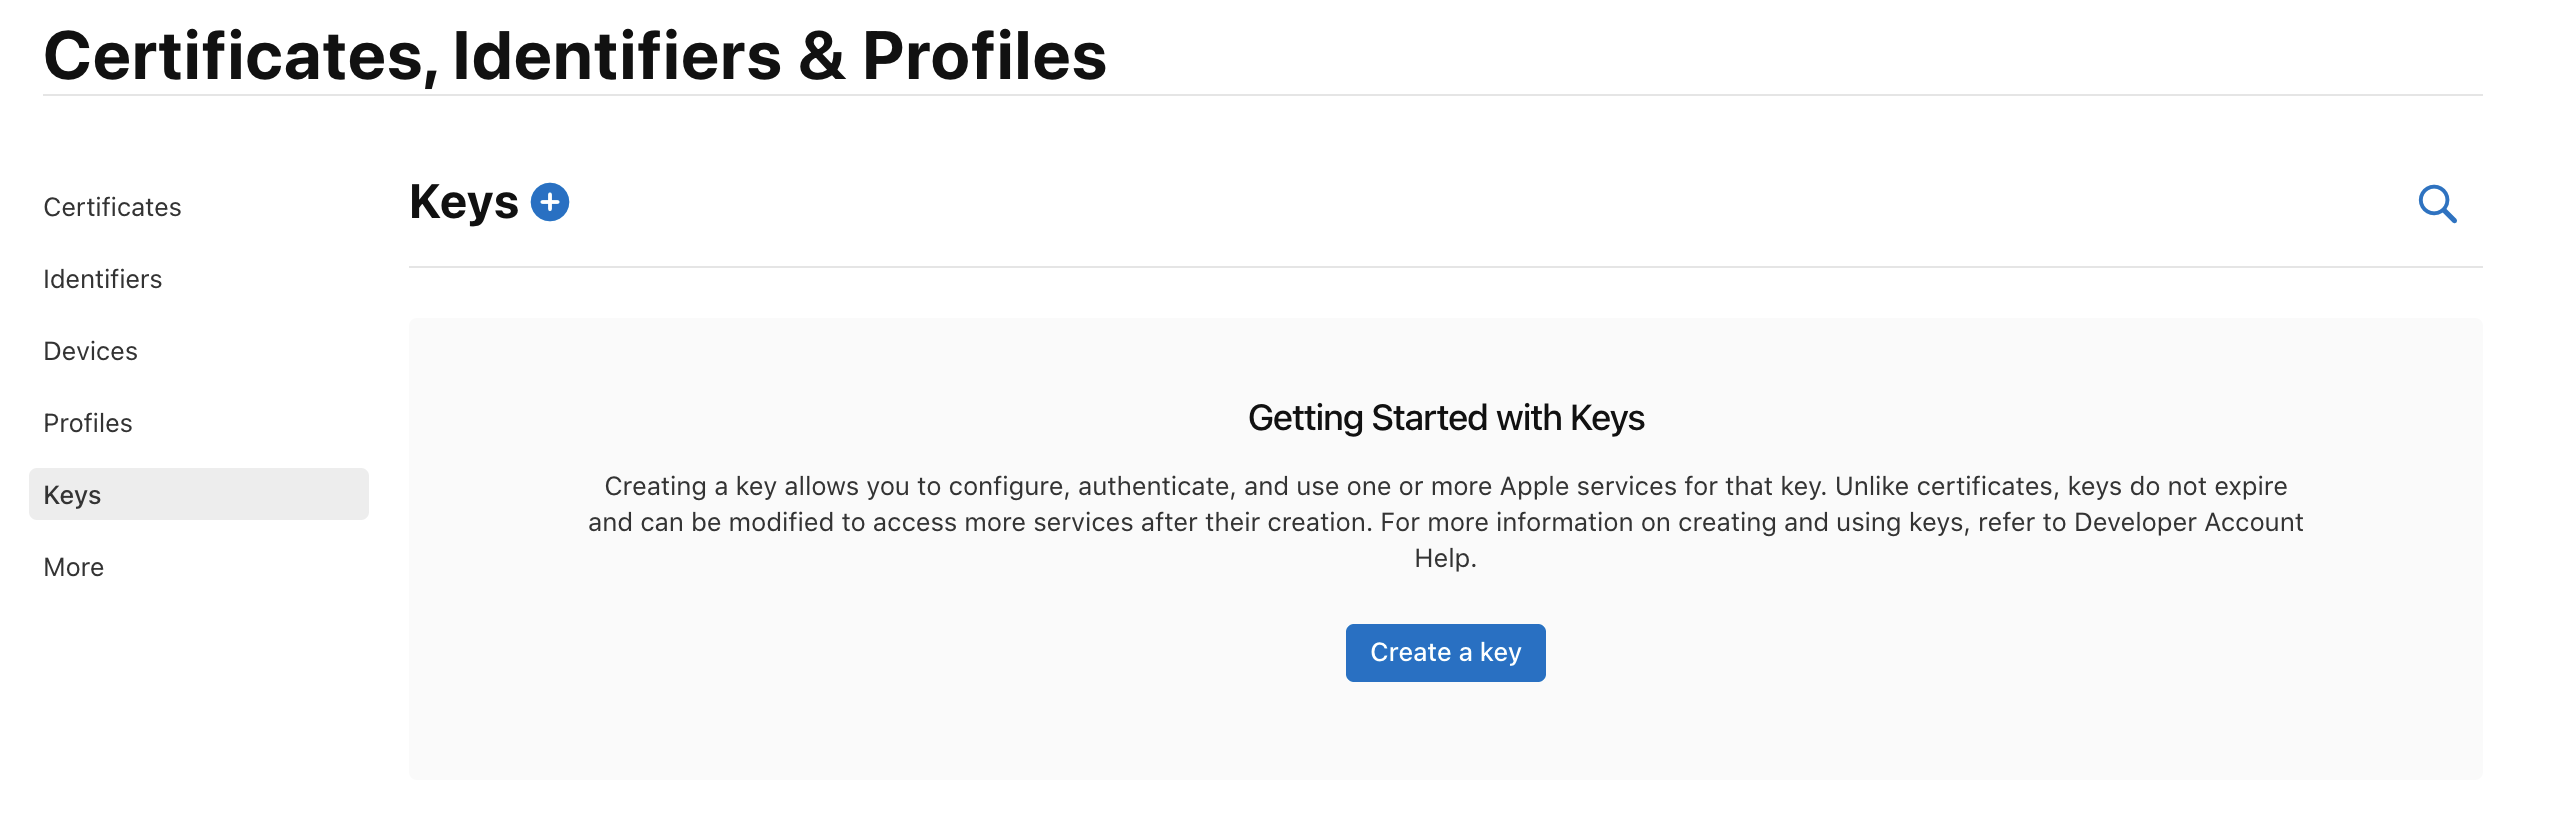
In order to generate a P8 key for Apple services first access your account at https://developer.apple.com/ and select 'Certificates, Identifiers & Profiles', then select 'Keys' on the left.
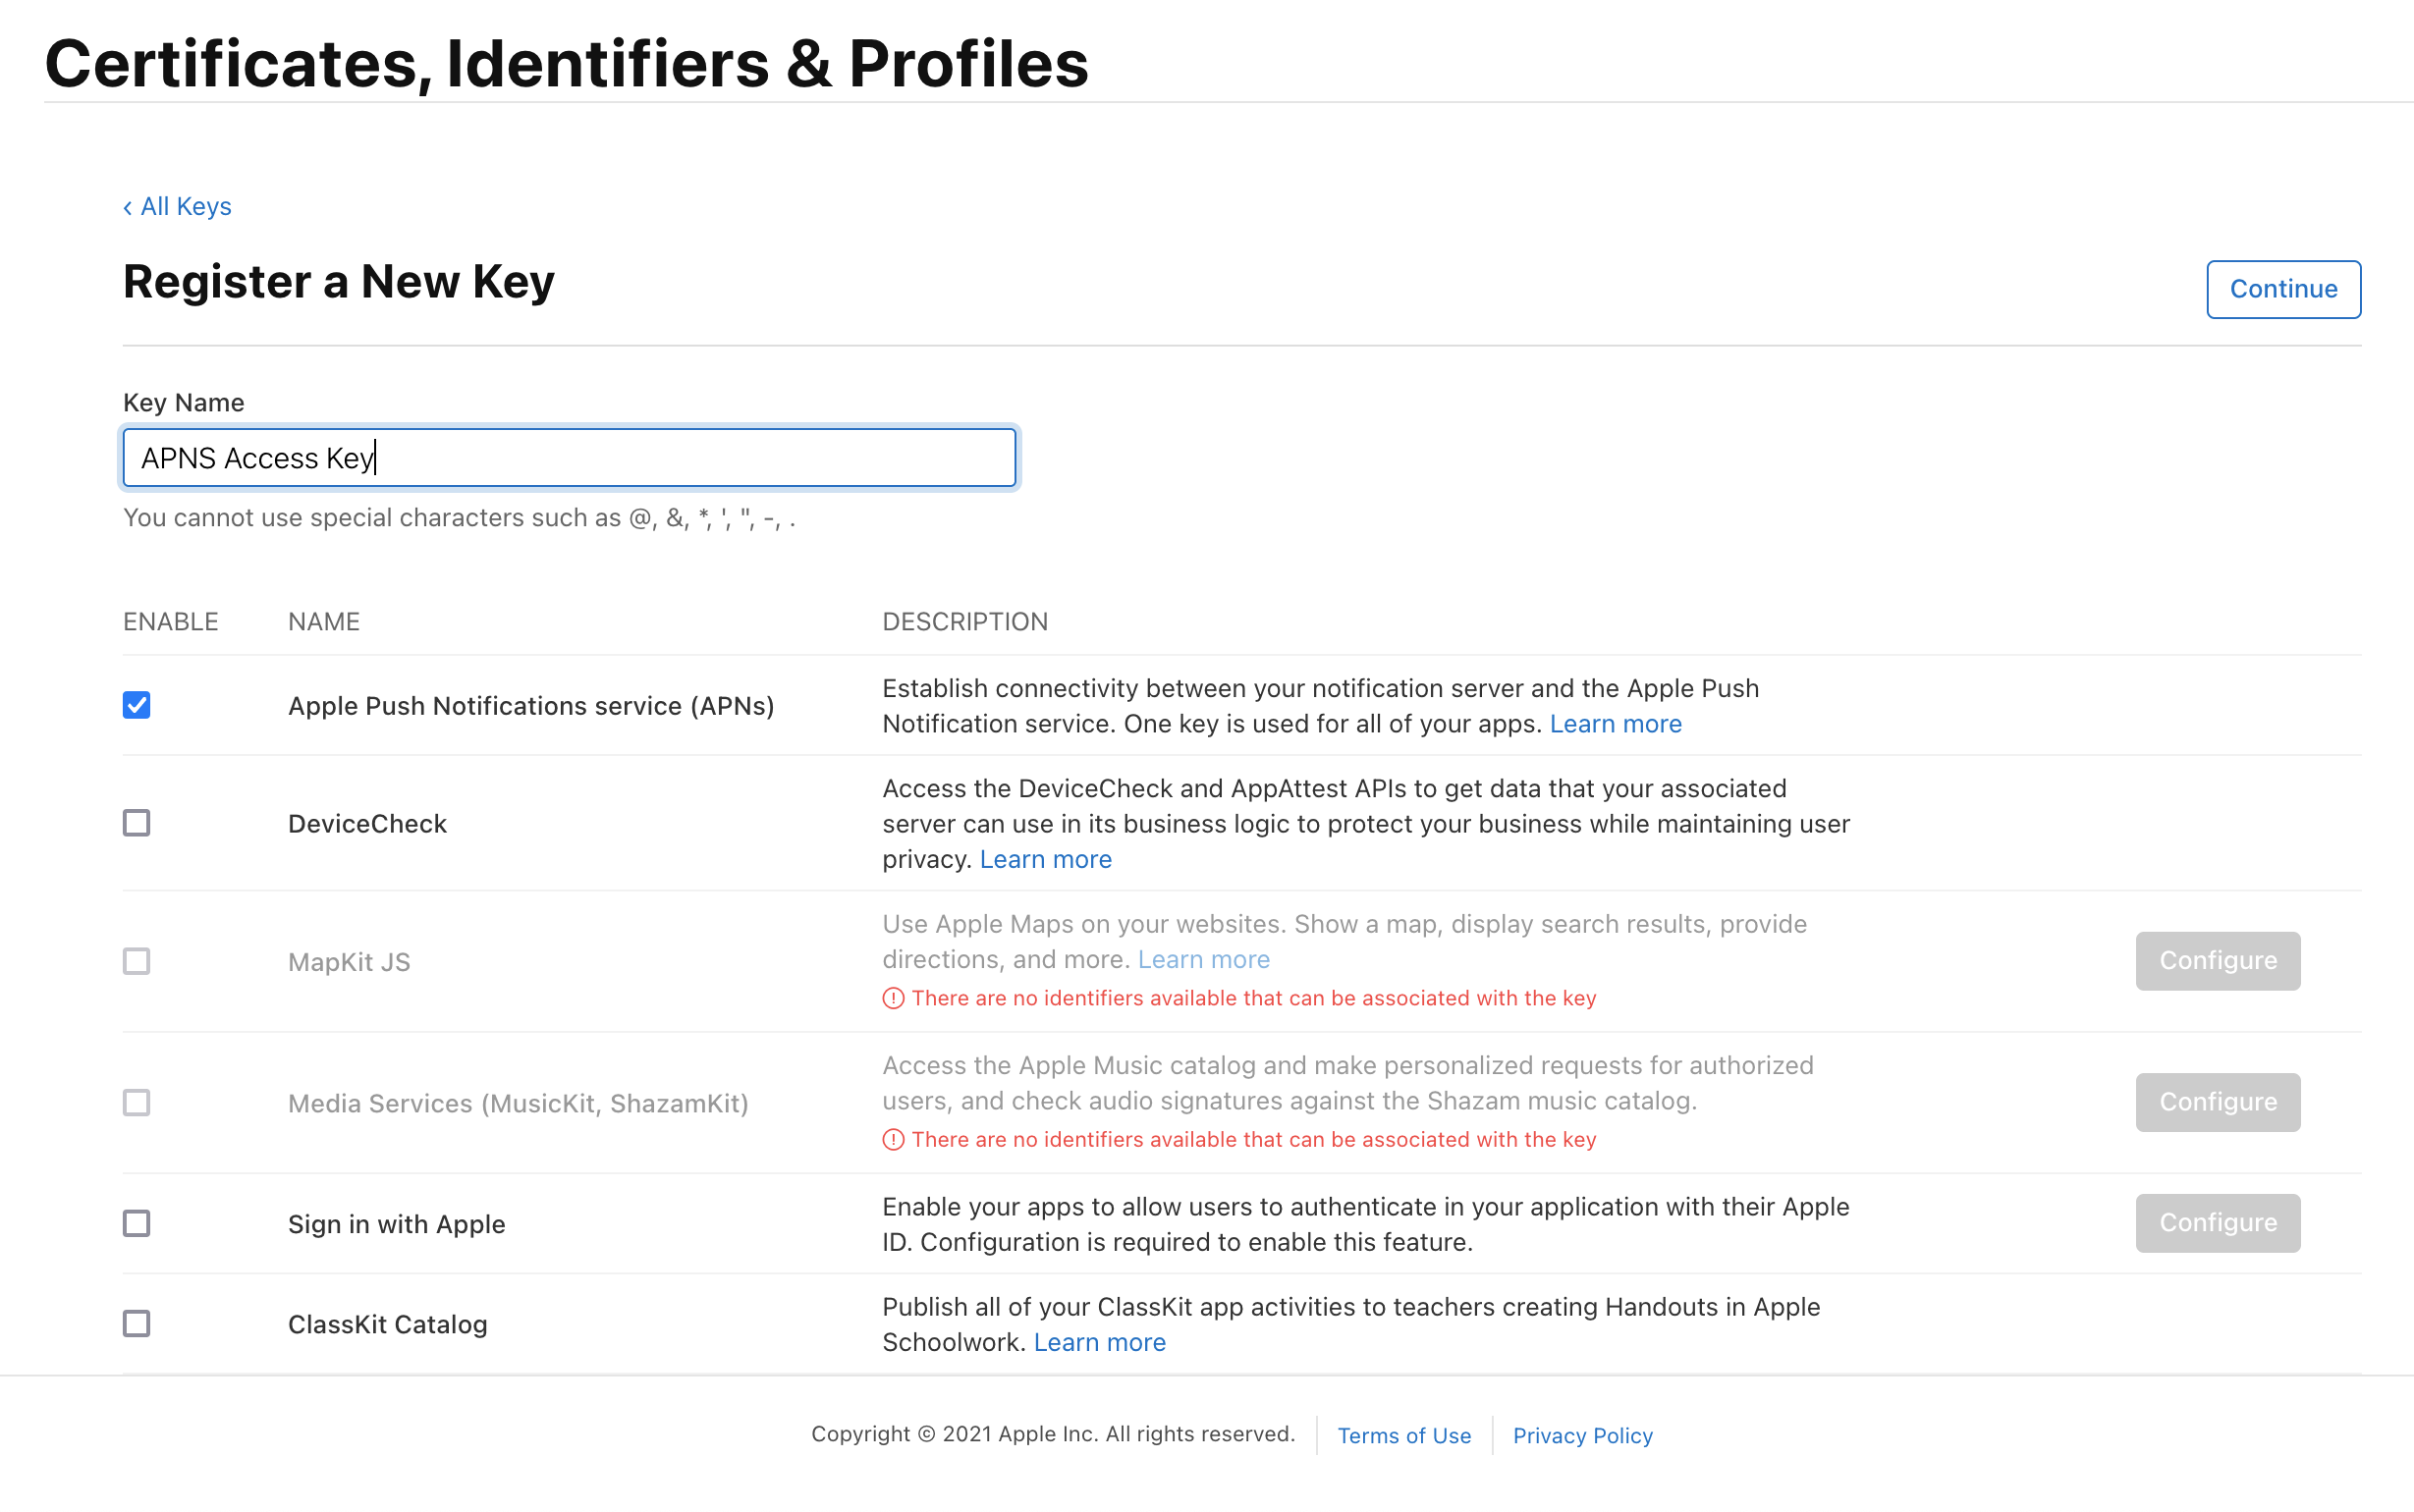
Select 'Create a Key' and on the form 'Register a New Key' enter a meaningful name such as 'APNS Access Key' and check the 'Enable' checkbox for 'Apple Push Notifications service (APNs)', click 'Continue'.
On the confirmation screen double check the APNs enablement is set then click 'Register'
On the final screen take note of your KeyID and download the key. Note that you can only download the key once, if lost the key must be revoked and re-created.
Downloading the key will save a .p8 file with the access credentials.
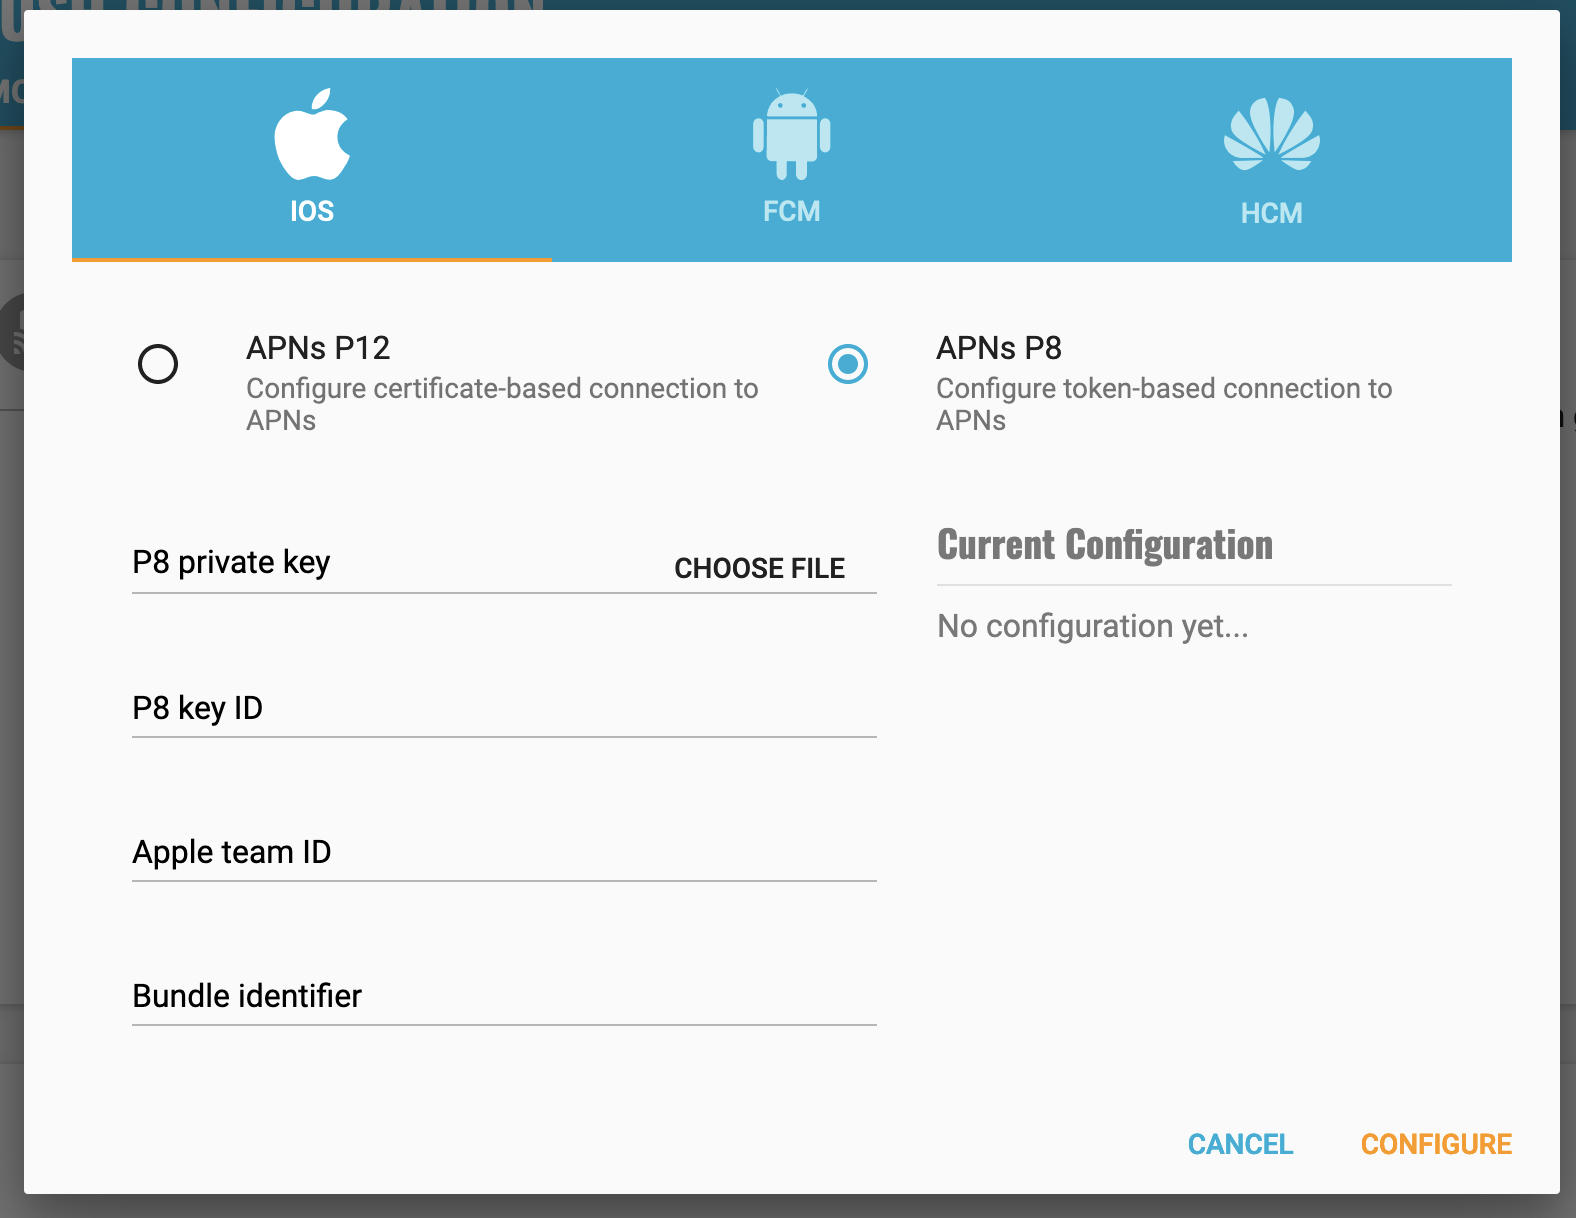
You now have all the details to configure your Kumulos App, expand 'Messaging' in the left menu, select 'Configuration' and click the cog next to the Apple icon. Select APNs P8 and select your file, enter your other details and click 'Configure'.
Configure your app capabilities and entitlements
In your app project settings use the "+ capability" button to add the App Groups, Background Modes and Push Notifications capabilities, in Background Modes you should have the "Remote Notifications" mode checked.
The video below shows how to create a push certificate on your Apple Developer portal, configure these certificates in Kumulos, and how to then configure the necessary entitlements in your iOS Xcode project.
FCM Setup
Enabling Push Notifications for Android
Please note it is the Google Service Account private key JSON file that needs to be uploaded to Kumulos, not the Google Services JSON file you include in your app project. The Google Service Account JSON file can be generated from the 'Service Accounts' section of the Firebase Developer console as is shown in the relevant section of the video above.
The next step is to add the google-services.json file to the root directory of your android project:
- Copy google-services.json to the project folder.
- Add google-services.json to the app project (click Show All Files in the Solution Explorer, right click google-services.json, then select Include in Project).
- Select google-services.json in the Solution Explorer window.
- In the Properties pane, set the Build Action to GoogleServicesJson.
- Right click packages, then select 'Add Google Play Service...'
- Select 'Firebase - Messaging', click 'Add Packages'
This process will automatically update your AndroidManifest.xml file as part of your project build.
In order for pushes to be handled by your registered receiver you must add a reference to your android manifest, inside the Application section.
<application android:label="MyApp.Android">
...
<service android:exported="false" android:name="com.kumulos.android.FirebaseMessagingService">
    <intent-filter>
        <action android:name="com.google.firebase.MESSAGING_EVENT" />
    </intent-filter>
    </service>
        <receiver android:name="com.kumulos.android.PushBroadcastReceiver" android:exported="false">
        <intent-filter>
            <action android:name="com.kumulos.push.RECEIVED" />
            <action android:name="com.kumulos.push.OPENED" />
            <action android:name="com.kumulos.push.DISMISSED" />
            <action android:name="com.kumulos.push.BUTTON_CLICKED" />
        </intent-filter>
    </receiver>
...
</application>
Next, you must create an instance of PushBroadcastReceiver, with the appropriate attributes for Xamarin to link it at build time.
using Android.App;
using Android.Content;
using Com.Kumulos.Android;

namespace FormsApp.Droid
{
    [BroadcastReceiver(Enabled = true, Exported = false)]
    [IntentFilter(new[] { "com.kumulos.push.OPENED", "com.kumulos.push.RECEIVED" })]
    public class MyPushReciever : PushBroadcastReceiver
    {
    }
}
C# configuration
Finally configure your SDK for In-App and opt-in the device for Push notifications, on iOS this will prompt the user to accept, on Android the permission has been given as part of the app installation.
Kumulos.CurrentConfig.AddKeys("YOUR_API_KEY", "YOUR_SECRET_KEY")
    .EnableInAppMessaging(InAppConsentStrategy.AutoEnroll);

Kumulos.Current.Initialize(Kumulos.CurrentConfig);
Kumulos.Current.RegisterForRemoteNotifications();
Advanced
Checking integration status
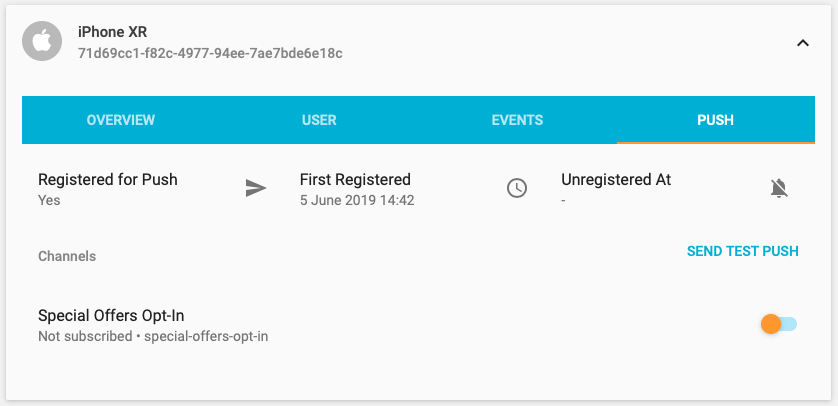
When you run your app on a simulator or install your app on a device, you can check that the install has successfully registered for push notifications by selecting the app and clicking the Installs tab to see the ten most recent installs of your app.
Click on an install, click the 'Push' tab and click Send Test Push.
If you do not receive the push notification, check the Error Log for any errors sending the push notification to the native push gateways. If you continue to experience problems, please don't hesitate to contact support who are standing by to help!
iOS - Notification Service Extension
In order to support images and action buttons in push notifications, along with delivery receipts the Kumulos SDK ships a Notification Service Extension, this must be added to your project in order to render images in the notification center.
- Right click on Packages for your new KumulosServiceExtension and select Add Packages...
- Enter Com.Kumulos.Extension and press "Add Package".
- Open your extension's Info.plist file, and ensure the deployment target is iOS 10.0 or higher, lower versions of iOS do not support extensions.
Visual studio should have created a file called NotificationService.cs in the Service Extension project automatically. Replace the file's contents with
using System;
using KumulosSDK.DotNet;
using Foundation;
using UserNotifications;

namespace [yournamespace]
{
    [Register("NotificationService")]
    public class NotificationService : UNNotificationServiceExtension
    {
        protected NotificationService(IntPtr handle) : base(handle)
        {
            // Note: this .ctor should not contain any initialization logic.
        }

        public override void DidReceiveNotificationRequest(UNNotificationRequest request, Action<UNNotificationContent> contentHandler)
        {
            NotificationServiceExtension.Current.DidReceiveNotificationRequest(request, contentHandler);
        }
    }
}
You must also configure your projects to share an App group, so that the service extension and app can share information.
- Update your Entitlements.plist in both the app project and service extension project. Check the
Enable App Groupsentitlement, and in the App Groups box which appears enter an item forgroup.[your-app-bundle].kumulos
The Kumulos SDK will automatically manage delivery receipts, along with downloading and adding images and dynamically creating action buttons for your push notifications.
Managing In-App User Consent
If you would like your users to opt-in to receive In-App messages you can configure the SDK during initialization to make opt-in explicit by setting the strategy, then calling the SDK helper to manage their consent.
using KumulosSDK.DotNet;
using KumulosSDK.DotNet.Abstractions;

...

Kumulos.CurrentConfig.AddKeys("YOUR_API_KEY", "YOUR_SECRET_KEY")
    .EnableInAppMessaging(InAppConsentStrategy.ExplicitByUser);
Kumulos.Current.Initialize(Kumulos.CurrentConfig);

Kumulos.Current.UpdateInAppConsentForUser(true);
Deep-linking for In-App
In-App messages allow you to hand-off to your own code via deep-linking action buttons. When tapped, these buttons pass control to the defined deep-link handler, including their defined data payload (configured in the In-App message composer for the action button).
If you want to handle deep-links with custom data payloads as part of an In-App message you can create a class that implements the IInAppDeepLinkHandler interface.
using System;
using KumulosSDK.DotNet.Abstractions;
using Newtonsoft.Json.Linq;

namespace TestApp
{
    public class DeepLinkHandler : IInAppDeepLinkHandler
    {
        public void Handle(InAppButtonPress buttonPress)
        {
            Console.WriteLine(buttonPress.MessageId);
            Console.WriteLine(buttonPress.DeepLinkData.ToString());
            Console.WriteLine(buttonPress.MessageData.ToString());
        }
    }
}
and add it to your configuration options during SDK initialization.
 var deepLinkHandler = new IInAppDeepLinkHandlerImplementation();

Kumulos.CurrentConfig.AddKeys("YOUR_API_KEY", "YOUR_SECRET_KEY")
    .EnableInAppMessaging(InAppConsentStrategy.AutoEnroll)
    .SetInAppDeepLinkHandler(myDeepLinkHandler);
Using the In-App Inbox
In-app messages can optionally be persisted in a user-level inbox for later retrieval. This allows you to build features such as loyalty rewards or expiring coupons into your app. Regardless of whether they are stored in the inbox, the maximum amount of in-apps stored on a device is 50 (the oldest messages exceeding this limit will be evicted).
Retrieve messages
To retrieve a list of messages from the user's inbox and present the first in the list, see the following example:
InAppInboxItem[] items = Kumulos.Current.InboxItems;
Kumulos.Current.PresentInboxMessage(items[0]);
Mark as read
To mark a single or all inbox messages as read:
InAppInboxItem[] items = Kumulos.Current.InboxItems;
Kumulos.Current.MarkInboxItemAsRead(items[0]);

Kumulos.Current.MarkAllInboxItemsAsRead();
Delete message
You can also delete an in-app message from inbox:
Kumulos.Current.DeleteMessageFromInbox(items[0]);
Inbox updated handler
In order to be notified when inbox changes you may set up a handler. The handler fires when one of the following happens to an in-app with an inbox configuration:
- message fetched from server
- message opened
- message marked as read
- message deleted
- message evicted (expires or limit of stored messages exceeded)
In order to use it, first create a handler implementing the IInboxUpdatedHandler abstraction interface.
public class MyInboxChangedHandler : IInboxUpdatedHandler
{
    public void Handle()
    {
        Console.WriteLine("Do work - the inbox has changed");
    }
}
Then during initialization tell your Kumulos configuration to use the handler
var inboxChangeHandler = new MyInboxChangedHandler();
Kumulos.Current.SetInboxUpdatedHandler(inboxChangeHandler);
To stop receiving updates you can clear the handler
Kumulos.Current.ClearInboxUpdatedHandler();
Get inbox summary
You can retrieve an inbox summary as follows:
 Kumulos.Current.GetInboxSummary().ContinueWith(r =>
{
    var summary = r.Result;
    Console.WriteLine(string.Format("Total {0}, Unread {1}", summary.Total, summary.Unread));
});
Get inbox item's image URL
Each inbox item may have an image associated with it. imageUrl returns a URL to the image resized to 300px width or null if there is no image.
Kumulos.Current.InboxItems[0].ImageUrl
Note if the message was created through the API (as opposed to Kumulos Messaging Dashboard) and contains a full URL to an image hosted elsewhere,
imageUrlcontains original URL without any resizing applied.
Customizing iOS Push Behavior
If you would like to perform additional work when the app is opened via a push notification or when a notification is received while the app is foregrounded you can access and set the additional helper methods by casting the config in your iOS project and set the handler blocks accordingly.
var config = (KSConfigImplementation)Kumulos.CurrentConfig;
config.SetPushOpenedHandler((Com.Kumulos.iOS.KSPushNotification notification) =>
{
    //Custom Code
});

config.SetForegroundPushPresentationOptions(UNNotificationPresentationOptions.Alert);
config.SetPushReceivedInForegroundHandler((Com.Kumulos.iOS.KSPushNotification notification) =>
{
    //Custom Code
});
If you want to do additional work depending on whether the app was opened by tapping an action button on a push notification you can interrogate the notification to determine what action opened the app.
 if (notification.ActionIdentifier != null)
{
    // The user tapped an action button.
    switch(notification.ActionIdentifier) {
        case "button-1": {
            // - Some work.
            break;
        }
        case "button-2": {
            //- Other work.
            break;
        }
    }
}
else
{
    // Just an app open.
}
Customizing Android Push Behavior
You can provide your own notification icon by using the SetPushSmallIconId on the configuration builder prior to initializing.
(Kumulos.CurrentConfig as KSConfigImplementation).SetPushSmallIconId([YOUR_ICON_RESOURCE]);
The push broadcast receiver class that was implemented during the setup process has several methods which can be overridden to provide more control over the notification presentation and handling and insert custom code before or after the base implementation.
using Android.App;
using Android.Content;
using Com.Kumulos.Android;

namespace TestApp.Droid
{
    [BroadcastReceiver(Enabled = true, Exported = false)]
    [IntentFilter(new[] { ActionPushReceived, ActionPushOpened })]
    public class MyPushReciever : PushBroadcastReceiver
    {
        protected override Intent GetPushOpenActivityIntent(Context context, PushMessage pushMessage)
        {
            return base.GetPushOpenActivityIntent(context, pushMessage);
        }

        protected override Notification BuildNotification(Context context, PushMessage pushMessage)
        {
            return base.BuildNotification(context, pushMessage);
        }

        protected override Intent GetBackgroundPushServiceIntent(Context context, PushMessage pushMessage)
        {
            return base.GetBackgroundPushServiceIntent(context, pushMessage);
        }
    }
}
If you would like to use action buttons on your notification then you must implement the IPushActionHandlerInterface, a sample implementation would look like.
using Android.Content;
using Com.Kumulos.Android;

namespace TestApp.Droid
{
    public class MyPushActionHandler : Java.Lang.Object, IPushActionHandlerInterface
    {
        void IPushActionHandlerInterface.Handle(Context context, PushMessage pushMessage, string actionId)
        {
            switch (actionId)
            {
                case "action-one":
                    {
                        //- Some work
                        break;
                    }
                case "action-two":
                    {
                        //- Some other work
                        break;
                    }
                default:
                    {

                        break;
                    }
            }
        }
    }
}
Then during your SDK initialization, instantiate an instance of your class and provide it to the SDK:
var handler = new MyPushActionHandler();
(Kumulos.Current as KumulosImplementation).SetPushActionHandler(handler);
Note that by default, no activity or UI will be started by the action button. You must launch the desired Android UI from your action handler implementation.
Remove device tokens from Kumulos
To remove the token from Kumulos, call this method.
Kumulos.Current.UnregisterDeviceToken();
Channels
You can create and manage subscriptions to push notification Channels via the SDK. Channels allow your users to define preferences for the type of content they would like to receive via notifications.
You can manage all channel interactions via the Kumulos.Current.PushChannels class.
Kumulos.Current.PushChannels.ListChannels().ContinueWith(r =>
{
    Console.WriteLine(r.Result);
});
Helper methods are then available for creating, listing and managing subscriptions to channels. Each helper is async and can be awaited or given a continue block.
public Task<object> ClearSubscriptions ();
public Task<object> CreateChannel (string uuid, bool subscribe, string name, bool showInPortal, Dictionary<string, object> meta);
public Task<object> ListChannels ();
public Task<object> SetSubscriptions (string[] uuids);
public Task<object> Subscribe (string[] uuids);
public Task<object> Unsubscribe (string[] uuids);
Channel visibility and meta data can be controlled when they are created.
Deferred Deep Linking
Deep linking allows users to reach app content by clicking a link. This can be achieved even if app is not installed.
To integrate deep linking into your Xamarin project, you have to complete the following steps.
Configuration & Setup (iOS)
Configure the Kumulos Console to setup your well-known site association. This is required for iOS to recognise links are associated with your bundle.
Add to your AppDelegate.cs:
public override bool ContinueUserActivity(UIApplication application, NSUserActivity userActivity, UIApplicationRestorationHandler completionHandler)
{
    return ((KumulosImplementation)Kumulos.Current).ContinueUserActivity(application, userActivity, completionHandler);
}
Associate a domain with your app. Note that the subdomain you specify here should match the one you specified on the deep link configuration page on the Kumulos Dashboard.
- Add the Associated Domains capability to your main app target
- Set 'domains' to
applinks:{yourSubdomain}.lnk.click

In order to enable and respond to Deep Links in your app code you must create a class implementing the IDeepLinkHandler interface.
using System;
using KumulosSDK.DotNet.Abstractions;

namespace TestApp.iOS
{
    public class DeepLinkHandler : IDeepLinkHandler
    {

        public void Handle(DeepLinkResolution deepLinkResolution, Uri uri, DeepLink deepLink)
        {
            // Handle the Deep Link
        }
    }
}
Finally, configure the SDK during initialization to use your IDeepLinkHandler
Kumulos.CurrentConfig.AddKeys("YOUR_API_KEY", "YOUR_SECRET_KEY")
    .EnableDeepLinking(new DeepLinkHandler());
Configuration & Setup (Android)
Configure the Kumulos Console with your Signing certificate fingerprints. These can be obtained by following the guide from Microsoft
Add an intent filter to your main activity:
 [IntentFilter(new[] { Intent.ActionView },
    Categories = new[] { Intent.CategoryBrowsable, Intent.CategoryDefault },
    DataScheme = "https",
    DataHost = "[yoursubdomain].lnk.click",
    AutoVerify=true)]
Note that the subdomain you specify above should match the one you specified on the deep link configuration page on the Kumulos Dashboard.
Note that setting
android:autoVerify="true"will verify ownership of the domain and is required starting in Android 12, instead of offering a list of apps to select from your app will open automatically. No further actions are needed to enable this.
Add following overrides to the main activity:
public override void OnWindowFocusChanged(bool hasFocus)
{
    ((KumulosImplementation)Kumulos.Current).SeeInputFocus(hasFocus);
}

protected override void OnNewIntent(Intent intent)
{
    ((KumulosImplementation)Kumulos.Current).SeeIntent(intent);
}
To trigger the deep link manually and verify the setup you can use adb as documented in the Android docs
In order to enable and respond to Deep Links in your app code you must create a class implementing the IDeepLinkHandler interface.
using System;
using Android.App;
using KumulosSDK.DotNet.Abstractions;

namespace TestApp.Droid
{
    public class DeepLinkHandler : IDeepLinkHandler
    {
        public void Handle(DeepLinkResolution deepLinkResolution, Uri uri, DeepLink deepLink)
        {
            // Handle the Deep Link
        }
    }
}
Finally, configure the SDK during initialization to use your IDeepLinkHandler
Kumulos.CurrentConfig.AddKeys("YOUR_API_KEY", "YOUR_SECRET_KEY")
    .EnableDeepLinking(new DeepLinkHandler());
Build
You can call API methods defined in the Kumulos Build service using the Kumulos.Current.Build.CallAPI method.
Parameters are provided as a list of key value pairs. Simply add a pair for each parameter that your API method expects and provide it as the second parameter to the CallAPI method.
var parameters = new List<KeyValuePair<string, string>>
{
    new KeyValuePair<string, string>("param1", "foo"),
    new KeyValuePair<string, string>("param2", "bar")
};

Kumulos.Current.Build.CallAPI("myAPIMethod", parameters).ContinueWith(t =>
{
    ApiResponse response = t.Result;
});
A threading task will be returned, which your code can continue with once the network operation has completed. The Result of the task will be an ApiResponse object. This object can then be inspected for the payload of the API method, its response code and message.
For an insert operation the response object will be a simple integer which can be cast.
For select operations the return type is a Newtonsoft JSON array, an example of reading this into a specific type could be.
public class OptionType
{
    public string title { get; set; }
    public int displayOrder { get; set; }
}

Kumulos.Current.Build.CallAPI("getOptionTypesWithOptions", parameters).ContinueWith(t =>
{
   ApiResponse response = t.Result;
   var array = (Newtonsoft.Json.Linq.JArray)response.payload;
   foreach(var item in array) {
       var type = item.ToObject(typeof(OptionType));
   }
});
Handling data fields
Kumulos stores data fields as base64 encoded data, so if you receive data from Kumulos, you will have to base64 decode it to access the original data. Similarly, when you send data to Kumulos, you should base64 encode it before transport.
Crash
Crash reporting allows you to track unhandled exceptions in your app, and optionally log any caught exceptions for further investigation. Crash reporting is not enabled by default, and can be optionally enabled at both the native OS level and as a global exception handler for your managed code.
Note that crash reporting is not available whilst connected to a debugger, but it does work with debug builds.
Native layer crash reporting
To enable the OS level crash reporting in iOS simply enable it as part of the configuration for the SDK.
var config = Kumulos.CurrentConfig.AddKeys("YOUR_API_KEY", "YOUR_SECRET_KEY").EnableCrashReporting();
Kumulos.Current.Initialize(config);
Native crash reporting will catch all exceptions, including unhandled exceptions raised from the Mono application, although these will include references to managed code and can be harder to parse.
Managed code crash reporting
You can also add a global exception handler to your C# code layer to record those exceptions with more complete detail from the .NET exception object.
iOS
...
public class AppDelegate : UIApplicationDelegate
{
...
public override bool FinishedLaunching(UIApplication application, NSDictionary launchOptions)
{
   AppDomain.CurrentDomain.UnhandledException += (sender, args) =>
   {
      Kumulos.Current.LogUncaughtException((Exception)args.ExceptionObject);
   };
   ...
}
Android
...
[Activity(Label = "MyAndroidTestApp", MainLauncher = true, Icon = "@mipmap/icon")]
public class MainActivity : Activity
{
...
     protected override void OnCreate(Bundle savedInstanceState)
     {
         AndroidEnvironment.UnhandledExceptionRaiser += (sender, EventArgs) =>
         {
             Kumulos.Current.LogUncaughtException(EventArgs.Exception);
         };
         ...
      }
      ...
}
Unhandled exceptions that lead to crashes will now be recorded automatically and shown in your App Delivery Console.
Manual tracking of exceptions
If you wish to log any caught exceptions, you can also record them with the relevant helper method.
Kumulos.Current.LogException(Exception e)
Kumulos.Current.LogUncaughtException(Exception e)
Ensure that crash reporting is enabled when attempting to log exceptions.
Troubleshooting
iOS Simulator Support
Currently the Kumulos SDK does not support building for simulators and doing so will result in mono linker errors during the build stage. This is due to conflicting CPU architectures in newer iOS and Mac devices.
Using XCFrameworks to resolve this issue is currently not supported on Windows and the side-car solution for Mac development requires a source code rather than packaged integration.
Java.Lang.NoClassDefFoundError
Certain versions of the Xamarin.Firebase.Messaging package ship versions of the underlying Java libraries that are missing dependencies, resulting NoClassDefFoundError exceptions when the Firebase project is initialized. This can be fixed by reverting to a known good version such as 71.1740.4
Firebase default options not found
If the Firebase Messaging Service cannot start due to the google-services JSON plugin not being applied correctly a workaround can be used by specifying the configuration options manually and re-initializing Firebase, all the relevant details can be found in your google-services.json
var options = new FirebaseOptions.Builder()
      .SetApplicationId("<AppID>")
      .SetApiKey("<ApiKey>")
      .SetStorageBucket("<StorageBucket>")
      .SetGcmSenderId("<SenderID>").Build();

FirebaseApp.InitializeApp(this, options);
Changelog
9.0.0 (Nuget build 8.0.0.3)
- Migrate SDK to .NET6 / MAUI
- Breaking: Namespacing updates references to
should be updated to:
using Com.Kumulos; using Com.Kumulos.Abstractions;using KumulosSDK.DotNet; using KumulosSDK.DotNet.Abstractions;
Full release notes can be found in github: https://github.com/Kumulos/KumulosSdkXamarin/releases/tag/8.0.0.3
8.0.0 (Nuget build 7.0.0.1)
- Add Deferred Deep Linking Support see integration guide
- Breaking: In-App deep link handler signature updated
- Breaking: Base SDK Android 12 support
Migration Guide
- Update your
IInAppDeepLinkHandlerimplementation to the new signaturepublic void Handle(InAppButtonPress buttonPress)for more details see Deep-linking for In-App for details.
7.1.0 (Nuget build 6.1.0.0)
- Added support for notification channels on Android
7.0.0 (Nuget build 6.0.0.0)
-
Breaking: Removed support for simulators on iOS, due to CPU architectures being common across devices and sims we can now only support one or the other in a Static Binary. XCFrameworks are not currently an option due to open issues with the Xamarin platform.
-
Updated Android and iOS SDK bindings, pulling in API extensions for In-App Inbox features
6.1.1 (Nuget build 5.1.1.2)
- Update internal implementation of our Build API, this now uses JSON payloads which overcomes some limitations with sizes of encoded parameters.
6.1.0 (Nuget build 5.1.0)
- Expose SetPushSmallIconId for Android
6.0.0 (NuGet build 5.0.0.1)
- Upgrade Android SDK to Android X, add delivery receipts for iOS
Migration Guide
-
On Android update the target framework to Android X. Xamarin provides a migration tool to upgrade dependencies to Android X, added to your build steps by including the Nuget package
Xamarin.AndroidX.Migration. -
On iOS the notification service extension has been moved to its own package, remove the SDK nuget package from your Service Extension project and follow the updated integration steps in notification service extension
5.0.0 (NuGet build 4.0.0.6)
- Add support for pictures in push notifications and action buttons in Android and iOS
Migration Guide
- If you have already implemented a
PushBroadcastReceiverand want to use the action buttons in push notifications you must add theActionButtonClickedintent to its list.
4.0.0 (NuGet build 3.0.0.2)
- Fix potential runtime exceptions due to AOT only execution on iOS. The
PushReceivedInForegroundHandlercould throw exceptions in runtime due to the mono AOT compiler leaving branches in a JIT state.
Migration Guide
- The
SetPushReceivedInForegroundHandlerno longer accepts a second argument to the block for the completionHandler. Setting the behavior for the notification is now handled by the KSConfig methodSetForegroundPushPresentationOptionswhich accepts theUNNotificationPresentationOptionsenum values.
2.0.1
- Fix bug when tracking multiple exceptions within the same session.
2.0
- Add In-App Messaging support
Migration Guide
Updating from 1.0 should be simple as only minor breaking changes have been introduced.
Android SDK Integration
In order to build the newer native Java of the android SDK you must add a desugaring step to the project [MyProjectName].Android.csproj
<AndroidDexTool>d8</AndroidDexTool>
iOS Push Integration
-
RegisterDeviceToken delegate is no longer required, the SDK will automatically forward device tokens to Kumulos.
-
UserNotificationCenterDelegateis no longer required, the SDK will automatically create one..
Android Push Integration
- An additional service intent is required in the android manifest
<service android:name="com.kumulos.android.FirebaseMessagingService">
    <intent-filter>
        <action android:name="com.google.firebase.MESSAGING_EVENT" />
    </intent-filter>
</service>`
-
TrackNotificationOpenhas been removed, the SDK will automatically notify Kumulos when this occurs. -
PushBroadcastReceiverImplementationhas been removed - this can now be abstracted by inheriting from the Java layerPushBroadcastReceiverclass
Further customization to the push received behaviour is detailed in the integration guide above.
1.0 (Com.Kumulos)
-
Refactor of interfaces to cut down on platform specific code / implementation details.
-
Add Crash Reporting, Custom Analytics Events, User Attributes, iBeacon/Eddystone support and background caching and sync of all events.
Legacy packages
KumulosXamarinShared / KumulosXamarinDroid / KumulosXamariniOS
1.1.0
- Add geolocation update helper method
1.0.0
- Initial release with Build, Push and Analytics support.