Audience Targeting
Kumulos provides different ways to target who you are sending push notifications and in-app messages to.
You can build audience segments to target specific users of your app based on the user attributes and analytics events you send to Kumulos as well as well the analytics data Kumulos captures automatically from the install (for example when the app was last opened).
You can use channels to categorize the content you send and let users subscribe to content relevant to their preferences.
You can define Geofences to target installs within a specific area or within a certain radius of a fixed point on a map (e.g. within 1000m of a retail outlet that is running a promotion).
You can also add Beacons to target installs when they come into proximity of that beacon.
Segments
Segments let you target specific groups of users of your app. You can apply filters to user attributes (e.g. to target customers or non-customers), analytics events (e.g. to target users who have done a certain task a number of times) as well as the data we capture automatically from the install (e.g. to target users who have not opened the app recently). By defining segments, you can send your users content that will be relevant and meaningful to them.
Defining segments
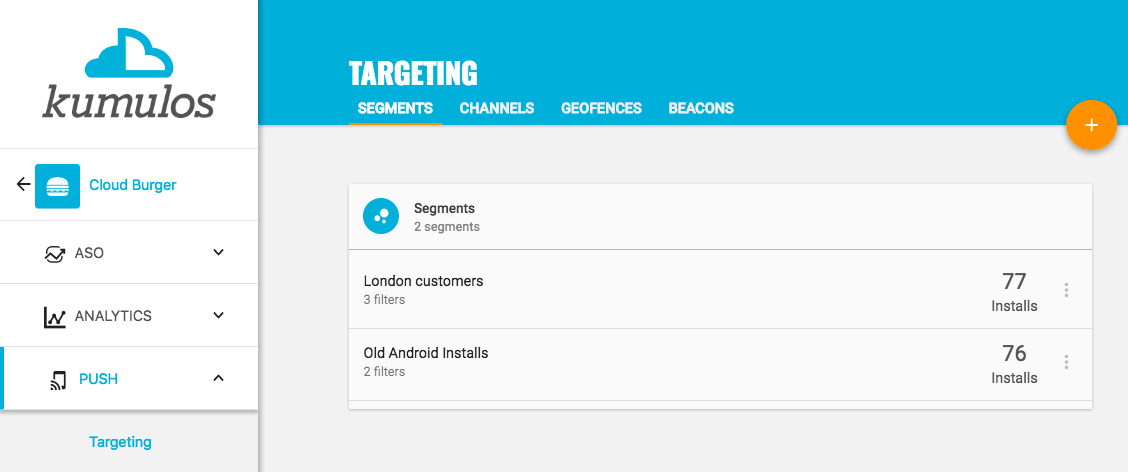
To add, edit and delete audience segments for an app, click on the app and then from the app dashboard for that app, expand "Messaging" from the left menu, select "Audience" and then select the "Segments" tab.
To define a new audience segment, click the primary action button. This will open the add segment dialog. Give the segment a descriptive name (as this is what your team and your client will see when sending a targeted message).
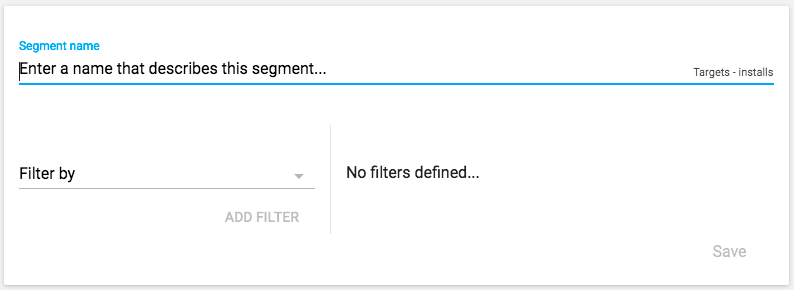
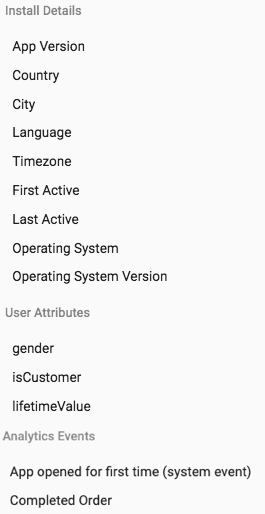
Next, select the filters that will be used to define your audience segment. From the Filter by drop down, you can filter your audience by details of the install, any associated user attributes and any analytics events (optionally, with specific properties):
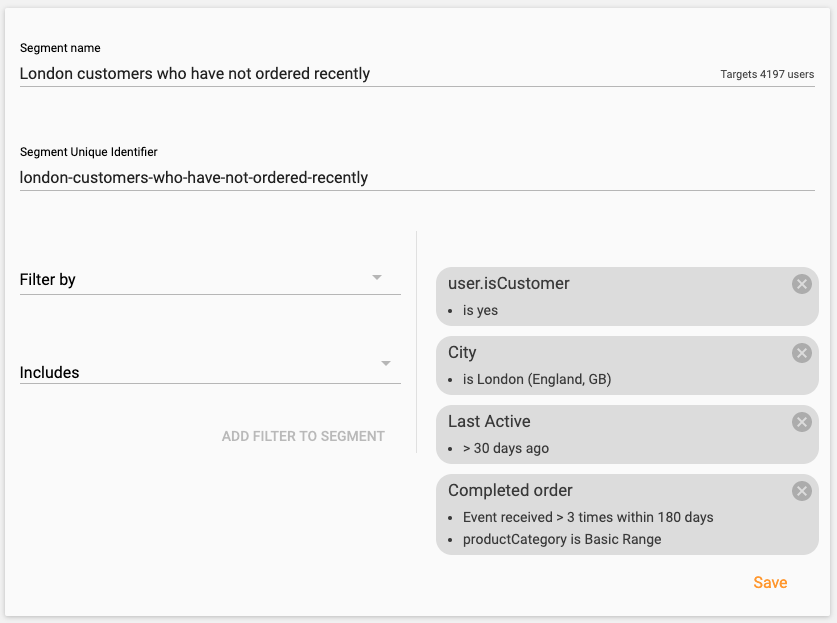
You can add multiple filters to define your audience segment. Filters are applied via a boolean and (i.e. an install must match all filters to be included in an audience segment). As you add your filters you will be able to see how many installs your audience segment will currently target. For example, to target all customers in London, who have placed more than three orders from the basic range in the last six months, but have not opened the app in the last 30 days, add the following filters:
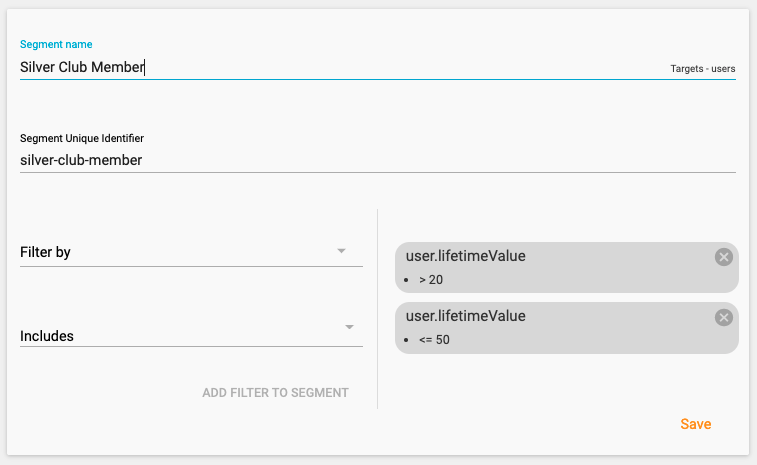
You also create segments to target users in a specific range of values for example:
You can also define a filter to find users that do not have a given attribute set, for example users who have not configured their email settings.
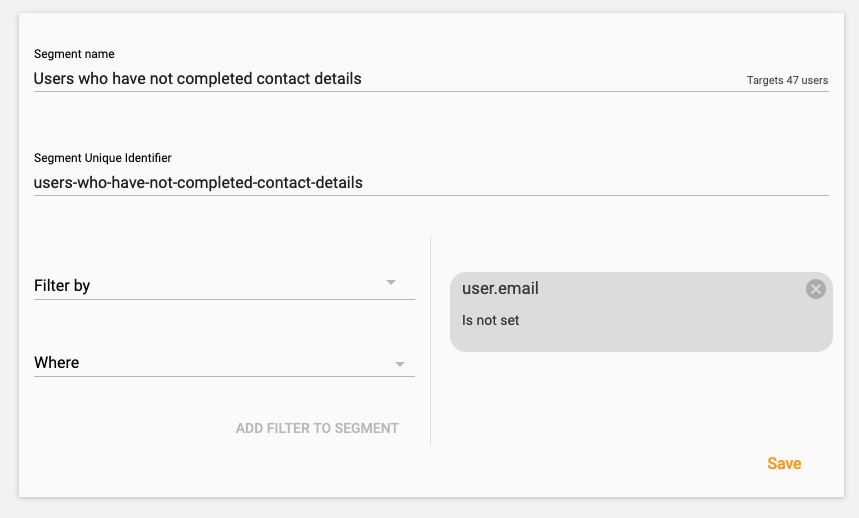
Note that for the purposes of not set a user will match if they do not have the attribute set, or the attribute is set but is blank.
When done, click Save to save your audience segment. Your segment will now be listed, showing how many filters define it and how many installs it is currently targeting.
Note that the number of installs targeted by a segments is dynamic and always updated when sending a message to a segment. In other words, when sending a message to a segment, all installs of your app (including any new installs) are automatically included in the audience segment if all of the filters apply to them.
Your clients can define audience segments from their client portal in exactly the same way.
Channels
Channels allow your users to subscribe to content based on their preferences. By defining either portal visible marketing groups or allowing your app to create private or public groups, channels allow you to target content at a receptive audience.
Defining channels via the agency console
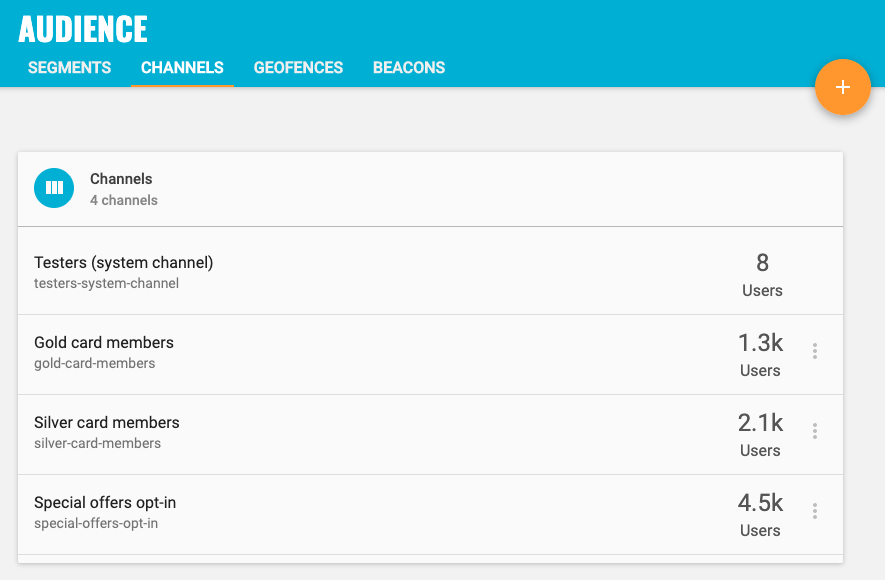
To add, edit and delete channels for an app click on the app and then from the dashboard, expand "Messaging" on the left menu, select "Audience" and then select the "Channels" tab.
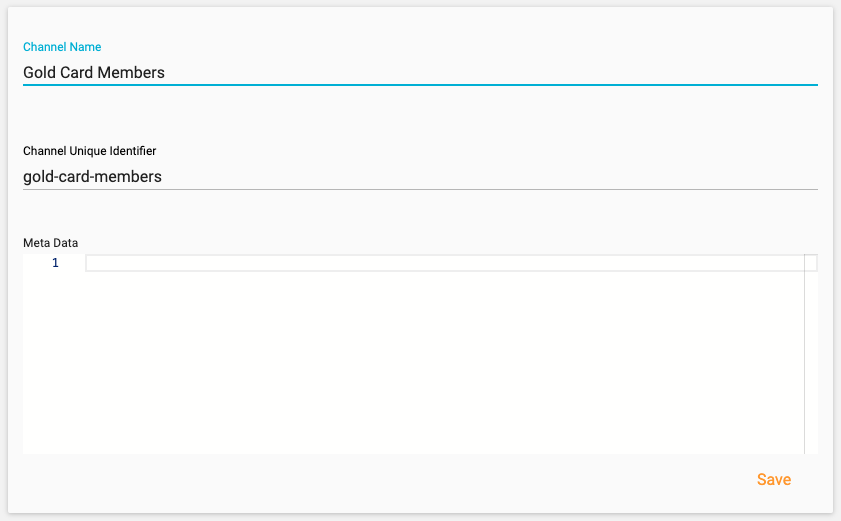
To create a new channel, click the primary action button. This will open the add channel form. Give the channel a descriptive name and a unique identifier.
You can optionally define a JSON object of meta data which will be returned to your app when requested from the API. This field can be used to provide additional filtering or information when rendering the channel within your app.
Note that a newly created channel will target no users until users are subscribed by an SDK (e.g. Swift), the Messaging API or, if you want to subscribe users to a channel in bulk, by uploading a CSV of user identifiers.
Upload a CSV to subscribe users to a channel
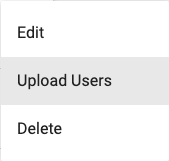
If you want to subscribe users to a channel in bulk, for example to set the audience for a campaign, you can do so by uploading a CSV of user identifiers. Expand the context menu, next to the channel you want to subscribe users to and select "Upload Users".
Click "Choose File" and browse our computer to find the file. Click "Upload" when ready.
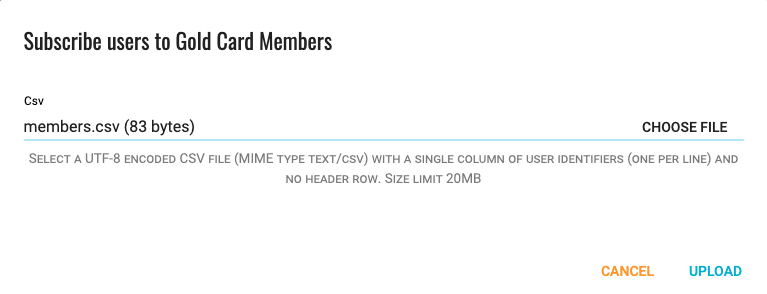
Once processed, the channel will reflect how many users are now subscribed.
Please note the CSV file should be UTF-8 encoded with MIME type text/csv and contain a single column of user identifiers, one per line, and no header row. No user identifier should be greater than 255 characters and the maximum size of the file is 20MB.
You can also subscribe users in bulk to a channel by uploading a CSV file via API.
Notes on the visibility of channels
Channels created in the agency console are considered publicly available. They will be visible in the agency console / client portal and returned to any app requesting a list of channels from the SDK.
In order for a channel created via an SDK or the Push API to be visible in the agency dashboard for targeting notifications via the UI, it must be created with the showInPortal flag set to true and will require a friendly name.
Any channel which has a friendly name is considered publicly available and so will be returned to an app requesting a list of channels, finer control of what channels are rendered can be achieved with metadata.
Channels with no friendly name are considered private and will not be returned to apps requesting a list of channels unless the requesting install is subscribed to it.
Channel metadata
When creating a channel, you can optionally provide a dictionary of meta data to be associated with the channel which will be returned to your app as part of the read request. This metadata can be used for any additional contextual information used by your app, such as any business rules regarding categorization or access control. For example: if you want to add a channel for a special offer or promotion ahead of time, you could add a start date in the JSON object that your app could use to determine when to present the channel to users of the app.
Geofences
You can define Geofences to target installs within a specific area or within a certain radius of a fixed point on a map (e.g. within 1000m of a retail outlet that is running a promotion).
Defining Geofences
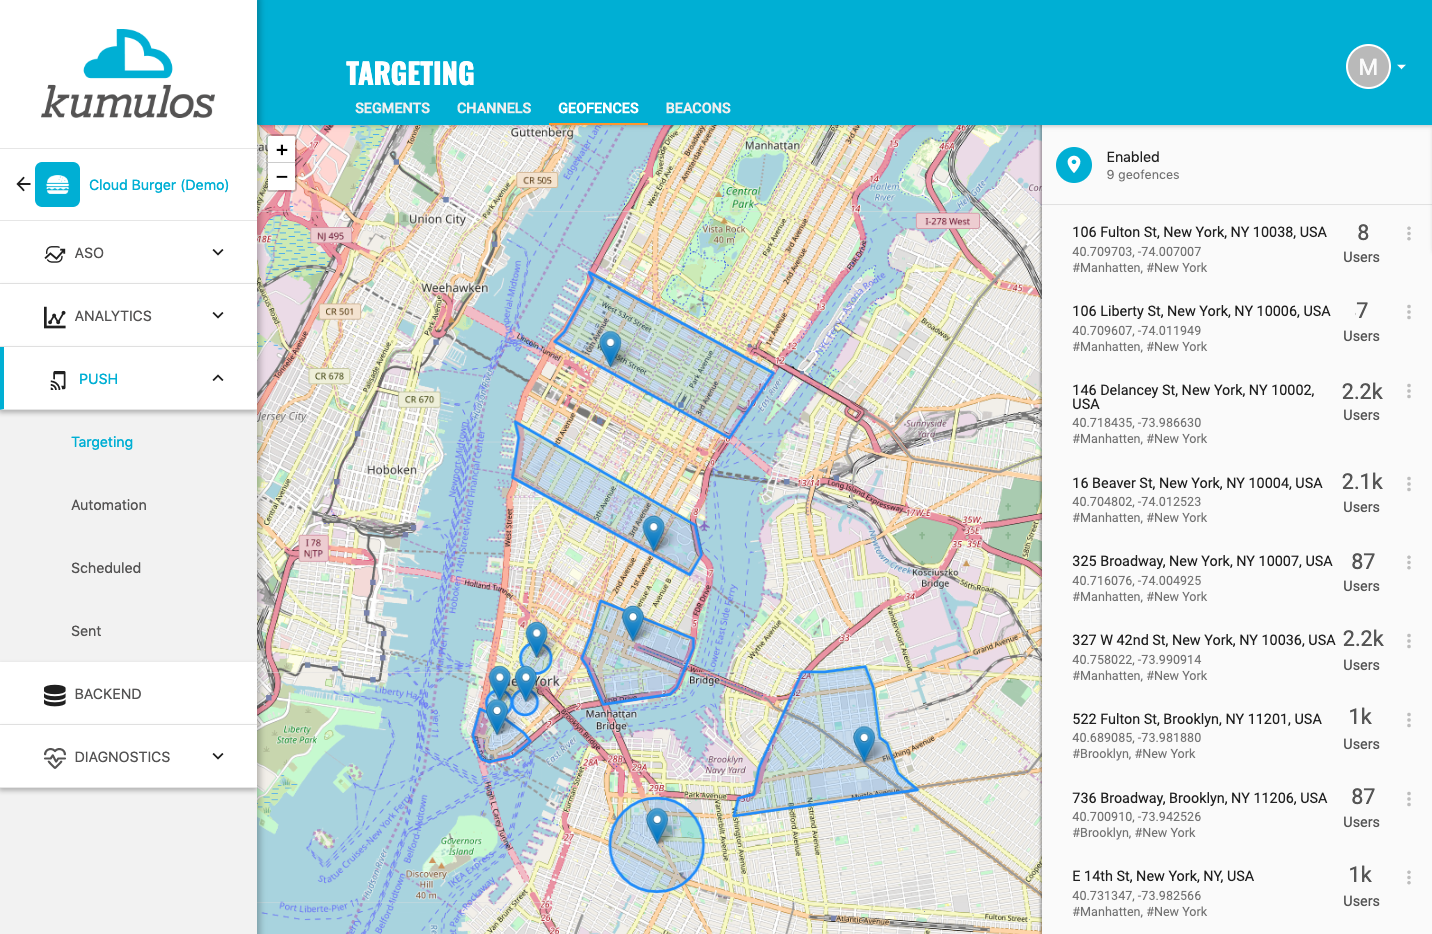
To add, edit and delete Geofences for an app, click on the app and then from the app dashboard for that app, expand "Messaging" from the left menu, select "Audience" and then select the "Geofences" tab.
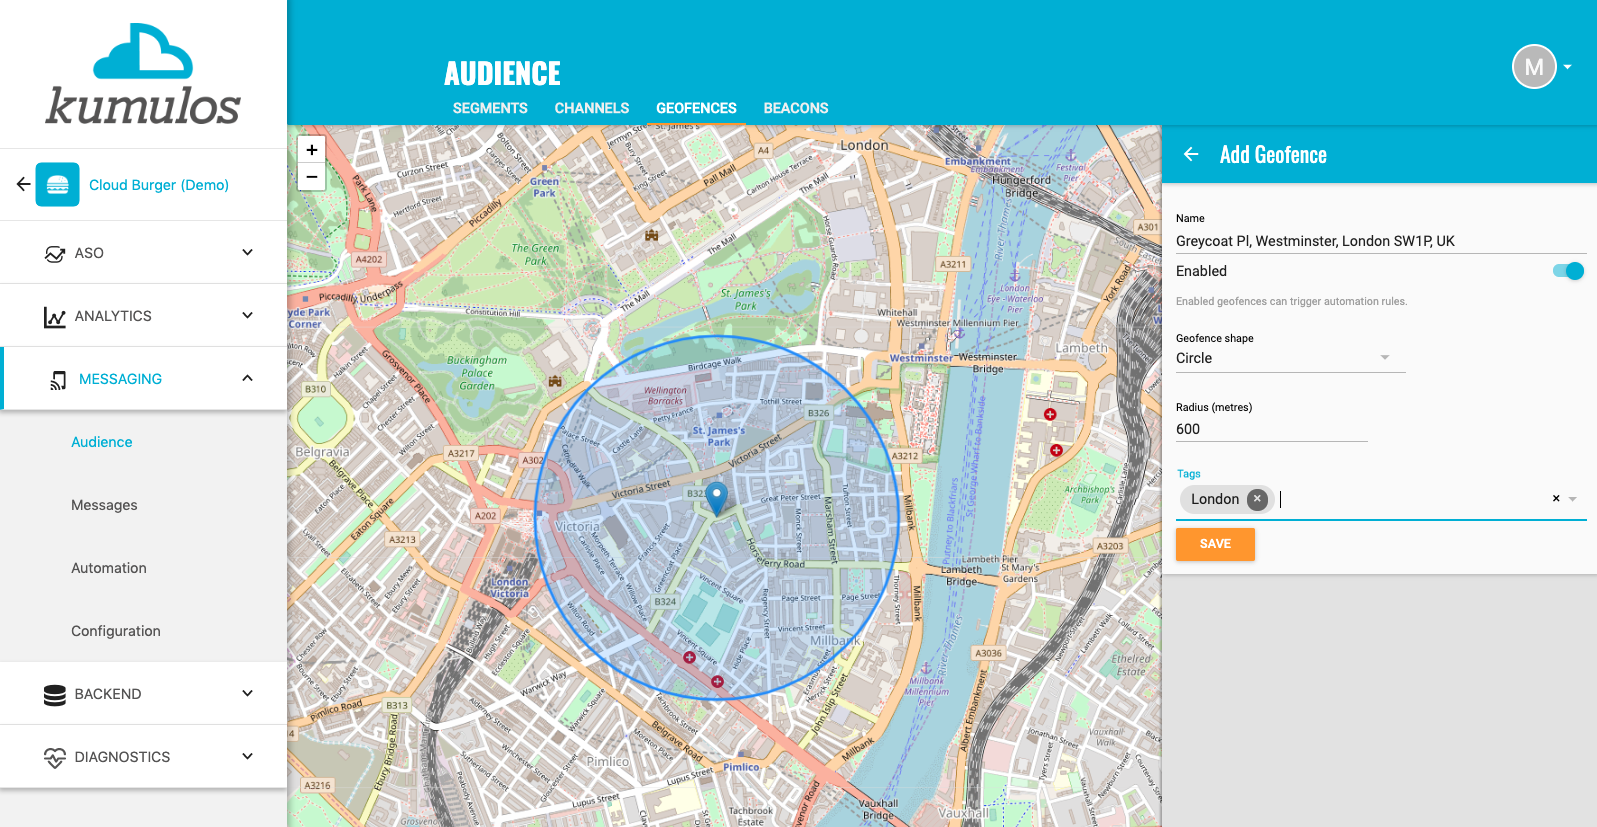
The map will automatically zoom to show all existing Geofences and how many users' last known location was in each geofence.
To add a geofence, click the primary action button. Type an address in the Search box. All matching results will be shown. Click on a result to drop a pin in the map at that location.
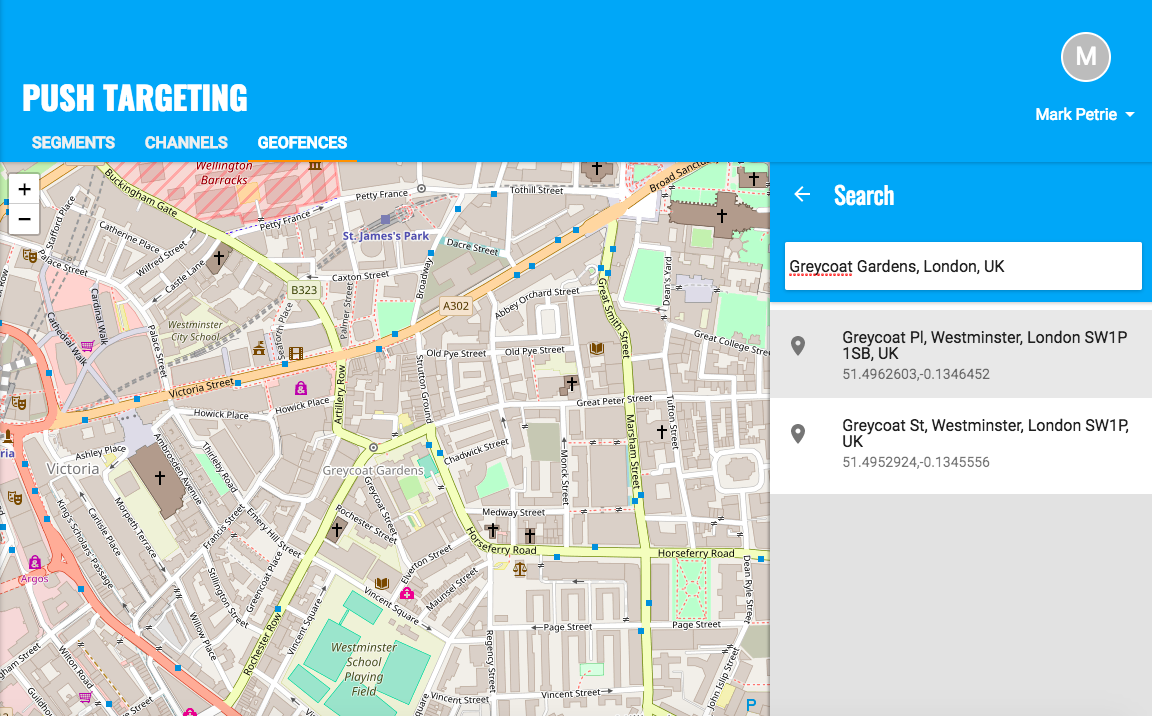
You can click the back arrow next to 'Add Geofence' to return to the search results. Once you have found the closest result, you can drag-and-drop the pin to fine tune the exact location.
Give the Geofence a meaningful name (this will default to the address) and then choose the desired shape of the geofence.
Circle
If you wish to target installs within a certain radius of the point on the map (e.g. within 1000m of a retail outlet that is running a promotion), choose 'Circle' and enter a radius in meters. Radius must be a minimum of 1 meter and maximum of 10000 meters (i.e. 10 kilometers).
Polygon
Alternatively, if you wish to target installs within a specific area (e.g. a shopping mall), choose 'Polygon'. Click on the map to add points and draw your geofence.
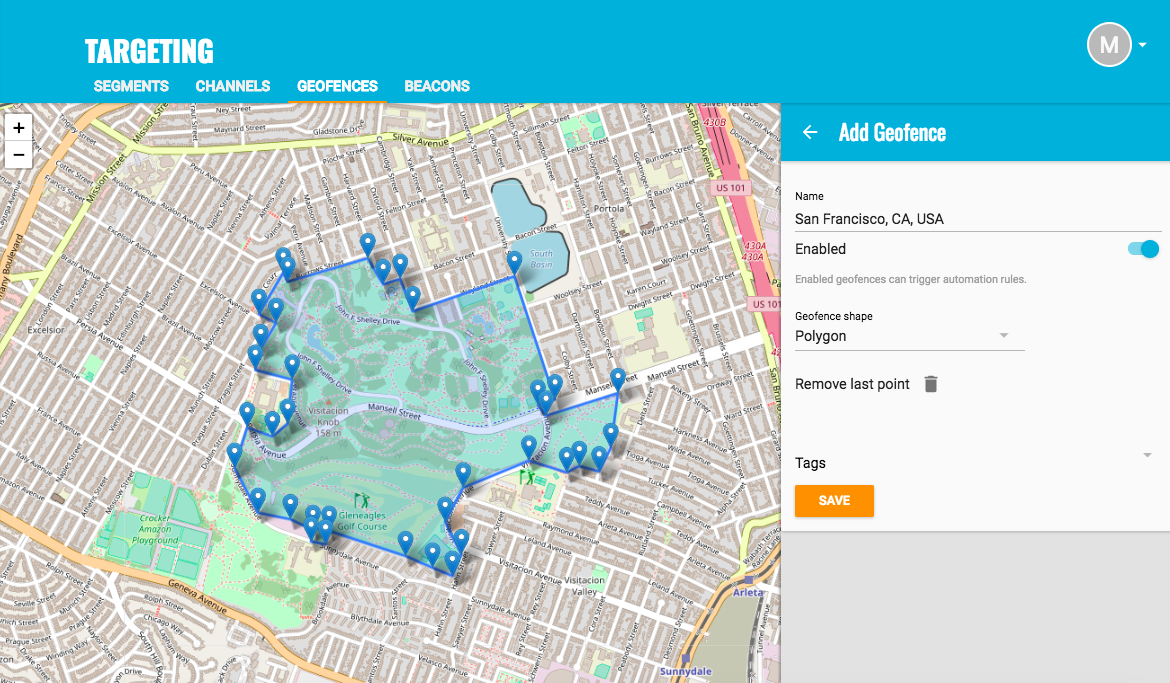
Add as many points as are required to accurately define a geofence around a specific area.
It is easier to roughly draw the geofence around the area and then refine, either by dragging the points or clicking either side of the lines of your geofence to add additional points.
If you make a mistake, click 'Remove Last Point'.
Tags
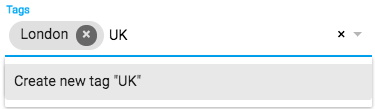
You can optionally add one or more tags to a geofence. This allows you to group geofences (and beacons) and use multiple geofences (and beacons) with the same tag as a trigger for an automation rule. To add a tag to a geofence, start typing in the tags field and either select a tag you have used before or create a new tag (which will then be available when adding or editing other geofences and beacons).
Click "Save" when ready to add the geofence.
Thanks to our friends at the OpenStreetMap Foundation for the map tiles, which are displayed using LeafletJS - keep up the excellent work!
Messaging users in a Geofence
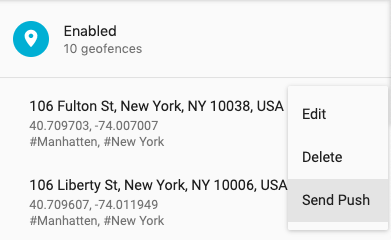
Geofences can be combined with segments and channels to create an audience when sending a push notification or in-app message and they can also be used with automations to trigger a push notification when someone enters or exits a geofence. However, if you want to quickly send a push notification to all users of your app whose last known location was inside a geofence, click the context menu next to that geofence and select "Send Push"
If you want the notification to appear in the foreground, add a title and a message. Use the emoji pickers to add emojis to your title and message as required. If you want to add a picture to your notification, click 'Choose Image' to open your Media Library. Here, you can upload a new image, select an image you have previously uploaded or search the Unsplash stock image library.
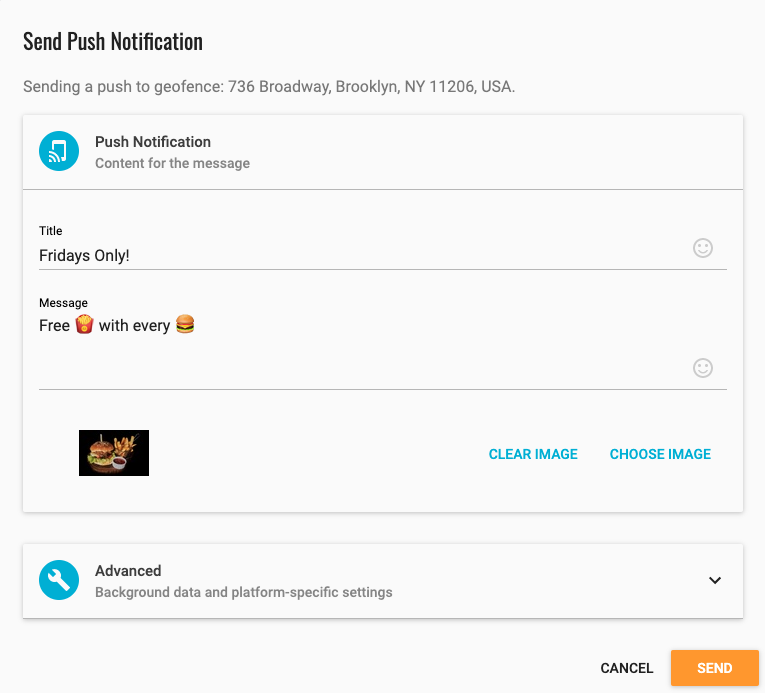
Set any advanced options and then click "Send" when ready.
Editing Geofences
You can edit and delete a geofence by clicking on the context menu next to that geofence and selecting "Edit" or "Delete" as appropriate.
If you want to temporarily disable a Geofence, then clicking context menu next to that geofence and select "Edit", toggle the "Enabled" switch and click "Save".
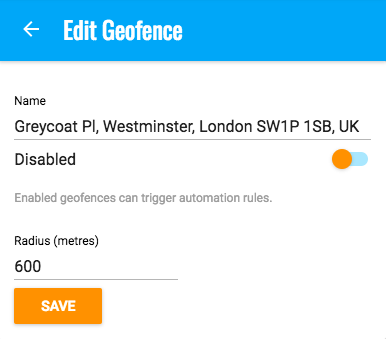
This provides a very quick way to control which geofences can trigger automation rules.
Beacons
If you have deployed hardware beacons, then you can add details of them to Kumulos to target installs when they come into proximity. Kumulos supports both iBeacon and Eddystone protocols.
Adding Beacons
To add, edit and delete Beacons, click on the app and then from the app dashboard for that app, expand "Messaging" from the left menu, select "Targeting" and then select the "Beacons" tab.
![]()
To add a beacon, click the primary action button and give the Beacon a meaningful name.
If you are adding an iBeacon, enter the identifier of the physical beacon. This is of the format uuid:major:minor where major and minor are integers. The cookbook contains example Swift code for how to notify Kumulos when an iBeacon is relatively close.
If you are adding an Eddystone beacon, enter the identifier of the physical beacon. This is of the format namespace:instance.
Some hardware beacons support both protocols. However, even if your hardware beacons do not, if you have iBeacons and Eddystone beacons in the same physical location (i.e. to target both iOS and Android installs) then only add a single beacon to Kumulos with both identifiers configured. This way, you can use both beacons to trigger the same automation rules.
![]()
You can optionally add one or more tags to a beacon. This allows you to group beacons (and geofences) and use multiple beacons (and geofences) with the same tag as a trigger for an automation rule. To add a tag to a beacon, start typing in the tags field and either select a tag you have used before or create a new tag (which will then be available when adding or editing other beacons and geofences).
![]()
Click "Save" when ready to add the beacon.
Next to each beacon is a count of how many proximity events have been recorded for that beacon - a useful approximation for footfall and deciding if your hardware beacons are positioned in the most optimal locations.
You can edit and delete a beacon by clicking on the context menu next to that beacon and selecting "Edit" or "Delete" as appropriate.
![]()
If you want to temporarily disable a Beacon, then clicking context menu next to that Beacon and select "Edit", toggle the "Enabled" switch and click "Save".
![]()
This provides a very quick way to control which beacons can trigger automation rules.
Read on for more details of how to use Beacons and Geofences to trigger automation rules and target installs when they enter or exit a Geofence or come into proximity with a Beacon...