Additional Users
You can add additional users from the "Account Settings" area of the console. These can be additional admins, developers from your own agency or freelancers, and clients with read only access to view their own app(s) for analytics.
Understanding Roles and Scope
Each user is assigned a role which describes the permissions they will have within the account, in addition to optional information which can restrict the scope of their access. For example a user can be given Team Member permission limited to apps for a given client. The available roles are described in more detail below.
Account Admin
Account admin's have full control of an account, they can manage all aspects of all apps, users, clients and can manage billing information.
Team Member
Team members have full control of apps, but can optionally be restricted to apps for a particular client. They cannot control billing information or manage users and apps they have not been granted access to.
Contractor
Contractors are exactly like team members except they cannot see the Kumulos news feed (product launch announcements, release notes, blog posts and guides). If you have rebranded your console with your own logo, colors and subdomain and want freelancers, sub-contractors or third party development partners to think they are using your system, then use the contractor role.
Client
Client users can view their apps from their client portal. When adding a client user, you must also specify the client they are to be given access to. Note that only clients with the client portal enabled will be listed. The client portal can be enabled for an existing client by Editing that client
Inviting a new User
The users console is accessed by selecting "Users" from the sidebar menu in the "Account Settings" area. When selected the first view is of the currently added users with summary information showing their name, the email address they use to access the console and their role.
To invite a new user to access the console click the action button at the top of the screen, this will display the Invite User form, email address is a required field, as is the new user's role. A short description of the access they will be granted is displayed at the bottom of the form.
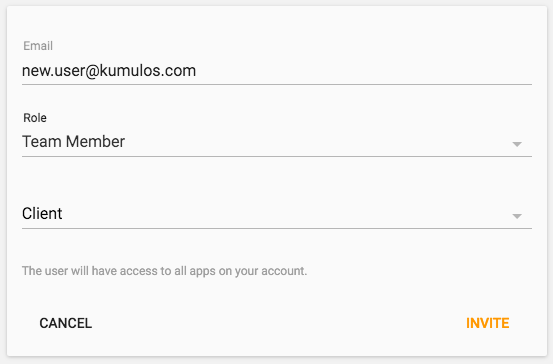
In the example above a new user is being created who will have Team Member permissions for all apps within the account.
When the desired permissions have been set, click the Invite button to send an email inviting the user to provide a password and access their new account.
Resend & Revoke Invitations
If you need to re-send the invitations you can click 'resend' in the invitations tab.

This will allow users who have previously been invited to recieve another email to access their account, if they can't access the orginial invite for any reason.
If the invitations has already been accepted then there will be no option to resend. Users should then be able to reset their passwords through the login page to gain access to their accounts.
Inviatations can be revoked in the "Inviations" tab provided they have not already accepted a previous invite. If the user has already accepted please refer to the "Managing Existing Users" section below
This will stop the invitation being valid and will not allow the recipient to access the user account.
Managing Existing Users
Existing users can be managed from the user console, accessed by selecting "Users" from the sidebar menu under "Account Settings". The initial view lists all the current active users showing their name, email address and role. Each user can be edited by clicking the pencil icon, or deleted by clicking the recycle bin.

Restoring Deleted Users
To restore a deleted user account simply navigate to the "Deleted Users" tab and click "Restore". This will allow the user to log in to their account with the permissions and details the account previously had.

Resetting a User's 2FA
If a user in your account loses access to their two-factor credentials, for example the device has been lost, you can reset their login by editing their user login and clicking 'Disable 2FA' in the panel. This will still respect the account level settings and if required by policy the user will be forced to setup 2FA on their next login.
