Overview
Having created tables to organize and store your data, you can then create API methods to access your data. If you wish to encapsulate business logic and execute server-side scripts, you can add KScript methods. Alternatively, you can use the RESTful API to access your data.
Working with APIs
Each API method is defined with a:
- title (name) for the operation;
- 'primary' table to work with;
- set of 'input parameters';
- and a set of 'actions'.
API methods can be 'defined' or 'deployed'. When a method is defined but not deployed, it is not accessible from any client SDK. In order to make API methods available to the client SDK, it is necessary to deploy the API.
Any changes you make to API methods after deployment will not be available to the client SDK until you deploy the API again. This is to allow for testing API methods before making the changes live.
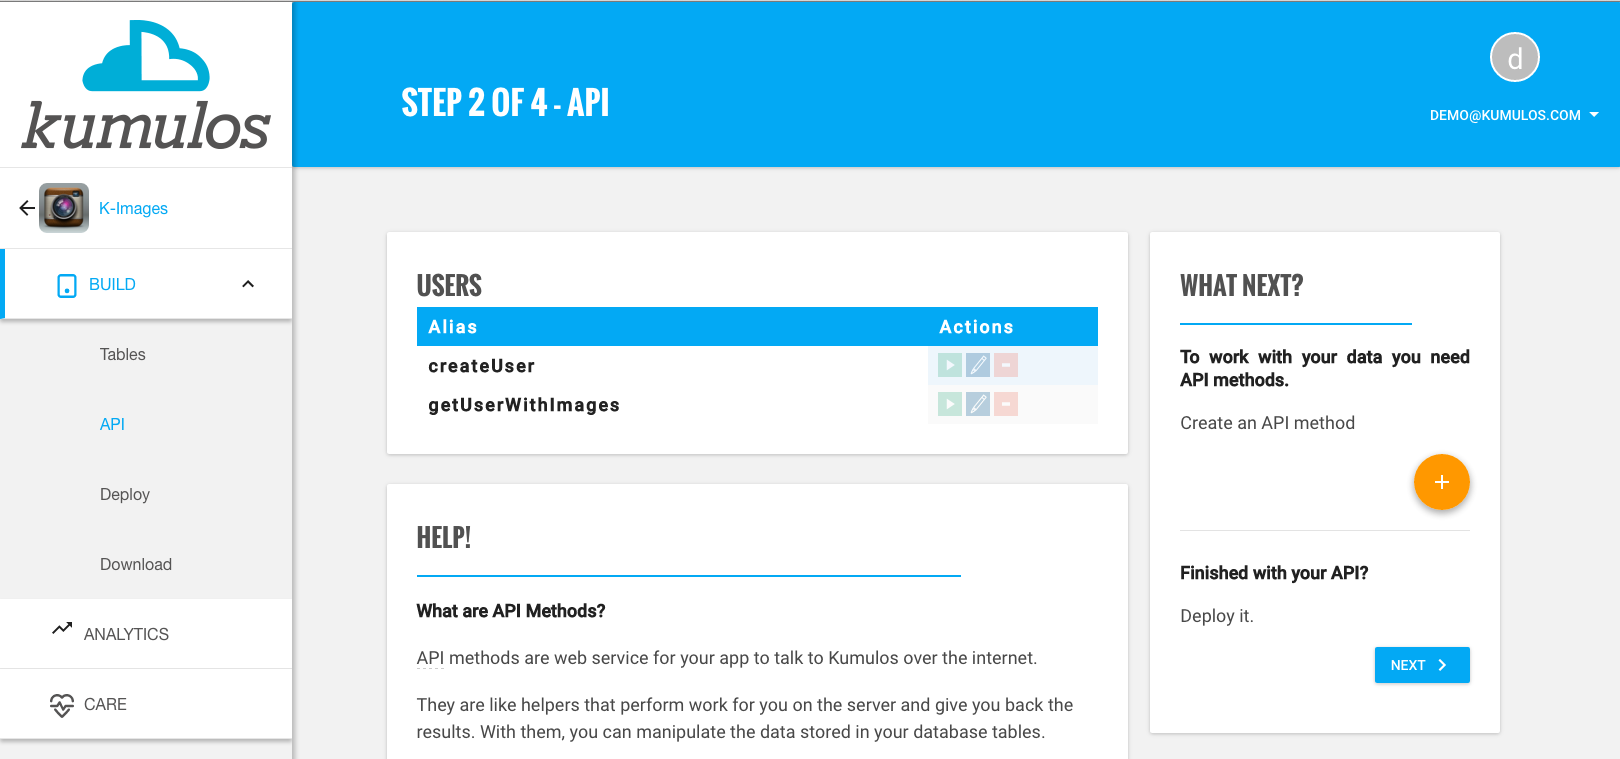
Managing API Methods
To manage your app's API methods, head to the Build service in your console and choose the 'API' option.
From here you can see all API methods defined for your app, edit and delete existing methods, and create new methods.
Testing Your API Methods
During development, you can test your methods from the web interface without integrating any client SDKs. Running an API method from the web interface is as simple as clicking on the 'run' link in the right-hand column of the method listing.
When you do, you'll be given all the input parameters to your method as input fields that you need to fill in. When you've added your desired values, clicking the 'Run' button will run it with your specified parameters. The result of execution will be displayed at the bottom of the screen for you to inspect.

Testing API methods will not deploy them and make them accessible from your client SDK. It is possible to test new API methods without affecting a production application.
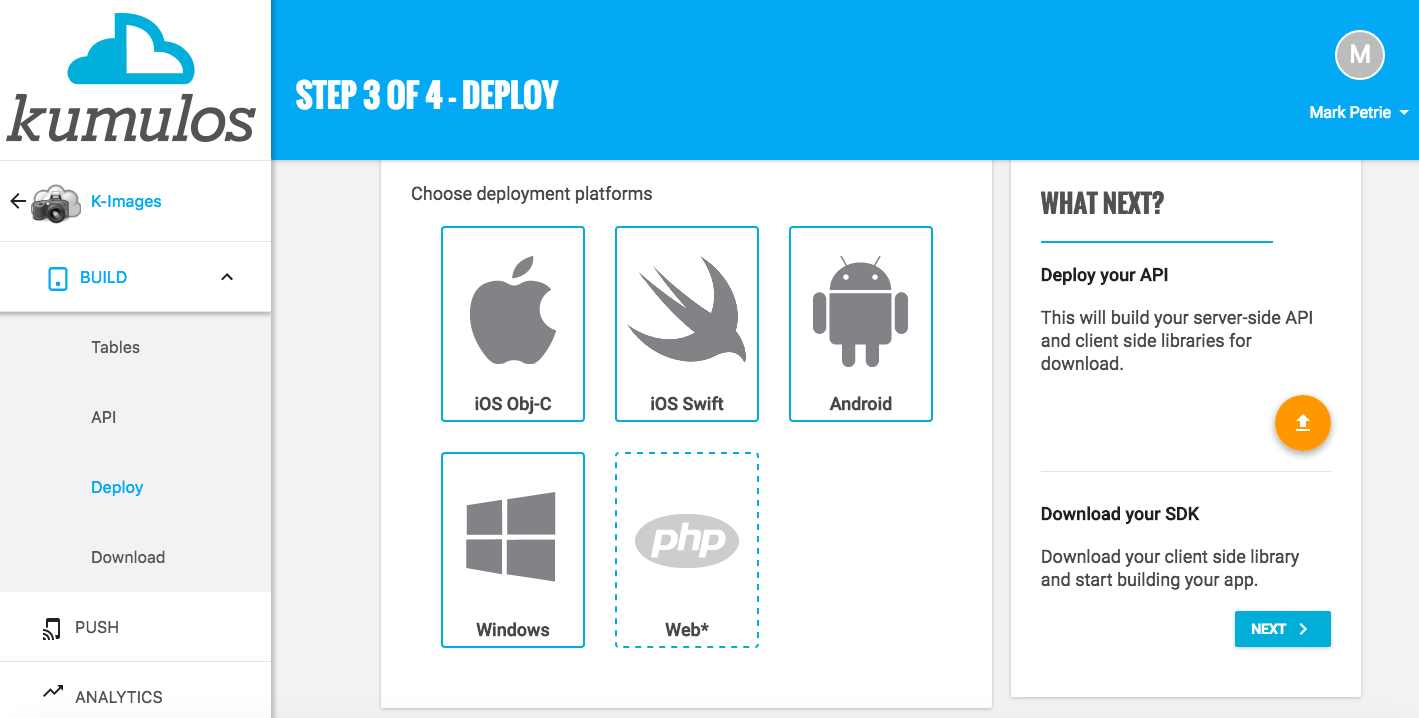
Deploying Your API
In order to make your API available to your client devices, you need to deploy the API methods. This step is important and turns your methods into native server-side code and also native client bindings. When you build your API, all methods you've added or deleted are synchronized so the changes are live.
To deploy your API, head to the 'Deploy' screen in the Build service. After selecting the platforms you'd like client SDKs built for, hit the deploy button.
Integrating into your project
Having deployed your API, you can now integrate one of our mobile SDKs into your project. Please see the Objective-C, Swift, Android, Cordova, Xamarin or Unity integration guide. Alternatively, you can use any HTTP client to access your API methods via the JSON and plist interface.
Creating & Editing APIs
Creating and editing API methods is done through the API method editor.
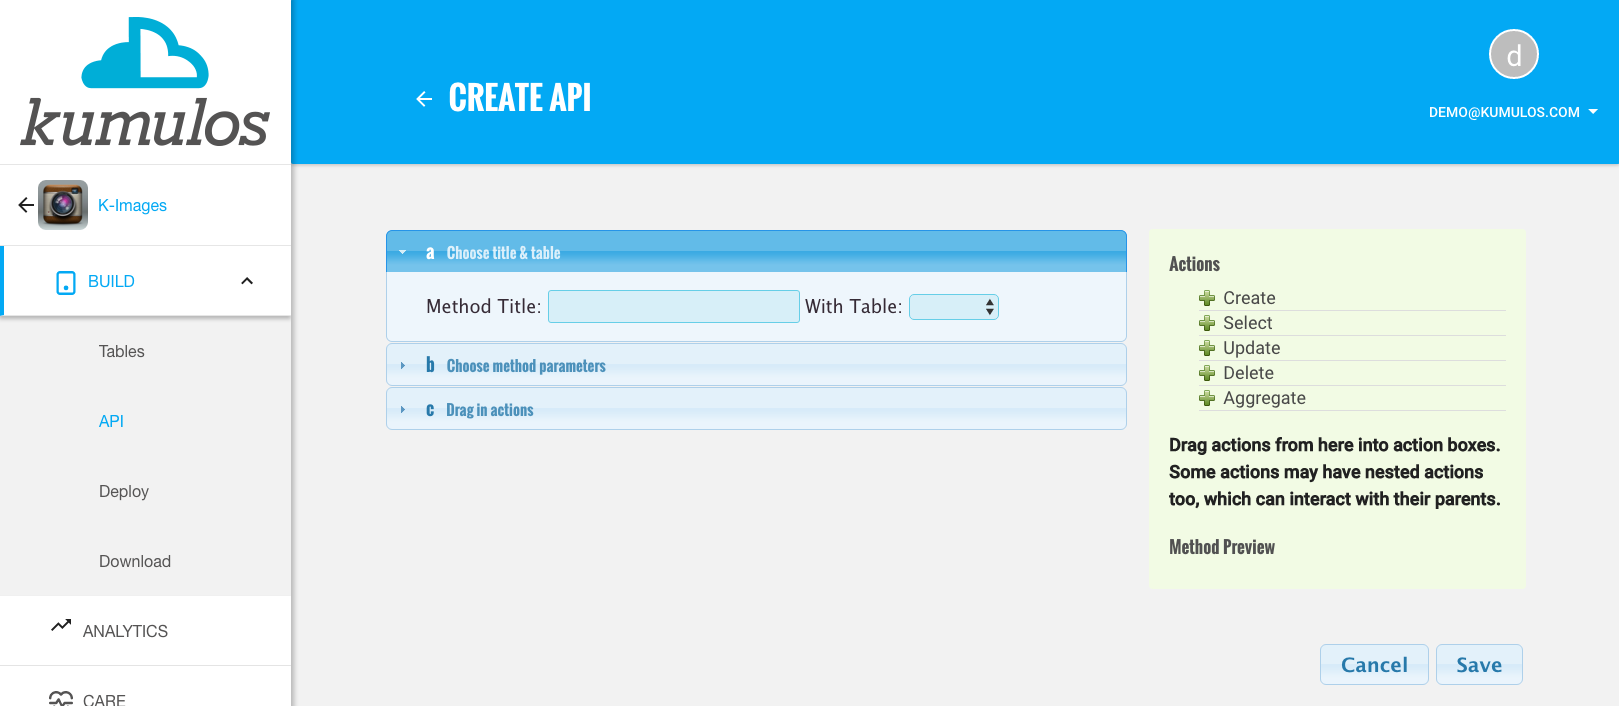
Through this interface, you define the title and table to work with, any input parameters to your method, and the actions you want to be performed on your data.
Title & Table
The title must be unique, and should represent your intention for the method. For example, 'Create User', 'Search Books', or 'Get posts with tag'.
Any title will be turned into
lowerCamelCasefor consistency, and this is the name you should use when calling API methods from the SDK.
Input Parameters
The table selected will be used to suggest input parameters, and will also be used as the default table for actions as they are added.
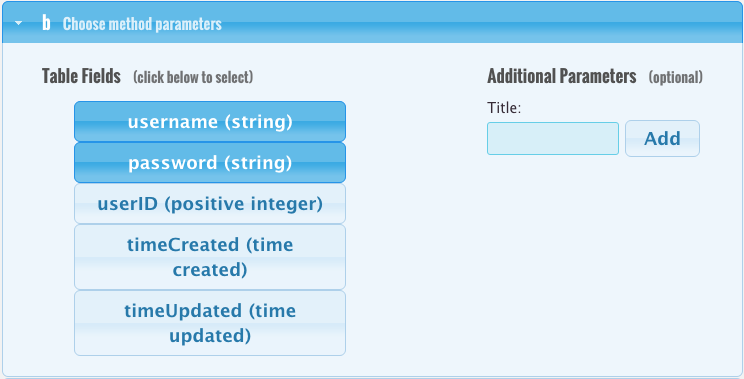
By default, all the fields from your primary table will be selectable for use as parameters to your API method, but if you want you can add extra parameters too. To select a parameter, simply click the toggle button to enable and disable the parameter. You should notice the method preview pane to the right of the screen updating as you modify your parameters.
Field names will also be converted to
lowerCamelCasefor use as input parameters
To add custom parameters, you just fill in a name for them and then click the 'Add' button. This will add the parameter to your parameter list and automatically enable it for you. Although you can't remove a custom parameter, you can deselect it in the same way as default parameters by clicking the toggle button.
Input parameters you have selected will be available to use in your API method's actions. It is also possible to select no parameters if none are desired and go straight to adding actions.
Actions
Actions define the data manipulation operations that will be performed on your data by an API method. Actions are dragged from the right hand action list into the left hand action panel.
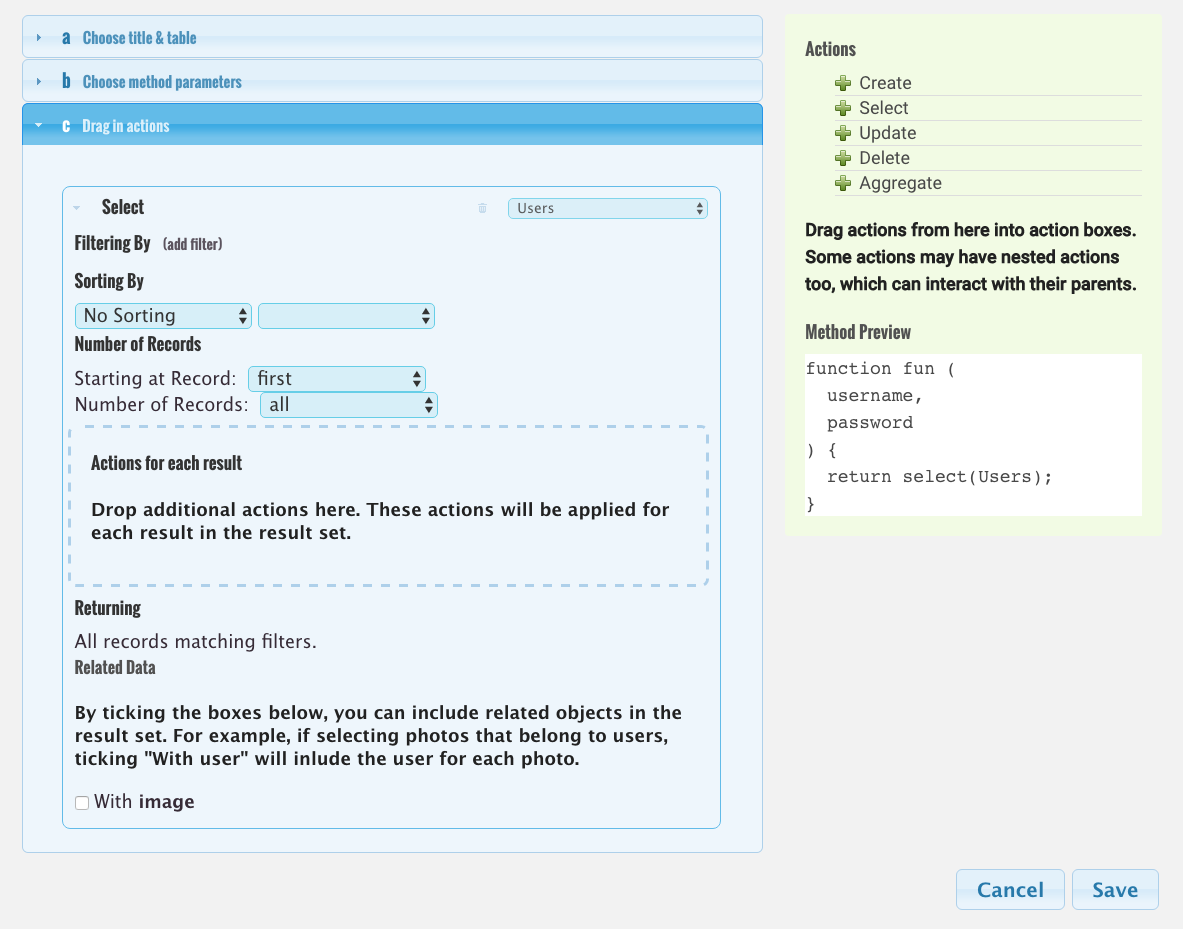
When you create APIs, you can use the following actions types.
Create
Create actions will make new records in your database tables, and generally when using a create action you'll want to enable all of the input parameters (except timeCreated, timeUpdated, and the ID parameter which are automatically filled in for you).
Select
Select actions are for retrieving the data you've created in your tables and support filtering the records you want to select. For methods mainly selecting data, you'll only want to enable input parameters related to the filters you're going to apply to select your data. The select actions also support nested actions, and returning related data which will both be covered in a following section.
Update
Update actions are for modifying existing records in your tables and you should give careful consideration to their filters to ensure you only update the records you want to update.
Delete
Delete actions will delete all records in a table that match the applied filters, so again it is important to consider your filters carefully when using this action type. Delete actions also allow the deletion of related data in a similar way to how select actions return related data.
Aggregate
Aggregate actions create summaries of data. The available aggregations are:
| Function | Description |
|---|---|
| Number | Gets the total number of records |
| Number (unique) | Gets the total number of unique values for a field |
| Total | Gets the sum of all values of a numeric field |
| Average | Gets the mean value of a numeric field |
| Minimum | Gets the minimum value of a numeric field |
| Maximum | Gets the maximum value of a numeric field |
Return Types
| Action | Return Type |
|---|---|
| Create | New record ID |
| Select | Array of records |
| Update | Number of updated records |
| Delete | Number of deleted records |
| Aggregate | Number value for selected aggregation |
Filters
Applies to: Select, Update, Delete, Aggregate
Adding a filter
Filters allow you to restrict the records that will be worked with by an action and can be added to supporting actions. To add a filter, click the "(add filter)" button in the 'Filtering By' box.

When you add a filter, you get a choice of:
- the field you'd like to match against in the table
- what comparison operator you'd like to use for the match
- and which input parameter to use the value from
Adding multiple filters
You can add more than one filter to actions that support filtering, and you can choose the type of logical operator that joins each filter in the chain. To add additional filters, click the "AND" or "OR" buttons as appropriate.
Filters using 'and' logical operators will only find records that match all of your applied filters, but if your filter chain uses only 'or' comparisons the filter will find records matching any of the filters.
Removing a filter
If you want to remove a filter, click the little trash can icon to the right of the filter row.
Filtering by 'timeCreated' or 'timeUpdated'
You can filter records based on the 'timeCreated' or 'timeUpdated' magic fields to restrict the records to only those added or updated within a given time range. For example, if you had a cycling app that stored details of your rides in a 'rides' table and you wanted a 'getWeeklyRides' API method that selected records created since start of the current week, you would add the following filter...

Although the timeCreated and timeUpdated fields are rendered in a readable format in the data browser, they are stored as timestamps in database and so the value of the timeCreated input parameter needs to be a timestamp in seconds.
Limits
Applies to: Select

Select actions can be limited so they only return the number of rows you want. This can be useful to allow paging of data. To limit the returned results, you need to add an input parameter for the limit. Next, under the "Number of Records" panel, you select the "limit" input parameter as shown.
If you want to offset where the start of the records are selected from, add another parameter such as "offset" and then select "Starting at record: offset". Then you can pass in a limit and offset to allow paging the returned results.
Sorting
Applies to: Select

This panel of the API editor allows you to set which sorting order you would like selected records to have.
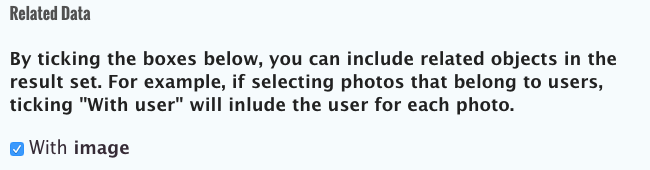
Related Data
Applies to: Select
This panel of the API editor will allow you to include records linked by "Belongs To" in your result from select actions. For more information about setting up "Belongs To" relationships, see table relationships in Kumulos.
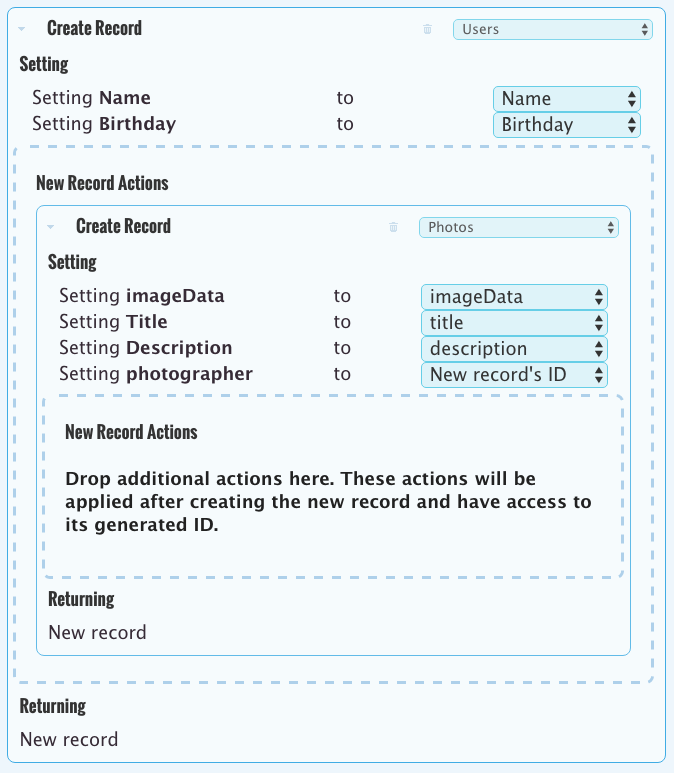
Nested Actions
Applies to: Select, Update, Create
All action types can be nested inside select or create actions. The way the nested actions work is slightly different depending on what type of action they are nested inside.
If you nest actions inside a create action, then the nested actions will be executed once and can access all of the field values of the newly created record.
On the other hand, nested actions in selects will be executed once for every result of the parent select action. The nested actions will have access to the field values of the current record during each iteration. It is important to define suitable filters so that your nested actions don't have unintended consequences.
The image here shows an example of nested action use to create a user with a photograph.
Returned Action
It is possible to choose which API action will be returned from an API method by using the returned action widget to the right of the editor:
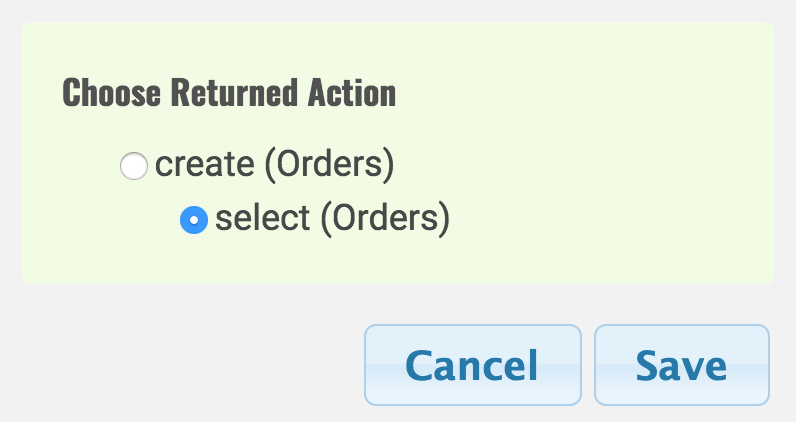
For example, this allows you to create a record and then select it back again from one API call.
N.B. you cannot return an action that is nested in a Select action
Response Codes
In this section, you can find information about what each server response code means, and how to debug your app should you encounter anything other than 'Success'.
Success (Code: 1)
This response code will be returned by Kumulos when the requested method was executed successfully.
Not authorised (Code: 2)
If you receive this error, then there is likely something wrong with your combination of:
- API key
- secret key
- salt
- hashedKey
You should check that you are initialising your Kumulos library with the correct API key and secret key. If you are using a custom library with the JSON API service, you should refer to the documentation to ensure that you're generating the hashedKey parameter correctly.
No such method (Code: 4)
When you receive this response, the API server is not able to find your requested API method. You should check that:
- the API method exists in the control panel
- your API has been deployed successfully since you added the API method
- the method title you are requesting matches the
lowerCamelCasetitle of the API method on the server
No such format (Code: 8)
This error indicates you're requesting an unsupported return format for the data. At this time Kumulos supports JSON or binary PLIST formats with the ".json" and ".plist" suffixes. Please ensure that the URL you are requesting ends with one of the two listed.
Account Suspended (Code: 16)
You may receive this code for a number of reasons related to your billing subscription (for example if your credit card has expired and you have not provided an alternative means of payment) or any terms of use violations.
The most likely reason for receiving this response code is that the build feature for the app is in trial and is therefore limited to use on 25 test devices only, but the app has been installed on more than 25 test devices. In this case, simply add build to your subscription.
Kumulos features are free to use on up to 25 test devices for up to 30 days while your app is in development. After this, you must either switch features off or add features to your subscription to remove these device and time-based limits (and also allow you to create a staging environment for your app).
This should be done prior to store submission (so that your app is not rejected due to exceeding device or time-based usage limits during the approval process).
The first time you are ready to switch an app into production, you must create a new billing subscription.
If you believe that you have received this response code in error (for example if you think that installations on emulators are incorrectly counting against your device count), please contact technical support.
Invalid request (Code: 32)
This is triggered when your API key is incorrect or you are not making a POST request to the API servers. To debug, please check your API key is correct, and if you're using custom bindings, that you're making a POST request to Kumulos.
Unknown server error (Code: 64)
This error will be returned upon any erroneous server state not covered by the other response codes. If you receive this error, it is likely that there is a fault on our API servers and you should notify support. However, it is possible that rebuilding your API methods may fix the problem.
Database error (Code: 128)
When encountering this error, Kumulos has had a problem communicating with your app's database tables. Some possible causes are:
- Kumulos service interruptions (check the status site)
- Hookup connectivity issues (check your app's care dashboard)
If you repeatedly see this error, it is recommended to contact support.
Examples: Filtering Related Data
It is often useful to filter records by fields in tables they are related to by a "Belongs To" field.
one-to-one relationship
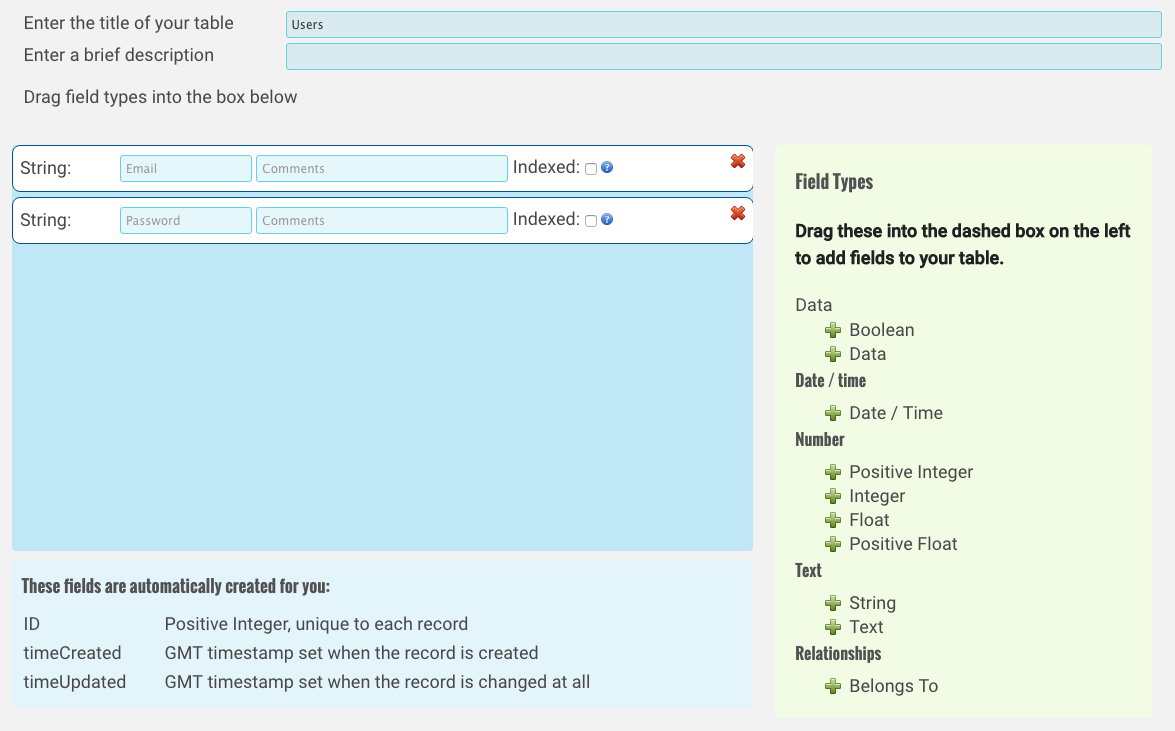
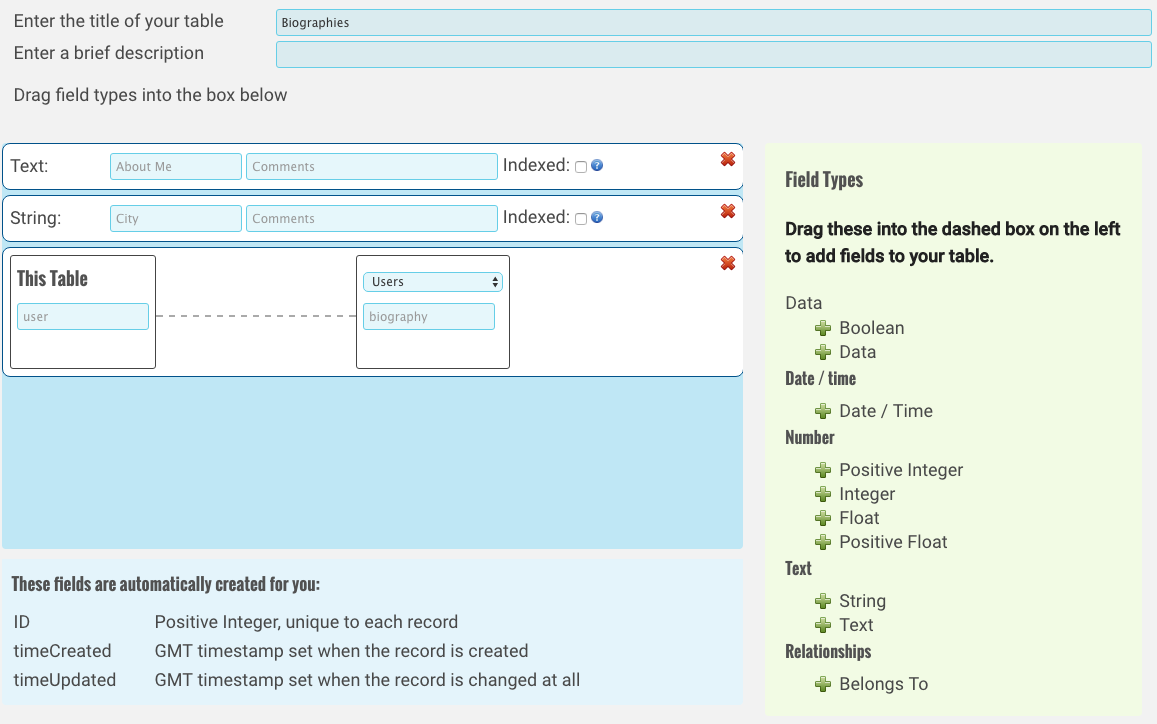
Using the biographies example for a mobile application allows users to enter a biography. You may decide to store the biography in a separate table (so its not returned by every API method that selects data about your users). Each Biography entry belongs to a User, and each User has a Biography. This is a one-to-one relationship.
Tables
Example Filter
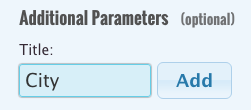
Consider your Biography table stores details of which city a user is from, and you'd like to select all Users that come from a particular city. The following will guide you through the creation of such an API method.
Create an API working with the Users table

Add an additional input parameter "City"
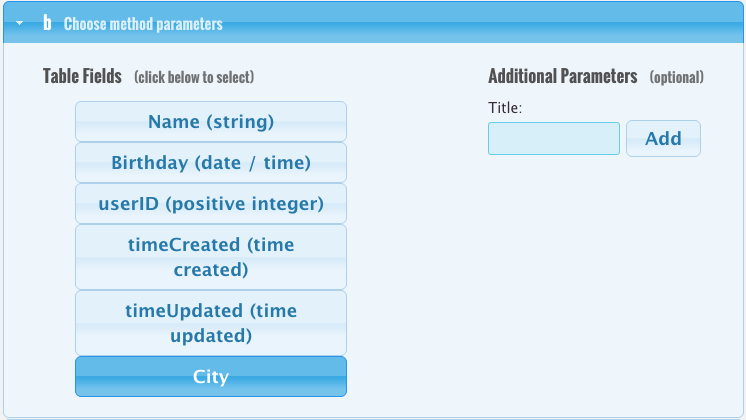
Add a select action with a filter across the Biographies table's City field
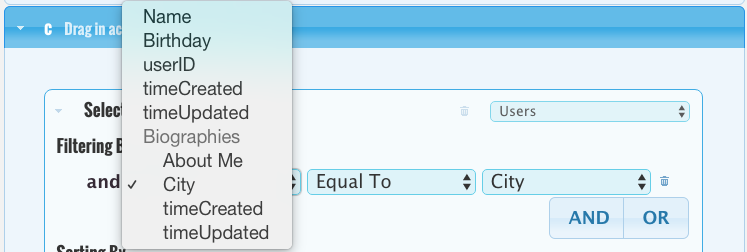
Kumulos realises that your User has a Biography and therefore allows you to search the fields of Biography from the Users table.
one-to-many relationship
We will use the photo sharing app as an example of how to filter data in a one-to-may relationship.
Tables
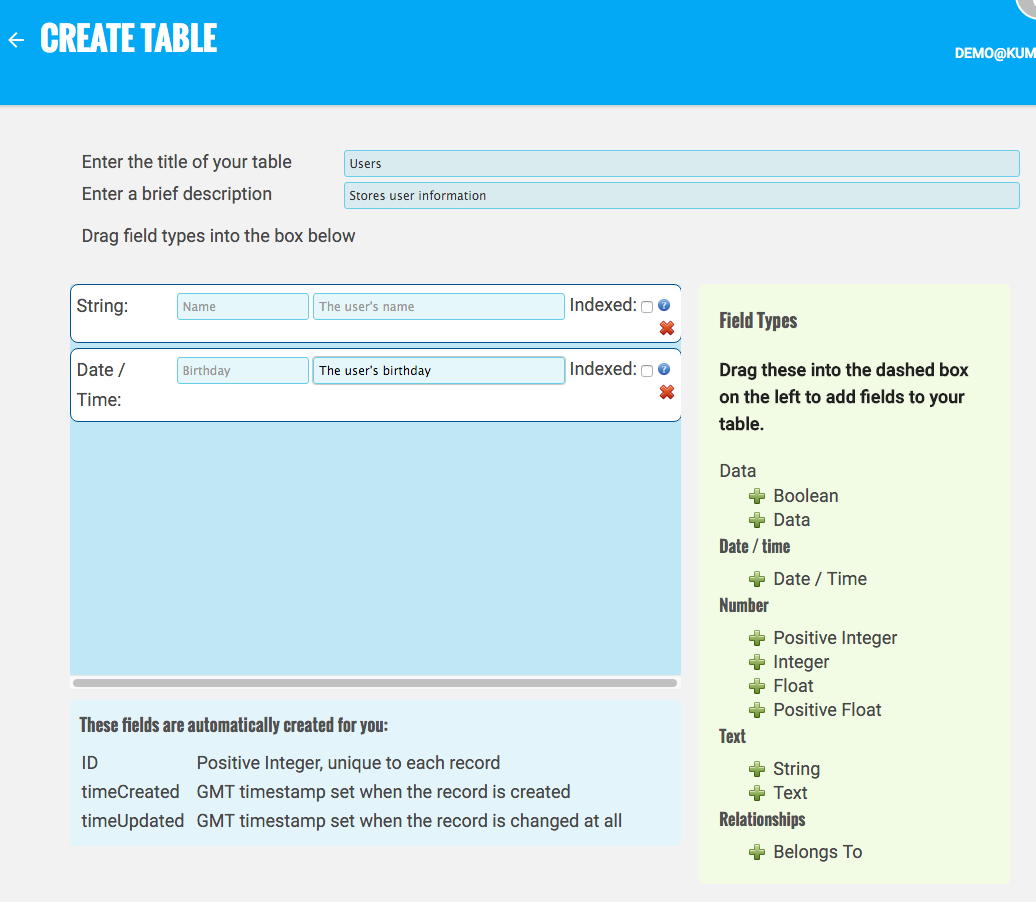
A pretty simple table definition that stores a user's name and the date of their birthday.
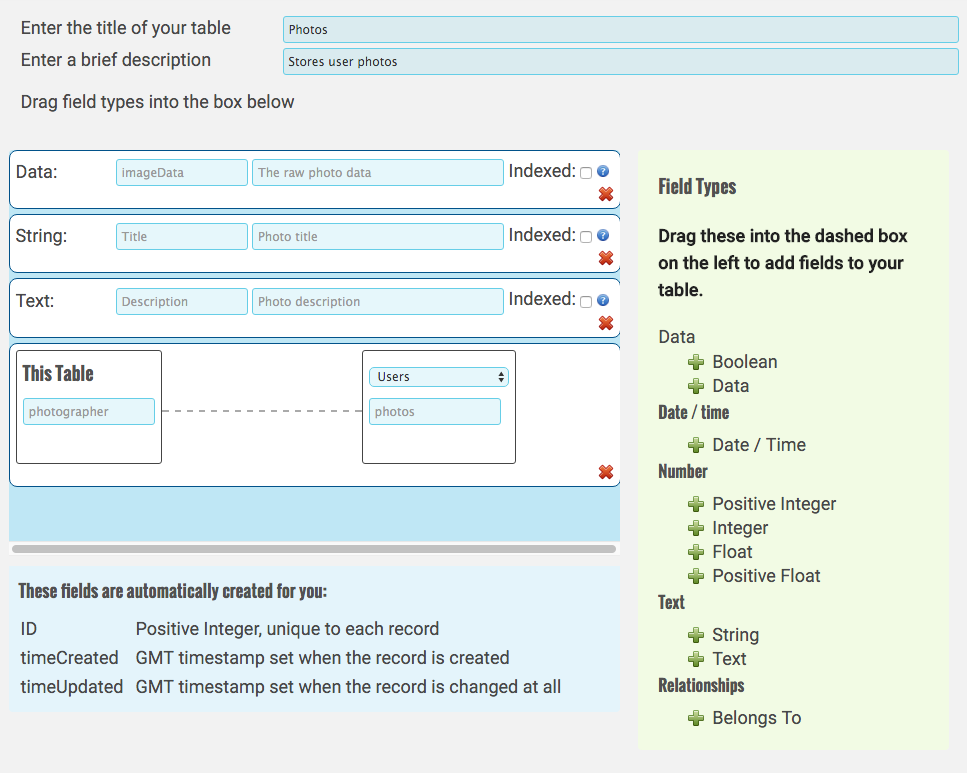
A data field for the photo data, a title and description constitute the main elements of this table. The relationship expressed is that the photo has a photographer who took the photo, and any given user has a collection of photos.
When a user is deleted, any photos that they’ve taken will also be deleted, but not any comments made on those photos.

The comments table stores comments on photographs. This table is essentially just two relationships and the actual comment text.
First, we say that the comment has an associated photo, and the photo has a collection of comments. Next, we say that the comment also has a creator (a user who posted it) and therefore each user has a collection of posted comments.
Because a comment belongs to both a user and a photograph, when either the owning user or photo are deleted, the comment will also be deleted.
Returning comments for a photo
Lets say you want to show a list of photos and the comments associated with them. There are two ways you can achieve this with a one-to-many relationship, which to use will depend on your mobile application.
Approach 1 - Returning related data
The most straight forward way to achieve this is to add a new API method on the photos table that also returns related data.
## Create an API working with the photos table
Add a new API method on the photos table.

## Add a select action that includes related data
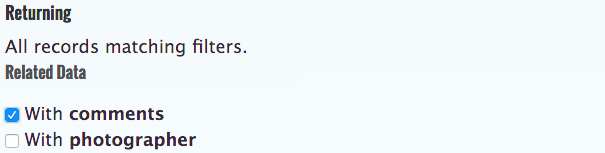
Drag in a select action and in the related data section, tick the 'With comments' box. Now, when you select photos, you will also receive all comments for each photo.
Approach 2 - Filtering comments by related data
While the above approach is the most straight forward, it may not be appropriate for your mobile application. For example, if the photos are shown in a list or grid view and comments are not shown until you click on the photo, then it doesn't make sense to waste bandwidth and processing time retrieving comments when they may not be required. In which case, when a user clicks on a photo, you would use the ID of that photo as a filter on the comments table.
## Create an API working with the comments table
Add a new API method on the comments table.

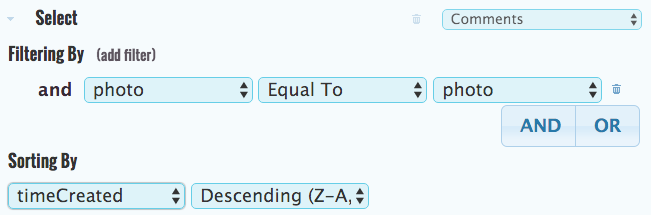
## Select the input parameter "photo"
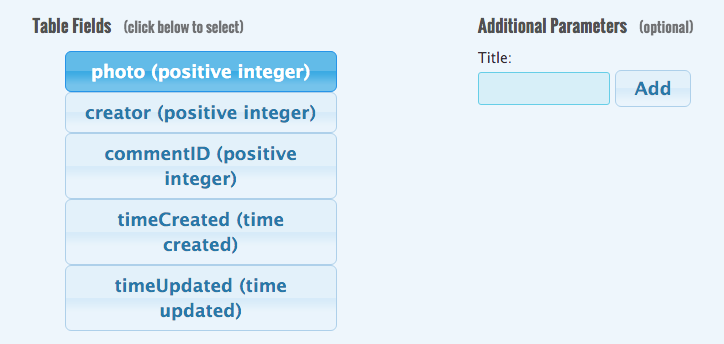
## Add a Select action with a filter on the "photo" field
Kumulos realises that comments belong to a photo and therefore allows you to filter the comments table based on the dynamic property photo.
many-to-many relationship
A many-to-many relationship is a composite relationship of two one-to-many relationships. Using our favorite meals example where many people like many meals, we build two one-to-many relationships with the following tables.
Tables
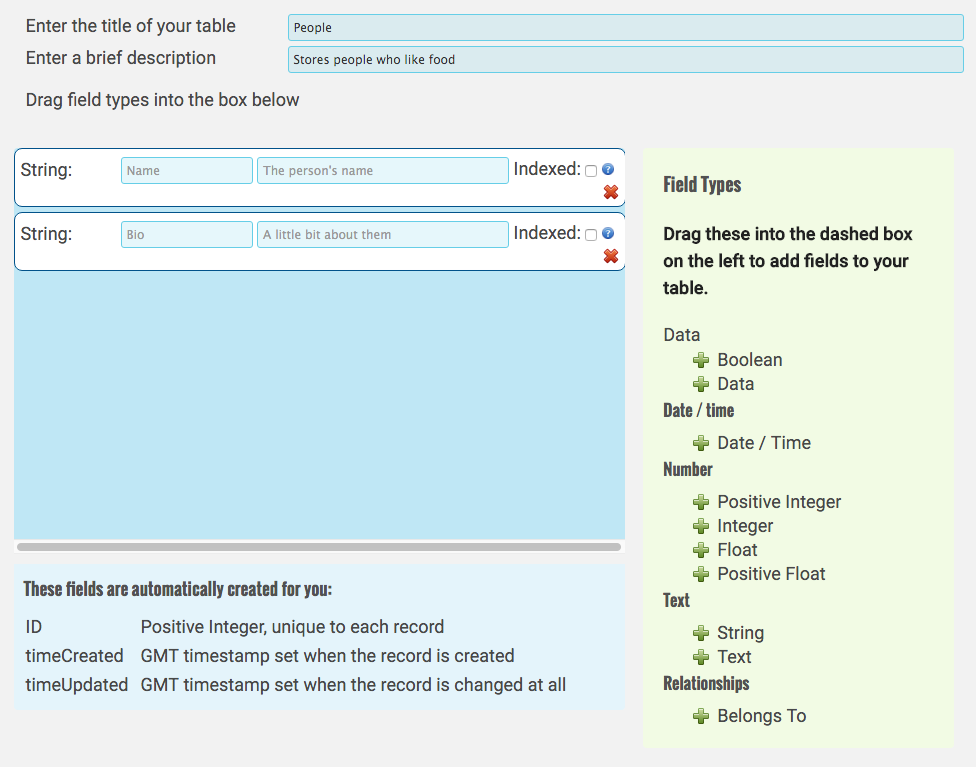
A simple table to store information about people, their name and why they like food.
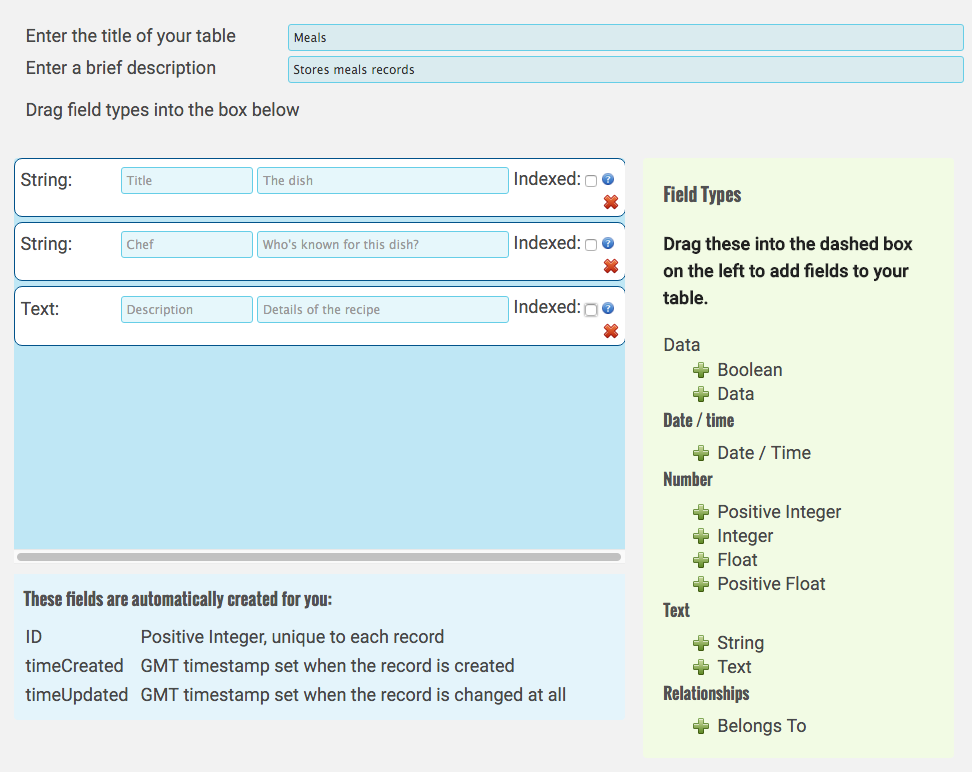
Another short table definition storing a title, description, and the name of a chef who is famous for the meal.
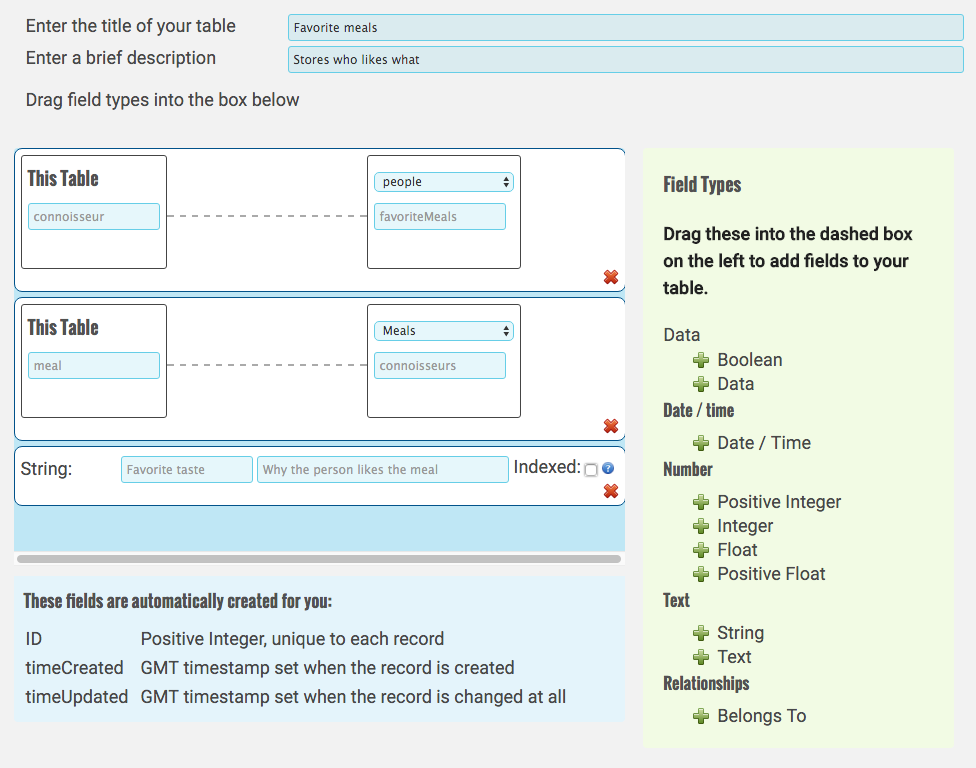
The favorite meals table stores a link between a person and a meal. It also stores what the person likes most about the meal. The many-to-many relationship between people and meals has been captured by these two one-to-many relationships:
- One person has many favorite meals (through connoisseur)
- One meal is the favorite dish of many connoisseur
Example Filter
Now, lets say we want to find all people who like a variation of a popular meal:
Create an API working with the People table

Add an additional input parameter "meal"
This will hold the title of the meal we want to search for.
Add a Select action with a filter on the "title" field in the "meals" table
Use the containing operator to filter results where the "title" of the meal is like the input parameter "meal" (via the favorite Meals tables).
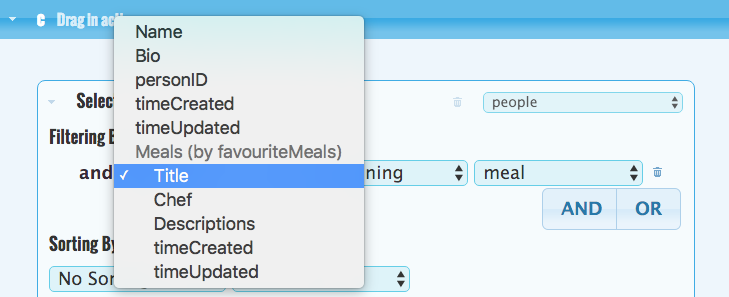
Because of the M:N relationship between People and Meals (stored in the favorite Meals table), Kumulos will let you search for People and filter on the Meals table. It does this by implicitly linking up through the favorite Meals table.