Unity
Integration
Kumulos provides an SDK in the form of a Unity package to ease the integration of the Kumulos Analytics, Push Notification, Crash Reporting and Build features into your iOS & Android applications created with Unity.
Integrate SDK components and dependencies
The Kumulos SDK is an open source project hosted on Github. You can find a link to the project in your agency console and here: https://github.com/Kumulos/KumulosSdkUnity. It is distributed as a Unity package for importing into your projects.
To get started, download the Unity package from GitHub and import it into your project.
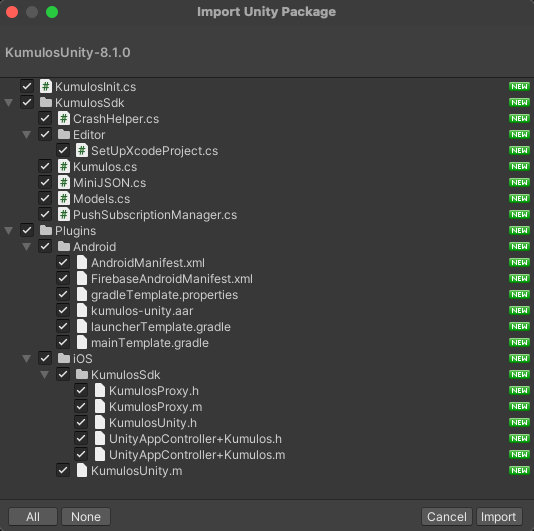
Once imported, you are ready to proceed with initialization.
Initialization
To configure the SDK for use you need to initialize it with your app's API credentials.
Your API Key and Secret Key can be obtained from the App Dashboard in your agency console.
C-Sharp
Attach the KumulosInit script to your main scene's camera object by dragging it from the Assets browser to the Main camera.
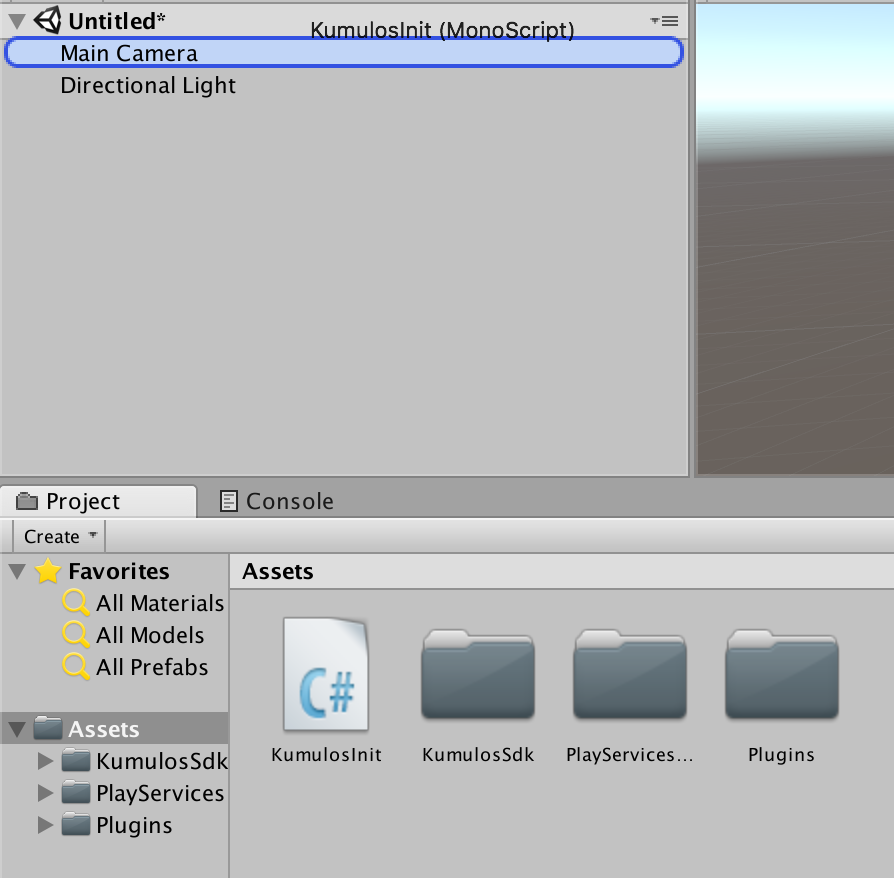
In the provided KumulosInit behavior, edit the config object to set up your credentials:
var config = (new Config.Builder("YOUR_API_KEY", "YOUR_SECRET_KEY"))
    .Build();

Kumulos.Initialize(config);
Android
For Android builds, it is necessary to export the Gradle project with the provided custom Gradle template files (ensure these file are selected in the Android player settings). Required files depend on Kumulos SDK version:
mainTemplate.gradlelauncherTemplate.gradlegradleTemplate.properties
mainTemplate.gradlelauncherTemplate.gradle
mainTemplate.gradle
On the player settings, tick the "Export project" box to save the Android project to your preferred location.
Once exported, open the project in Android Studio to continue initialization.
Add a MainApplication.java class to the project's main java sources package:
import android.app.Application;

import com.kumulos.android.KumulosConfig;
import com.kumulos.android.unity.KumulosUnity;

public class MainApplication extends Application {

    @Override
    public void onCreate() {
        super.onCreate();

        KumulosConfig.Builder kumulosConfig = new KumulosConfig.Builder("YOUR_API_KEY", "YOUR_SECRET_KEY");
        KumulosUnity.initialize(this, kumulosConfig);
    }
}
Make sure this class is referenced from
android:name=".MainApplication"property of the<application />tag in theAndroidManifest.xml.
iOS
For iOS, you need to add credentials to the Assets/Plugins/iOS/KumulosUnity.m file as follows:
#import "KumulosSdk/KumulosUnity.h"

@implementation KumulosUnity

+ (KSConfig*) buildConfig {
    KSConfig* kumulosConfig = [KSConfig configWithAPIKey:@"YOUR_API_KEY" andSecretKey:@"YOUR_SECRET_KEY"];

    return kumulosConfig;
}

@end
iOS Adding XCFrameworks
Since version 8.1.0 Unity SDK comes with XCFrameworks instead of fat libraries. Follow the steps below to add them to your Xcode project.
- Switch to New Build System in File -> Project Settings -> Build System
- Add
KumulosSDK.xcframeworkandKSCrash.xcframeworkfrom Kumulos Unity SDK to UnityFramework target (drag under frameworks, copy files). SelectDo Not Embedoption. This is equivalent to adding the XCFrameworks toLink Binary With Librariessection inBuild phases. - Add
KumulosSDK.xcframeworkandKSCrash.xcframeworkfrom Kumulos Unity SDK to the application target. SelectEmbed and signoption. This is equivalent to adding the XCFrameworks toLink Binary With LibrariesandEmbed Frameworkssections inBuild phases. Simulator builds (as chosen in unity) don't have general tab, add frameworks in Build phases.
Checking installs of your App
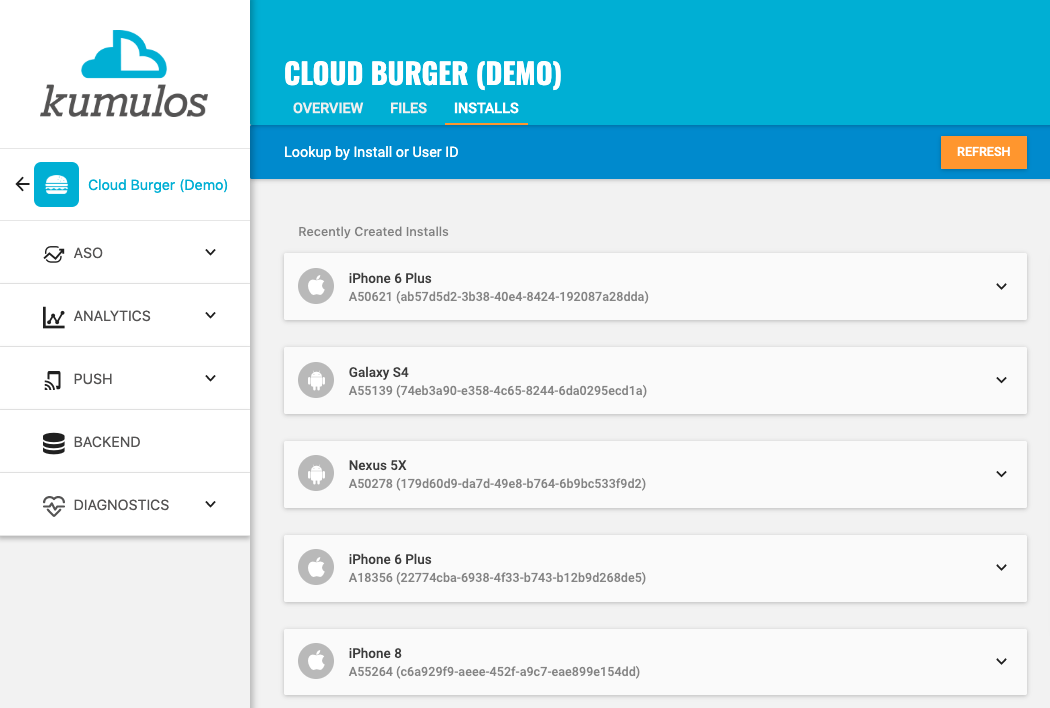
When you run your app on a simulator or install your app on a device, you can check that the SDK has been initialized correctly by selecting the app and clicking the Installs tab to see the ten most recent installs of your app. Click on any install to see more information.
If you experience any difficulties integrating an SDK or initializing the Kumulos client, please don't hesitate to contact support who are standing by to help!
That's it, you're now good to go! Continue reading to learn more about analytics, configuring push notifications and calling Build API methods in your app.
Installation ID
When initialized for the first time, the Kumulos SDK will create a unique identifier for the current installation. This identifier can be used to target push notifications to a specific device through KScript or the Push Notifications API.
In order to retrieve this identifier, simply access the class variable:
string id = Kumulos.Shared.InstallId;
Once you have the installation ID, you can send it to your app's backend to be used later for push targeting. For more information about push targeting, please see the KScript Documentation or push notification documentation as appropriate.
Analytics
Kumulos provides concise and easy to consume analytics & reporting features. By initializing the SDK, you automatically get session & engagement reporting out the box.
Session Analytics
Kumulos records sessions based on application foreground and background events. When an app enters the background, Kumulos will wait for a configurable idle period. If there are no more foreground events during that idle period, the current session will be closed.
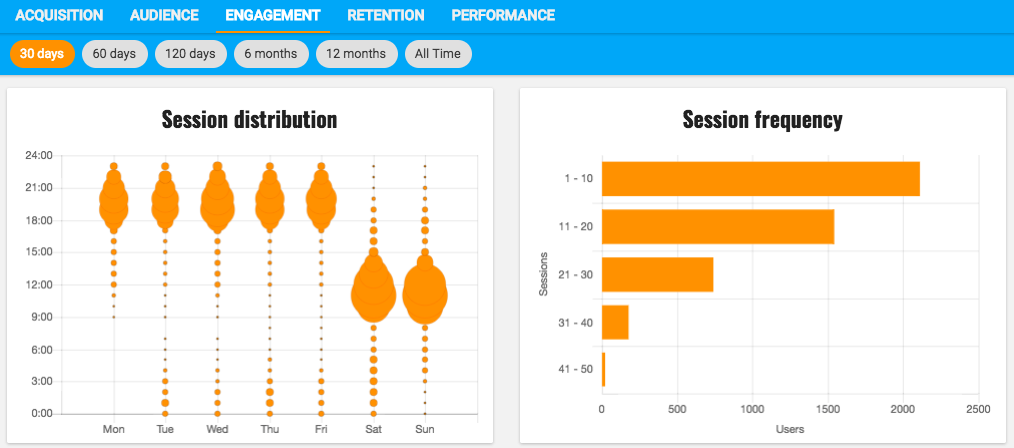
By default the idle period is 40 seconds of inactivity.
Event Tracking
Kumulos allows you to track custom analytics events that can be used as a trigger to fire automation rules (e.g. to trigger a push notification) or as steps in a funnel to track conversion through key user journeys in your app.
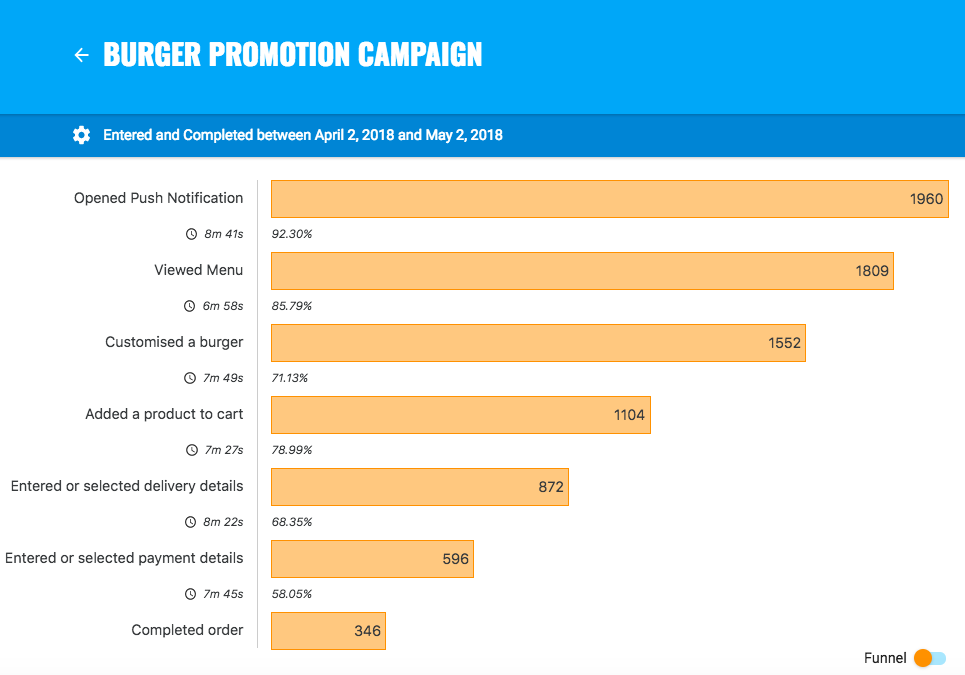
To track a custom analytics event, use Kumulos.trackEvent as follows:
var props = new Dictionary<string, object>();
props.Add("productId", "404");
Kumulos.Shared.TrackEvent("product.purchased", props);
Each event and its properties must be less than 250 KiB in size for the event to be tracked.
Event tracking is available offline as all events are persisted locally before being synced to the server in batches in the background.
A similar method
TrackEventImmediatelywill immediately start an event sync rather than waiting for the next time the app is backgrounded.
Checking events from your App
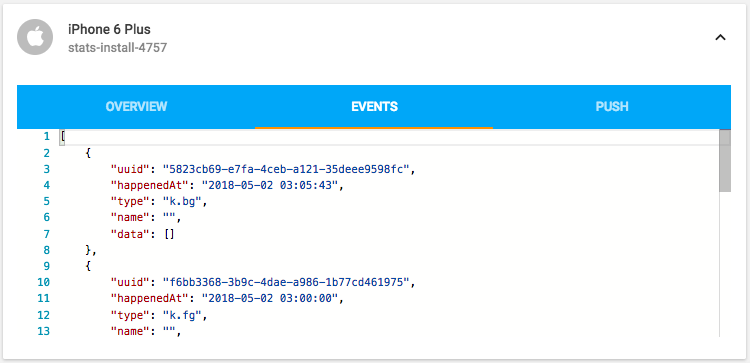
When you run your app on a simulator or install your app on a device, you can check that the SDK is recording events correctly by selecting the app and clicking the Installs tab to see the ten most recent installs of your app. Click on any install and then click on the Events tab.
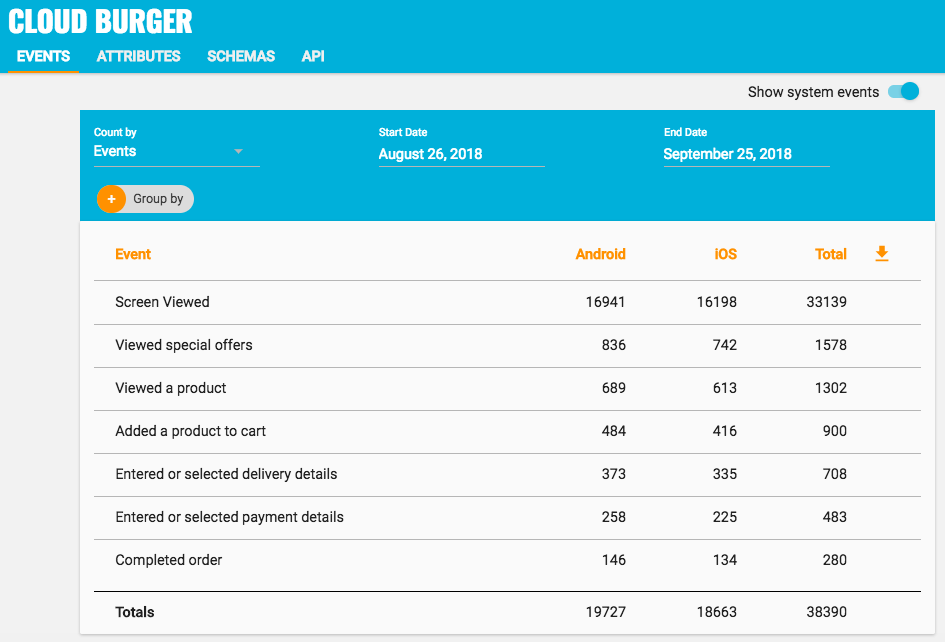
Alternatively, to see counts of all analytics events, including system events such as opened a push notification, recorded by installs of the app in the last 30 days, expand 'Analytics' and click 'Explore' in the left menu. For comparison, the total number of sessions in the same period is shown.
User Association
Kumulos allows associating a user identifier with the current installation ID. This user identifier is useful for performing analytics aggregations & analyses at the user level, for example, funnels completed by users across multiple devices. You can also optionally associate a collection of attributes with the user.
To associate the current app installation with a user, you can use the helper method as shown below:
Kumulos.Shared.AssociateUserWithInstall("unique-user-id");
User association is time-aware, so say two different users log in to the app, their user IDs will be associated with the same install for the time between subsequent calls to the helper method. For example:
Kumulos.Shared.AssociateUserWithInstall("Bob");
// This event will belong to Bob
Kumulos.Shared.TrackEvent("product.purchased", null);
Kumulos.Shared.AssociateUserWithInstall("Alice");
// This event will belong to Alice
Kumulos.Shared.TrackEvent("product.purchased", null);
Attributes
You can optionally associate a collection of attributes with the user for targeting, personalization or attribution. To associate attributes with the user, pass a collection into the helper method as shown.
var attributes = new Dictionary<string, object>();
attributes.Add("name", "Shawn");
attributes.Add("age", 25);

Kumulos.Shared.AssociateUserWithInstall("unique-user-id", attributes);
The collection of attributes for a given user must be less than 250 KiB in size.
If you do not have a user identifier, use the installation ID generated by the Kumulos SDK.
Location Tracking
You can send Kumulos location updates and use this to trigger events such as push notifications when an install enters a GeoFence.
How you configure location updates depends on the specific use case of your app. You should consider both accuracy and battery life when making this decision.
For Android, refer to the Android developer guide for further information.
On iOS, refer to the Apple Developer documentation for details of how to configure location services.
Once you have configured location updates on the platform of choice you can send the updates to Kumulos via the helper method.
Kumulos.Shared.SendLocationUpdate(new LocationUpdate(-54.618946, -65.234551));
Note if tracking location updates in the background you may want to invoke the location tracking helpers of the Android / iOS Kumulos SDK from native code. See the Android or iOS guides for further details.
Beacons
You can send Kumulos beacon proximity updates and use these to trigger automations such as sending a push notification when an install is in proximity to a beacon.
The Kumulos SDK provides helper methods to notify our services of proximity to a detected beacon.
You will need to integrate a suitable native library to detect the beacon proximity events on each platform.
Eddystone Beacon Detection
Beacon monitoring on Android requires a device with BLE, and API level 18+. You can read more about detecting beacons in the Android Nearby reference.
Once detected, the following C# helper can be used to send the update:
Kumulos.Shared.TrackEddystoneBeaconProximity("abcdef", "abc");
Alternatively you can send the update directly from the native code. See the Android integration guide for further details.
iBeacon Detection
Beacon monitoring on iOS requires a device with Bluetooth enabled. You can read more about detecting beacons in the Core Location reference.
Once detected, the following C# helper can be used to send the update:
Kumulos.Shared.TrackIBeaconProximity("uuid", 1, 2);
Alternatively you can send the update directly from the native code. See the iOS integration guide for further details.
Messaging & Push Notifications
The Kumulos SDK provides rich in-app messaging directly, as well as native push notifications via APNS and FCM. To integrate Kumulos Messaging into your app you have to complete the following steps:
- Enable the in-app messaging feature
- Configure APNS for iOS devices
- Configure FCM for Android devices
- Register for push notifications from Unity
Configuration & Integration
Enable In-App Messaging
Android
In your MainApplication.java, add the following config line:
kumulosConfig.enableInAppMessaging(KumulosConfig.InAppConsentStrategy.AUTO_ENROLL);
iOS
In your Assets/Plugins/iOS/KumulosUnity.m, add the following config line:
[kumulosConfig enableInAppMessaging:KSInAppConsentStrategyAutoEnroll];
Enable Push Notifications
iOS Config for APNS
To integrate Kumulos Messaging into your iOS project, you have to complete the following steps with either Key or Certificate based credentials.
- Set up APNs credentials in your Apple Developer account
- Configure Push in the Kumulos Agency Console
- Integrate SDK components with your iOS project & enable in-app messaging
- Register for push from the client app
Configure APNs
In order to generate a P8 key for Apple services first access your account at https://developer.apple.com/ and select 'Certificates, Identifiers & Profiles', then select 'Keys' on the left.

Select 'Create a Key' and on the form 'Register a New Key' enter a meaningful name such as 'APNS Access Key' and check the 'Enable' checkbox for 'Apple Push Notifications service (APNs)', click 'Continue'.
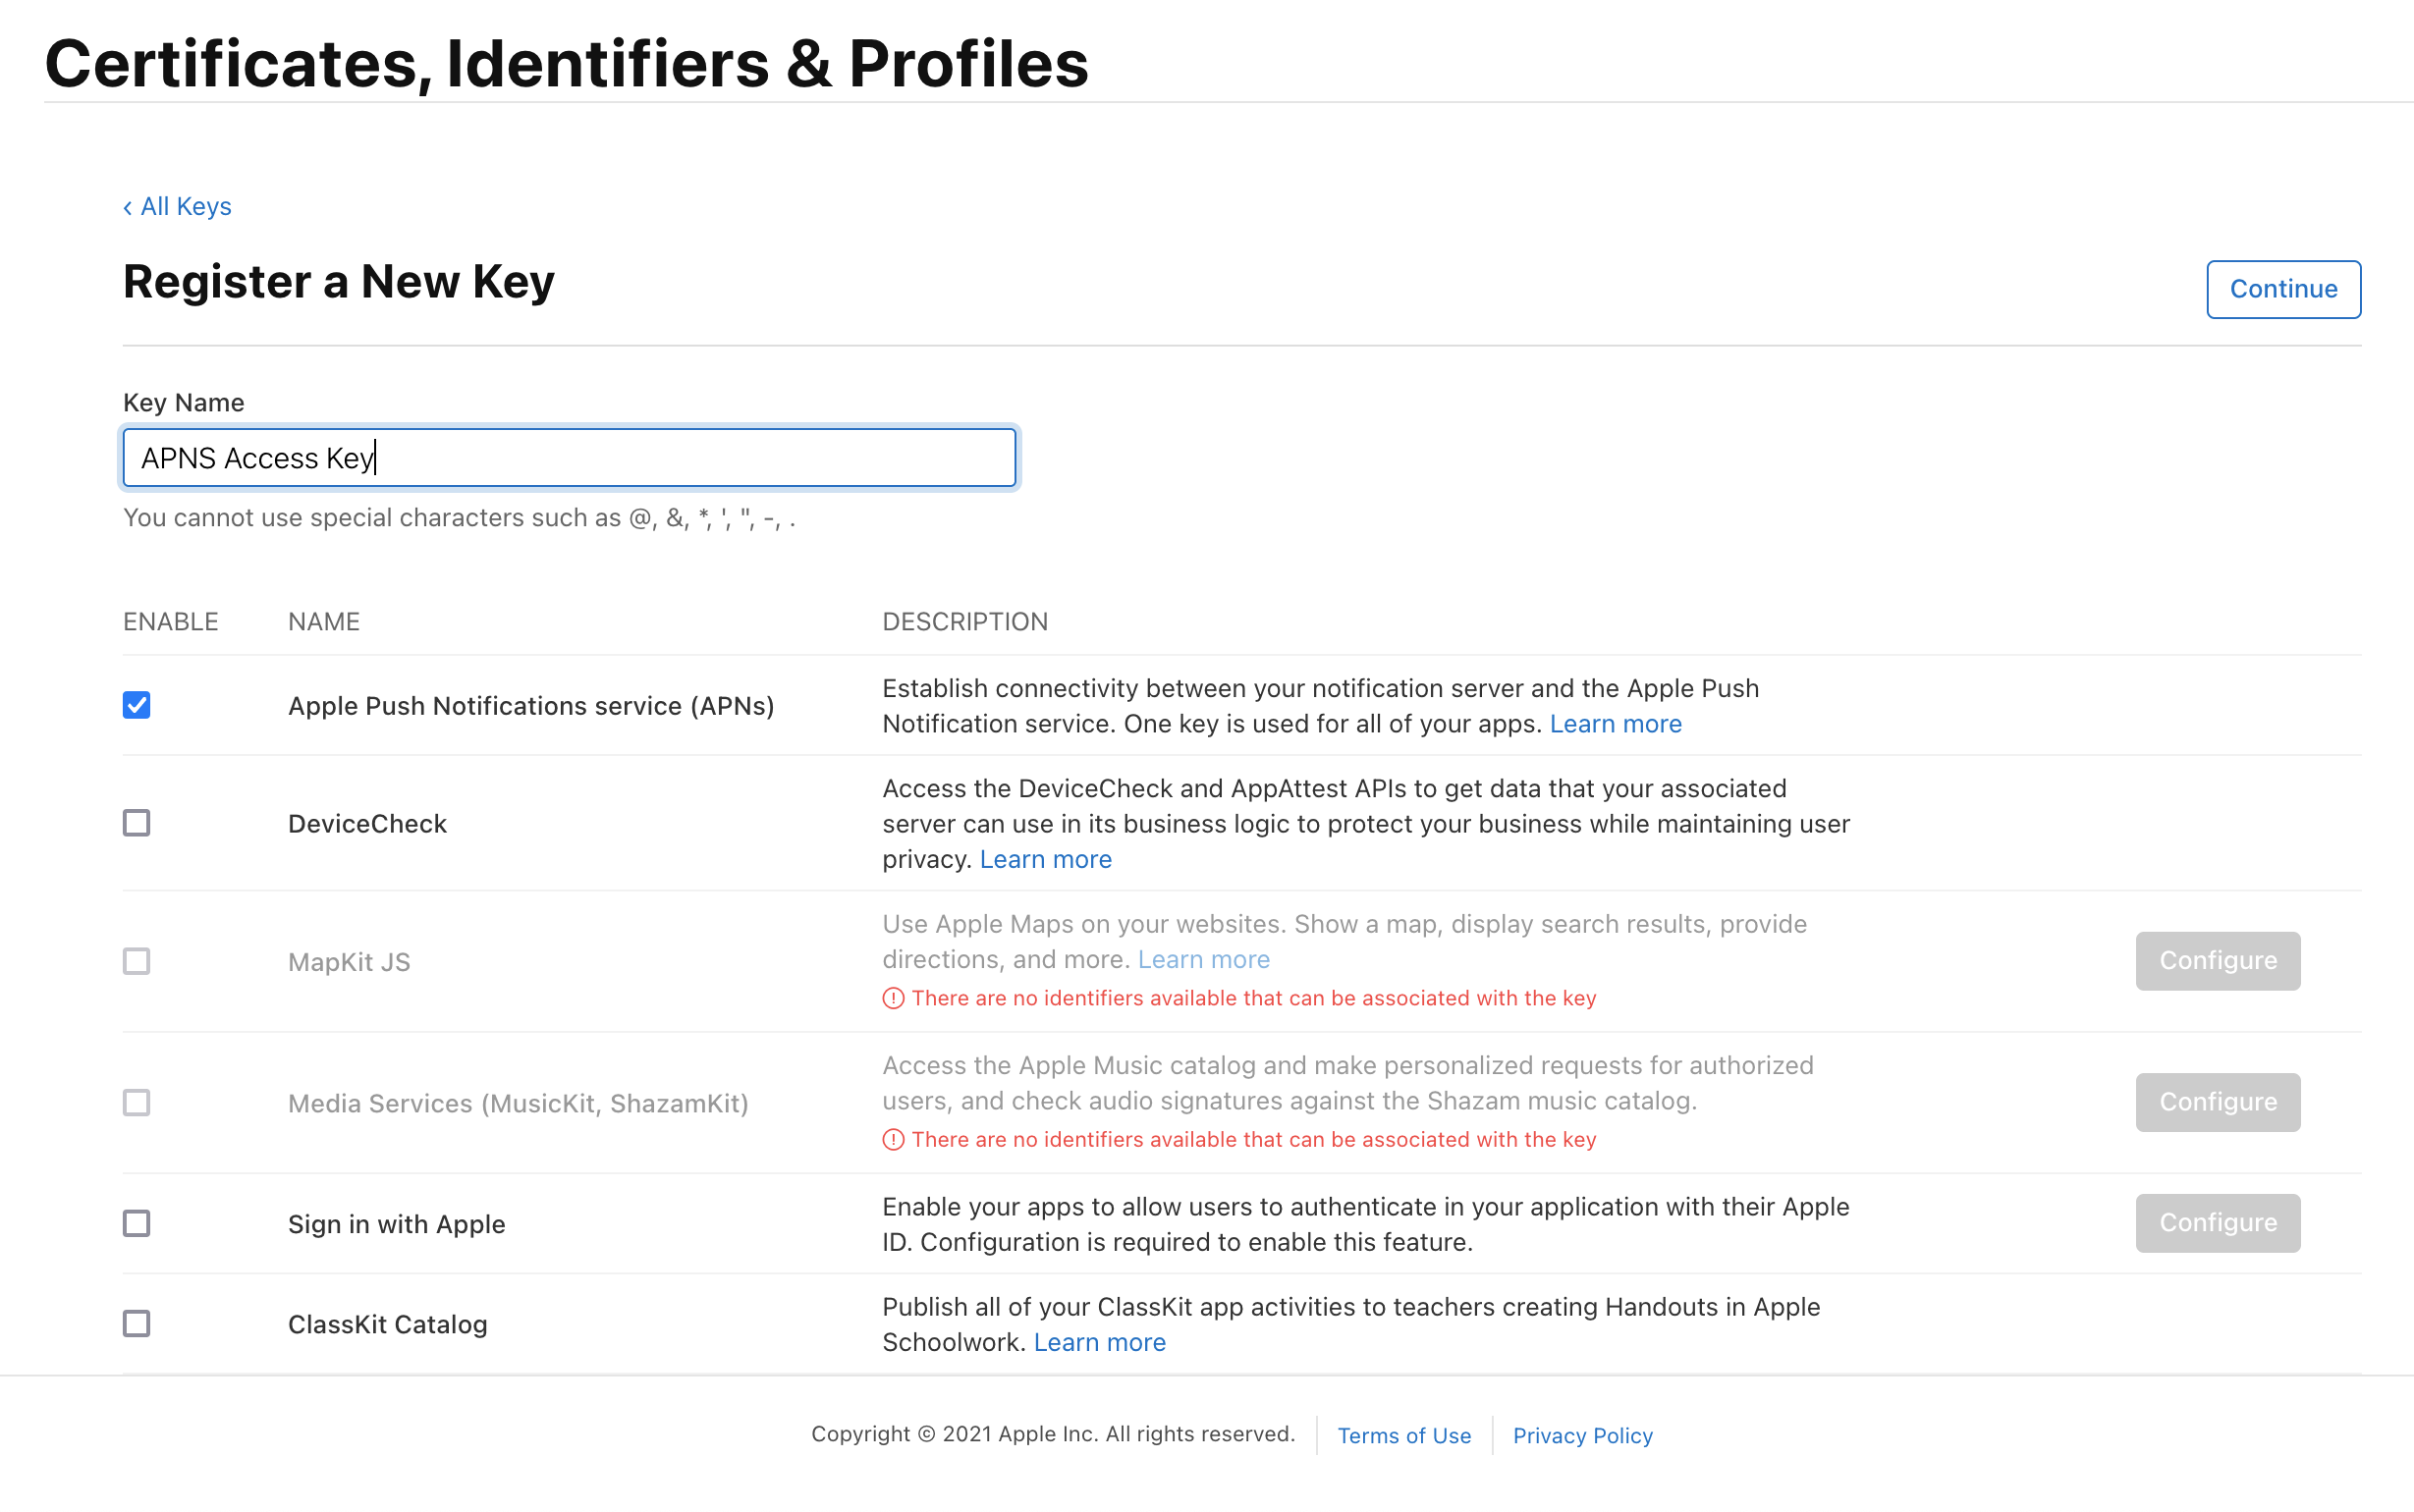
On the confirmation screen double check the APNs enablement is set then click 'Register'
On the final screen take note of your KeyID and download the key. Note that you can only download the key once, if lost the key must be revoked and re-created.
Downloading the key will save a .p8 file with the access credentials.
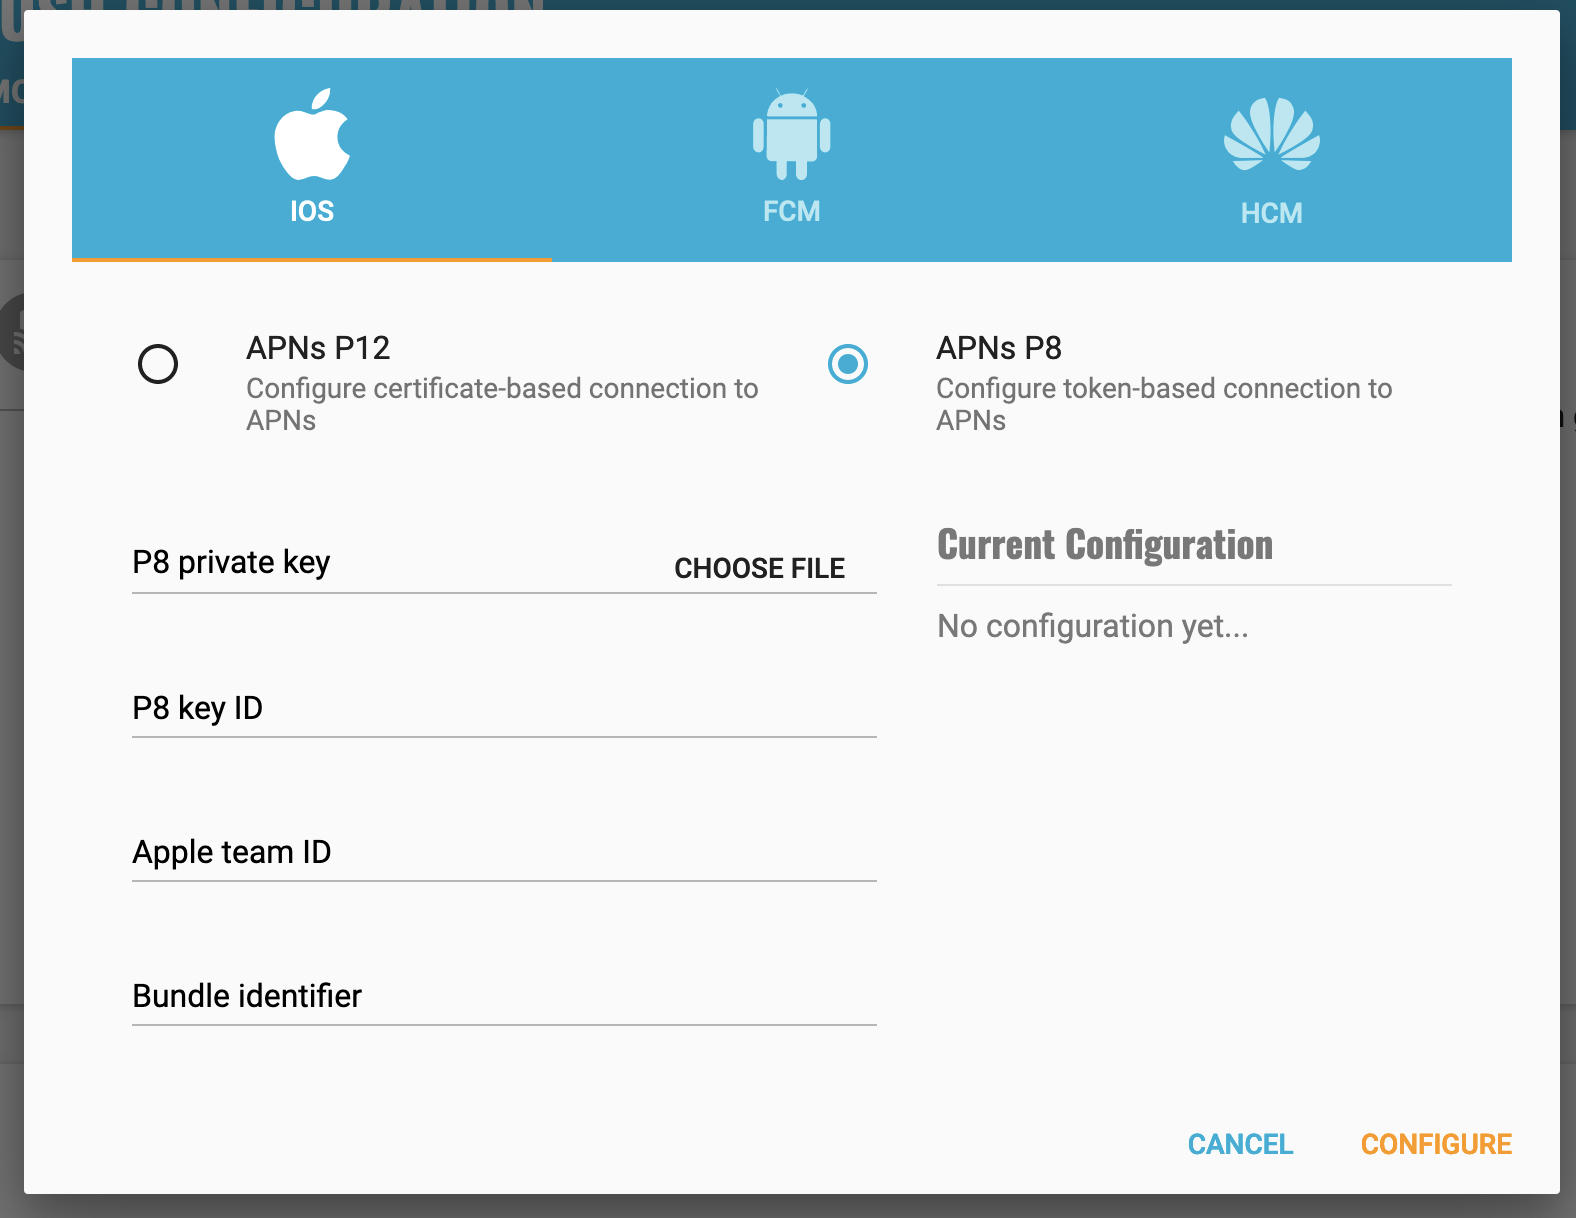
You now have all the details to configure your Kumulos App, expand 'Messaging' in the left menu, select 'Configuration' and click the cog next to the Apple icon. Select APNs P8 and select your file, enter your other details and click 'Configure'.
Configure your app capabilities and entitlements
In your app project settings use the "+ capability" button to add the App Groups, Background Modes and Push Notifications capabilities, in Background Modes you should have the "Remote Notifications" mode checked.
The video below shows how to create a push certificate on your Apple Developer portal, configure these certificates in Kumulos, and how to then configure the necessary entitlements in your iOS Xcode project.
In Unity's generated Xcode project, you should ensure that:
- Your bundle ID matches your push certificates (adjust in Unity: Edit > Project Settings > Player)
- Your team is correctly selected in the Xcode project's "General" settings
If you are having trouble, please also ensure that:
- The Xcode project's "Push Notifications" capability is enabled
- The Xcode project's "remote-notification" background mode capability is enabled
- The "UserNotifications.framework" is linked to your build target
Android Config for FCM
Start by setting up FCM and configuring your push credentials as shown in the video.
Enabling Push Notifications for Android
Next you need to enable and configure the Kumulos push service with the certificates you have created.
Please note it is the Google Service Account private key JSON file that needs to be uploaded to Kumulos, not the Google Services JSON file you include in your app project. The Google Service Account JSON file can be generated from the 'Service Accounts' section of the Firebase Developer console as is shown in the relevant section of the video above.
Next, you need to import the FirebaseMessaging package. You only need it for android, so, when importing untick iOS related plugin files located in Plugins/iOS/Firebase (including Firebase static libraries may result in iOS build errors). Additionally, if Android Studio suggests to enable Android Auto-resolution, choose 'Disable'. Otherwise it may load Firebase dependencies as jars, and classes from jars may conflict with Kumulos gradle dependencies. Sync your project.
Next, add the google-services.json file to your Assets folder.
When you have configured FCM, you need to adjust the Kumulos Gradle template (Plugins/Android/mainTemplate.gradle) file, uncommenting the dependency line as shown below:
    // TODO: Uncomment the following line if using FCM for push notifications
    implementation 'com.google.android.gms:play-services-gcm:17.0.0'
Depending on the version of Kumulos Unity SDK you are using there are further adjustments
After you installed Firebase messaging package, remove
Assets/Plugins/Android/AndroidManifest.xmland renameAssets/Plugins/Android/FirebaseAndroidManifest.xmltoAndroidManifest.xml.FirebaseAndroidManifest.xmlcontains deletedAndroidManifest.xmlcorrectly merged with Firebase manifest. Renamed file should be set as Main Manifest in player settings.Note that you may need to fix errors in Firebase module's
build.gradleandFirebase/AndroidManifest.xml. Follow suggestions given by Android Studio.
Note the
Assets/Plugins/Android/AndroidManifest.xmlfile shipped with the Kumulos SDK will be overridden with the FirebaseMessaging template. You will need to add theMainApplicationclass back to theandroid:nameattribute on theapplicationtag for correct integration.Note that you might need to reopen your Android Studio for the Firebase imports to be detected.
Note that you may need to fix errors in Firebase module's
build.gradleandFirebase/AndroidManifest.xml. Follow suggestions given by Android Studio.
Registering for and Handling Push Notifications
Once the APNS and FCM configuration has been completed, you should call the helper method to request a push token from the user.
Kumulos.Shared.PushRegister();
On iOS, this method will prompt the user about sending remote notifications, so you should consider applying a permission priming UX pattern to prepare the user for this step.
After registering for notifications, you should set up a handler to make use of received notifications:
Kumulos.Shared.OnPushReceived += (PushMessage message) => {
    Debug.Log("Push message received");
};
This handler will be called when a push is received when the app is in the foreground (both silent and ordinary pushes), or when the app has been opened from the tray notification.
Tracking open rates and conversions (opening the app from a push), and URL pushes are handled automatically by the SDK.
Advanced
Checking Push Registrations
When you run your app on a simulator or install your app on a device, you can check that the install has successfully registered for push notifications by selecting the app and clicking the Installs tab to see the ten most recent installs of your app.
Click on an install, click the 'Push' tab and click Send Test Push.
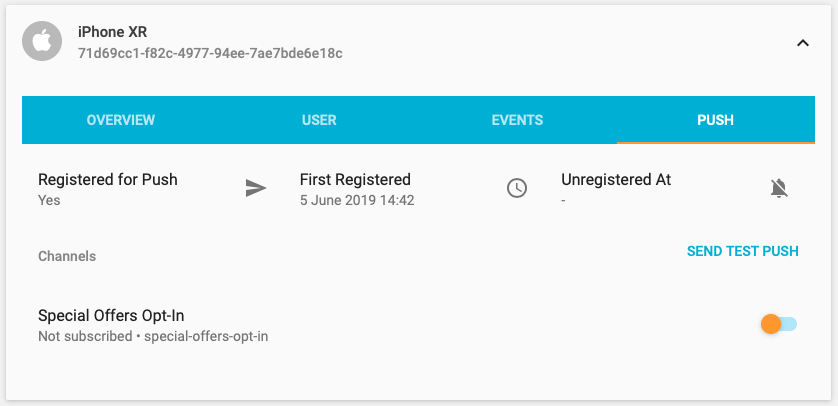
If you do not receive the push notification, check the Error Log for any errors sending the push notification to the native push gateways. If you continue to experience problems, please don't hesitate to contact support who are standing by to help!
Supporting Pictures, Action Buttons, Delivery Tracking and Badges in Notifications
When sending a push notification you can attach a picture or action buttons to it. They will show on iOS 10+ devices and Android devices with API level 16+. Badges are only relevant for iOS.
Integrating Android
No extra steps needed.
Integrating iOS
The notification will expand upon swiping the notification on devices supporting 3D Touch. In order to enable this functionality you need open your iOS project in Xcode and add a Notification Service Extension to your application.
Make sure to correctly set up signing for the extension target.
Then replace the contents of NotificationService.m with the following lines:
#import "NotificationService.h"
#import <KumulosSDKExtension/KumulosNotificationService.h>

@interface NotificationService ()
@end

@implementation NotificationService
- (void)didReceiveNotificationRequest:(UNNotificationRequest *)request withContentHandler:(void (^)(UNNotificationContent * _Nonnull))contentHandler {
[KumulosNotificationService didReceiveNotificationRequest:request withContentHandler: contentHandler];
}
@end
#import "NotificationService.h"
#import "KumulosNotificationService.h"

@interface NotificationService ()
@end

@implementation NotificationService
- (void)didReceiveNotificationRequest:(UNNotificationRequest *)request withContentHandler:(void (^)(UNNotificationContent * _Nonnull))contentHandler {
[KumulosNotificationService didReceiveNotificationRequest:request withContentHandler: contentHandler];
}
@end
Next, make the following modifications to the Notification Extension target:
- Add
KumulosSDKExtension.xcframeworkfrom the SDK to the extension target. SelectEmbed and signoption. - In Build Settings, Architectures make sure that valid architectures are selected. For example,
Standard architectures - $(ARCHS_STANDARD)
- Add
libKumulosSDKExtension.ashipped with KumulosSDKUnity to$(PROJECT_DIR). Set target membership of the library. It must be a member of the Notification Extension target. - In Build Settings, Search Paths add
$(PROJECT_DIR)/Libraries/Plugins/iOS/KumulosSdkto Header Search Paths - In Build Settings, Architectures make sure that valid architectures are selected. For example,
Standard architectures - $(ARCHS_STANDARD) - in Build Settings, Other Linker Flags make sure that
-ObjCflag is present
Supporting push delivery tracking and badges
For push delivery tracking and badges to work correctly you need to:
- Set up a Notification Service Extension as described above
- Add the App Groups capability to your App and Notification Service Extension targets
- Set the group to
group.{your.bundle.identifier}.kumulosfor both targets
Note that due to iOS limitations badge is not set when app is in the foreground
Handling notification action buttons
When a user interacts with your push message the OnPushReceived defined as above is called. If a button was tapped, the notification object will contain an ActionId property:
Kumulos.Shared.OnPushReceived += (PushMessage message) => {
    Debug.Log(message.ActionId);
};
Managing In-App User Consent
If you would like your users to opt-in to receive In-App messages you can configure the SDK during initialization to make opt-in explicit by setting the strategy, then calling the SDK helper to manage their consent.
In MainApplication.java:
kumulosConfig.enableInAppMessaging(KumulosConfig.InAppConsentStrategy.EXPLICIT_BY_USER);
In Assets/Plugins/iOS/KumulosUnity.m:
[kumulosConfig enableInAppMessaging:KSInAppConsentStrategyExplicitByUser];
Now manage the user's consent from C# with the following helper:
Kumulos.Shared.InAppUpdateConsentForUser(true);
Background Data
Background data pushes on Unity will wake up the native application layer, but not the handler attached to your scene.
Deep-linking for In-App
In-App messages allow you to hand-off to native application screens via deep-linking action buttons. When tapped, these buttons pass control to the defined deep-link handler, including their defined data payload (configured in the In-App message composer for the action button).
If you want to handle deep-links with custom data payloads as part of an In-App message you can create add an event handler in KumulosInit as follows:
Kumulos.Shared.OnInAppDeepLinkPressed += (Dictionary<string, object> data) =>
{
    Debug.Log("In-app deep link pressed");
};
Using the In-App Inbox
In-app messages can optionally be persisted in a user-level inbox for later retrieval. This allows you to build features such as loyalty rewards or expiring coupons into your app. Regardless of whether they are stored in the inbox, the maximum amount of in-apps stored on a device is 50 (the oldest messages exceeding this limit will be evicted).
Retrieve messages
To retrieve a list of messages from the user's inbox and present the first in the list, see the following example:
List<InAppInboxItem> items = Kumulos.Shared.InAppGetInboxItems();
Kumulos.Shared.InAppPresentInboxMessage(items[0]);
Mark as read
To mark a single or all inbox messages as read:
//single
List<InAppInboxItem> items = Kumulos.Shared.InAppGetInboxItems();
Kumulos.Shared.InAppMarkInboxItemRead(items[0]);

//all
Kumulos.Shared.InAppMarkAllInboxItemsRead();
Delete message
You can also delete an in-app message from inbox:
List<InAppInboxItem> items = Kumulos.Shared.InAppGetInboxItems();
Kumulos.Shared.InAppDeleteMessageFromInbox(items[0]);
Inbox updated handler
In order to be notified when inbox changes you may set up a handler. The handler fires when one of the following happens to an in-app with an inbox configuration:
- message fetched from server
- message opened
- message marked as read
- message deleted
- message evicted (expires or limit of stored messages exceeded)
You can use it as follows:
Kumulos.Shared.OnInboxUpdated += () =>
{
    //refresh your inbox
};
Note, you can do
Kumulos.Shared.OnInboxUpdated -= HandlerNamewhen you stop being interested in inbox updates.
Get inbox summary
You can retrieve an inbox summary as follows:
Kumulos.Shared.GetInboxSummaryAsync((InAppInboxSummary summary) => {
    if (summary != null){
        Debug.Log("totalCount: " + summary.TotalCount + " unreadCount: "+ summary.UnreadCount);
    }
});
Get inbox item's image URL
Each inbox item may have an image associated with it. ImageUrl returns a URL to the image resized to 300px width or null if there is no image.
List<InAppInboxItem> items = Kumulos.Shared.InAppGetInboxItems();
string url = items[0].ItemUrl;
Note if the message was created through the API (as opposed to Kumulos Messaging Dashboard) and contains a full URL to an image hosted elsewhere,
ImageUrlcontains original URL without any resizing applied.
Channels
You can create and manage subscriptions to notification Channels via the SDK. Channels allow your users to define preferences for the type of content they would like to receive via notifications.
You can manage all channel interactions via the KumulosSDK.PushSubscriptionManager class in the SDK. Helper methods are available for creating, listing and managing subscriptions to channels. To create a subscription manager, simply construct one as follows:
var pushManager = new PushSubscriptionManager (Kumulos.Shared);
Listing Channels
To list available & subscribes channels, you can call ListChannels:
pushManager.ListChannels((List<PushChannel> channels) => {
    Debug.Log(channels[0].IsSubscribed);
});
Channel visibility and meta data can be controlled when they are created.
Managing Subscriptions
Channel subscriptions can be managed with the Subscribe, Unsubscribe, SetSubscriptions, and ClearSubscriptions method. For example:
pushManager.SetSubscriptions (new string[]{ "stone-crows" });
Creating a Channel
pushManager.CreateChannel (new CreatePushChannelRequest ("brazen-beasts", true), (PushChannel obj) => {
    Debug.Log("Created channel");
});
Build
You can call API methods defined in the Kumulos Build service using the Kumulos.Call method.
Parameters are optionally provided as a dictionary. Assume in this example you expect a list of characters:
[Serializable]
class House
{
    public string name;
    public int influence;
}

[Serializable]
class Character
{

    public string name;
    public int age;
    public House house;
}

Kumulos.Shared.Call<List<Character>>("myApiMethod", (Kumulos.KumulosCallResult<List<Character>> result) =>
{
    if (!result.IsSuccessful) {
        Debug.Log("Error");
        return;
    }

    var character = result.payload[0];
    Debug.Log("I am " character.name + " of " + character.house.name);
});
Note that the model classes must have the [System.Serializable] attribute in order to be deserialized correctly.
Kumulos stores data fields as base64 encoded data, so if you receive data from Kumulos, you will have to base64 decode it to access the original data. Similarly, when you send data to Kumulos, you should base64 encode it before transport.
Crash
Crash reporting allows you to track unhandled exceptions in your app, and optionally log any caught exceptions for further investigation. Crash reporting is not enabled by default. To enable this feature, modify your Kumulos configuration as follows.
In KumulosInit.cs:
var config = (new Config.Builder("YOUR_API_KEY", "YOUR_SECRET_KEY"))
    .EnableCrashReporting()
    .Build();

Kumulos.Initialize(config);
In MainApplication.java:
kumulosConfig.enableCrashReporting();
In Assets/Plugins/iOS/KumulosUnity.m:
[kumulosConfig enableCrashReporting];
That's it! Unhandled exceptions that lead to crashes will now be recorded automatically and shown in your App Delivery Console.
Note that crash reporting is not available whilst connected to a debugger, but it does work with debug builds.
Upload dSYM Files for Symbolication
In order to ensure your stack traces are fully symbolicated, it is necessary to upload your dSYM information from your project.
To upload dSYM files for Release builds, you should add a new "Run Script Phase" to your Xcode project's "Build Phases".
Save the following script into your Xcode project's source root:
#!/bin/sh

#
## This script processes dSYM files for Release builds of your apps. dSYM files
## are needed to fully symbolicate crash reports from Release builds when using
## Kumulos's Crash Reporting features.
#
## It is intended to be used as part of a Run Script Phase in your app's Xcode
## project.
#
## Inside your Run Script phase, you should invoke this script as follows:
#
##   upload_dsyms.sh API_KEY SERVER_KEY
#
## You should replace the API_KEY and SERVER_KEY tokens with your Kumulos app's
## API key and server key respectively.
#

UPLOAD_URL="https://crash-symbolicator.app.delivery/dsyms"

if [ "Release" != "$CONFIGURATION" ]; then
    echo "[KUM] Not processing dSYM info for $CONFIGURATION builds"
    exit 0
fi

if [ "$1" != "upload" ]; then
    API_KEY="$1"
    SERVER_KEY="$2"

    DIR="$( cd "$( dirname "${BASH_SOURCE[0]}" )" && pwd )"
    SCRIPT="$(basename $0)"

    echo "[KUM] Starting dSYM processing in the background..."
    CMD="$DIR/$SCRIPT upload $API_KEY $SERVER_KEY"

    eval "$CMD" > /dev/null 2>&1 &
    exit 0
fi

API_KEY="$2"
SERVER_KEY="$3"

WORKDIR=$(mktemp -d -t kumulos)

if [ $? -ne 0 ]; then
    echo "Failed to create temp working directory"
    exit $?
fi

ZIPDIR="$WORKDIR/dSYMs"
ZIPFILE="$WORKDIR/upload.zip"

mkdir "$ZIPDIR"

if [ $? -ne 0 ]; then
    echo "Failed to create temp working directory"
    rm -rf "$WORKDIR"
    exit 1
fi

DSYMS=$(find "$BUILT_PRODUCTS_DIR" -iname "*.dSYM")

if [ $? -ne 0 ]; then
    echo "Failed to find dSYM files, aborting"
    exit $?
fi

while read -r DSYM; do
    cp -R "$DSYM" "$ZIPDIR/"

    if [ $? -ne 0 ]; then
        echo "Failed to copy $DSYM for processing"
        rm -rf "$WORKDIR"
        exit 1
    fi
done <<< "$DSYMS"

OLD_PWD="$PWD"

cd "$ZIPDIR" && zip -r "$ZIPFILE" .

if [ $? -ne 0 ]; then
    echo "Failed to create zip archive for upload"
    rm -rf "$WORKDIR"
    cd "$OLD_PWD"
    exit 1
fi

cd "$OLD_PWD"

CURL_MAJOR=$(curl --version | head -n 1 | cut -f 2 -d " " | cut -f 1 -d ".")
CURL_MINOR=$(curl --version | head -n 1 | cut -f 2 -d " " | cut -f 2 -d ".")

if [ $CURL_MAJOR -lt 7 ] && [ $CURL_MINOR -lt 52 ]; then
    curl --fail --retry 3 --retry-delay 3 --user "$API_KEY:$SERVER_KEY" -X PUT -F dsyms="@$ZIPFILE" "$UPLOAD_URL"
else
    curl --fail --retry 3 --retry-delay 3 --retry-connrefused --user "$API_KEY:$SERVER_KEY" -X PUT -F dsyms="@$ZIPFILE" "$UPLOAD_URL"
fi

if [ $? -ne 0 ]; then
    echo "Failed upload"
    rm -rf "$WORKDIR"
    exit 1
fi

rm -rf "$WORKDIR"
After adding the above script to your project as upload_dsyms.sh, copy the script snippet into a new Run Script Phase as shown below:
"$SRCROOT/upload_dsyms.sh" API_KEY SERVER_KEY
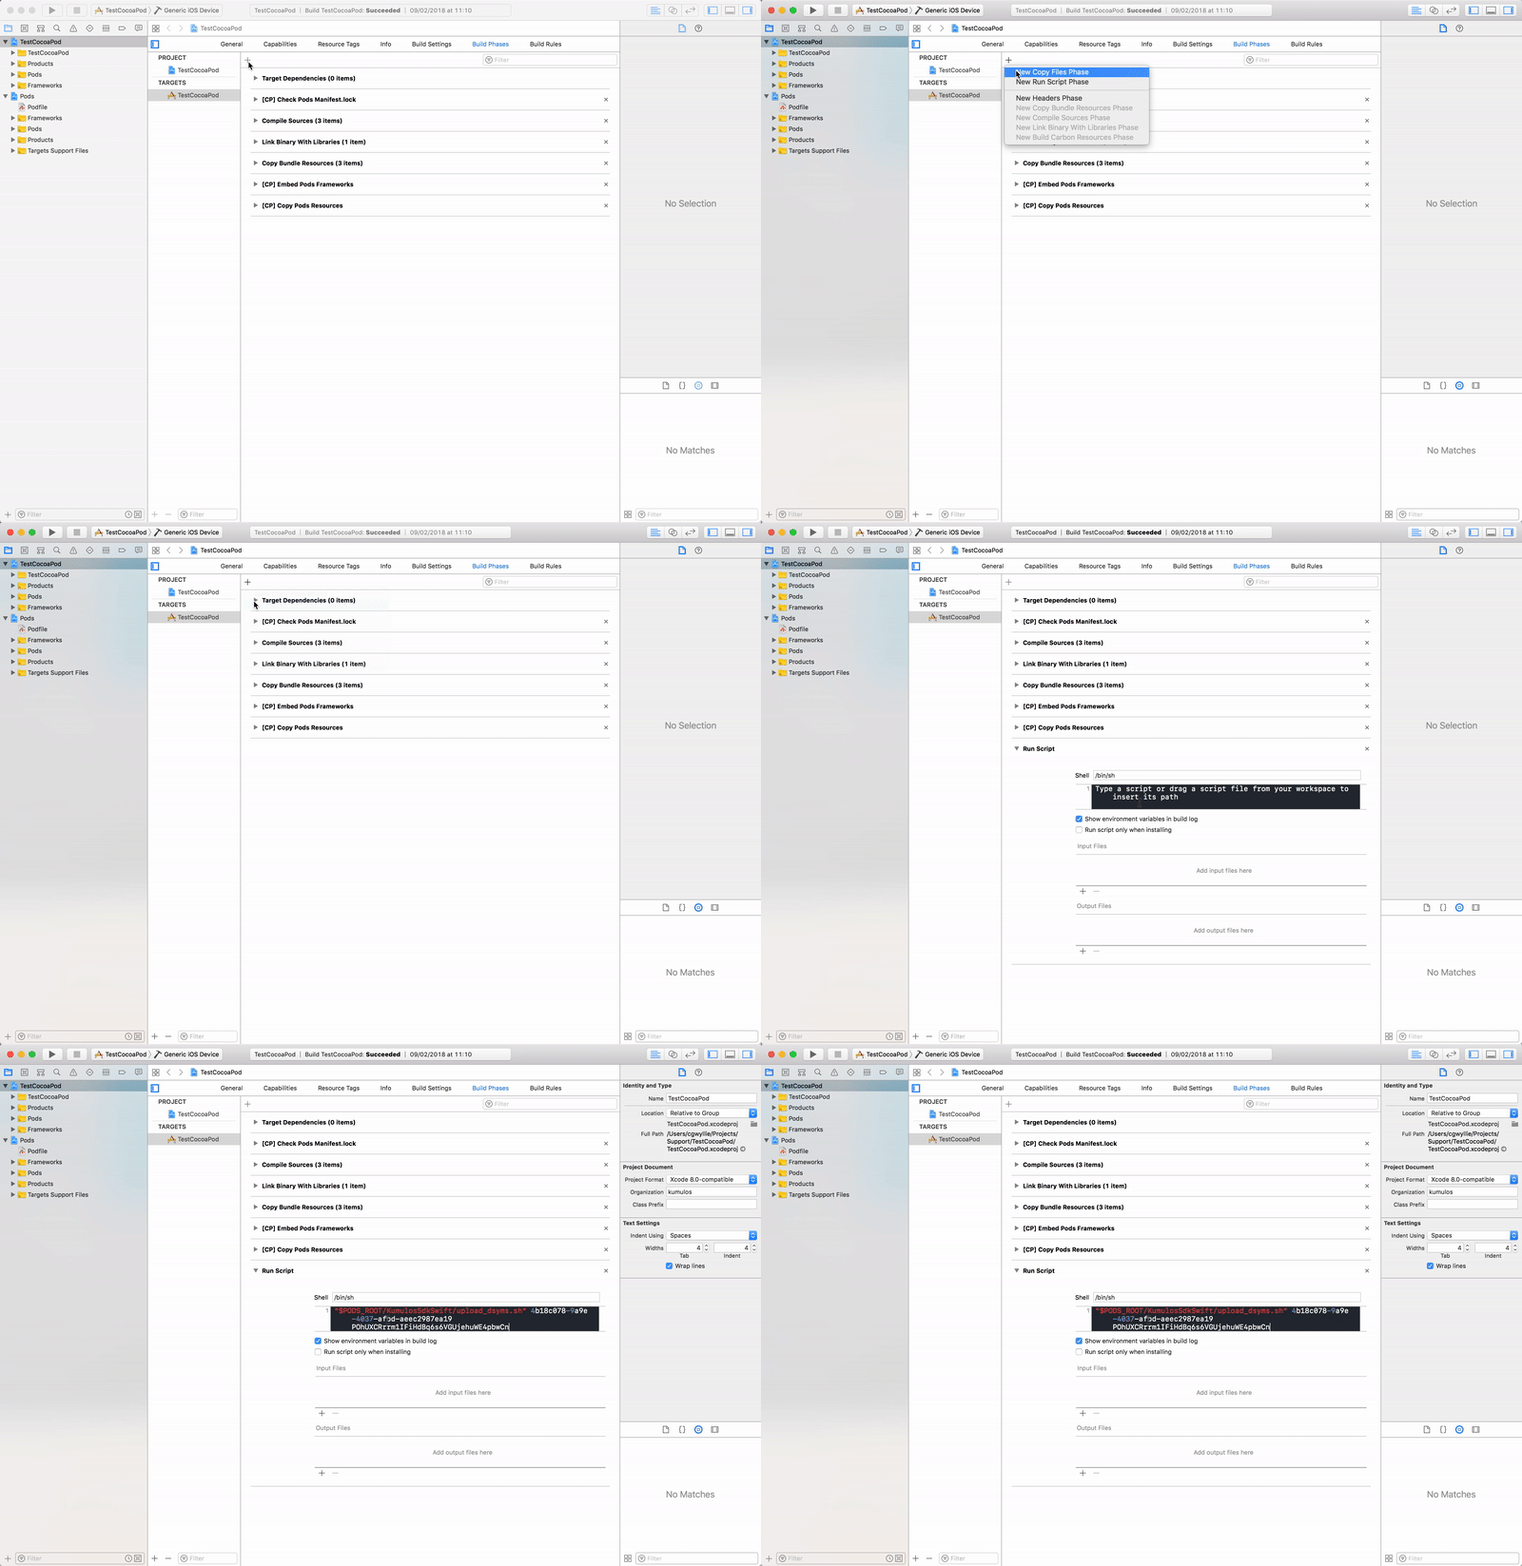
Make sure you replace the API_KEY and SERVER_KEY tokens with your app's API and server keys which can be found on the application's dashboard.
Bitcode-enabled Builds
If your project has bitcode enabled, it will be necessary to upload the dSYM files that Apple generates as part of App Store distribution step.
These generated dSYM files can be downloaded using the Xcode Organizer. Once downloaded, the generated dSYM files will be available in your app's archive.
You should follow the steps of the screen capture below to prepare your symbols for upload.
Once prepared for upload, you should upload the dSYM zip file to your App Delivery Console.
Changelog
8.2.0
- Added support for notification channels
8.1.0
- Ship Kumulos Unity SDK with XCFrameworks (this lets including arm64 architecture for simulator builds). See integration guide above.
- Allow marking in-app messages as read
- Allow setting
OnInboxUpdatedhandler, see docs above - Add
GetInboxSummaryAsynchelper method, see docs above - Expose extra fields on InAppInboxItem:
SentAt,DataandImagePath
8.0.1
- Trigger
OnPushReceivedalso for silent push notifications - Update base SDK to latest version (prevents in-app crash in non-EN_US locales)
8.0.0
- Update supported version of Unity to latest available LTS (2020.3.x)
To use this release you must use 2020.3+ Unity version and follow integration steps from above.
7.0.0
- Update supported version of Unity to latest available LTS (2019.4.x)
Starting with 2019.3 Unity project structure on Android has changed. Hence, there are multiple gradle templates and manifest files in Assets/Plugins/Android. To use this release you must use 2019.3+ Unity version and follow integration steps from above.
6.0.1
- Minor manifest bug fix
6.0.0
- In-App inbox deletion
iOS
- Delivery tracking
- Incrementing badges
You need to set up App Groups and add Notification Service Extension as described above for delivery tracking and badges to work.
Android
- Support custom sounds for notification
- Show "sent when" on notification
- Set long text style for allowing reading longer messages
- Update to depend on AndroidX modules directly
- Update Firebase packages to latest versions
- Update ACRA to latest version
- minSDK raised from 14 to 16
5.1.0
- Support for in-app message expiry
- Support pictures in push notifications
- Support push action buttons
4.0.0
- Add in-app messaging features
- Update base SDKs to latest versions
- Update supported version of Unity to latest available LTS (2018.4.x)
3.1.3
- Add Android FCM listener service by default in merged ApplicationManifest
3.1.2
- Update iOS static library to include full bitcode
- Update Android version to 6.1.0
- Add call to pushUnregister on iOS in unregistration method
3.1.1
- Update SDK version number
3.1.0
- The analytics implementation will now log events that would be recorded on supported platforms, when running in the editor
3.0.0
- Update Android SDK to 6.0.0
- Update Objective-C SDK to 1.7.0
- Replace GCM with FCM for push notifications
- Add user association helpers to get & clear current user association
2.0.0
- Wrap native iOS & Android SDKs for improved feature parity
- Add crash reporting
- Add session analytics
- Add custom event tracking
- Add user association with attributes
- Add beacon proximity helpers
Breaking Changes
Although this release makes no breaking API changes, it does require the use of the Gradle project build setup for Android projects.
1.1.0
- Add location update helper
1.0.0
- Initial release with Analytics, Push, and Build support for iOS & Android