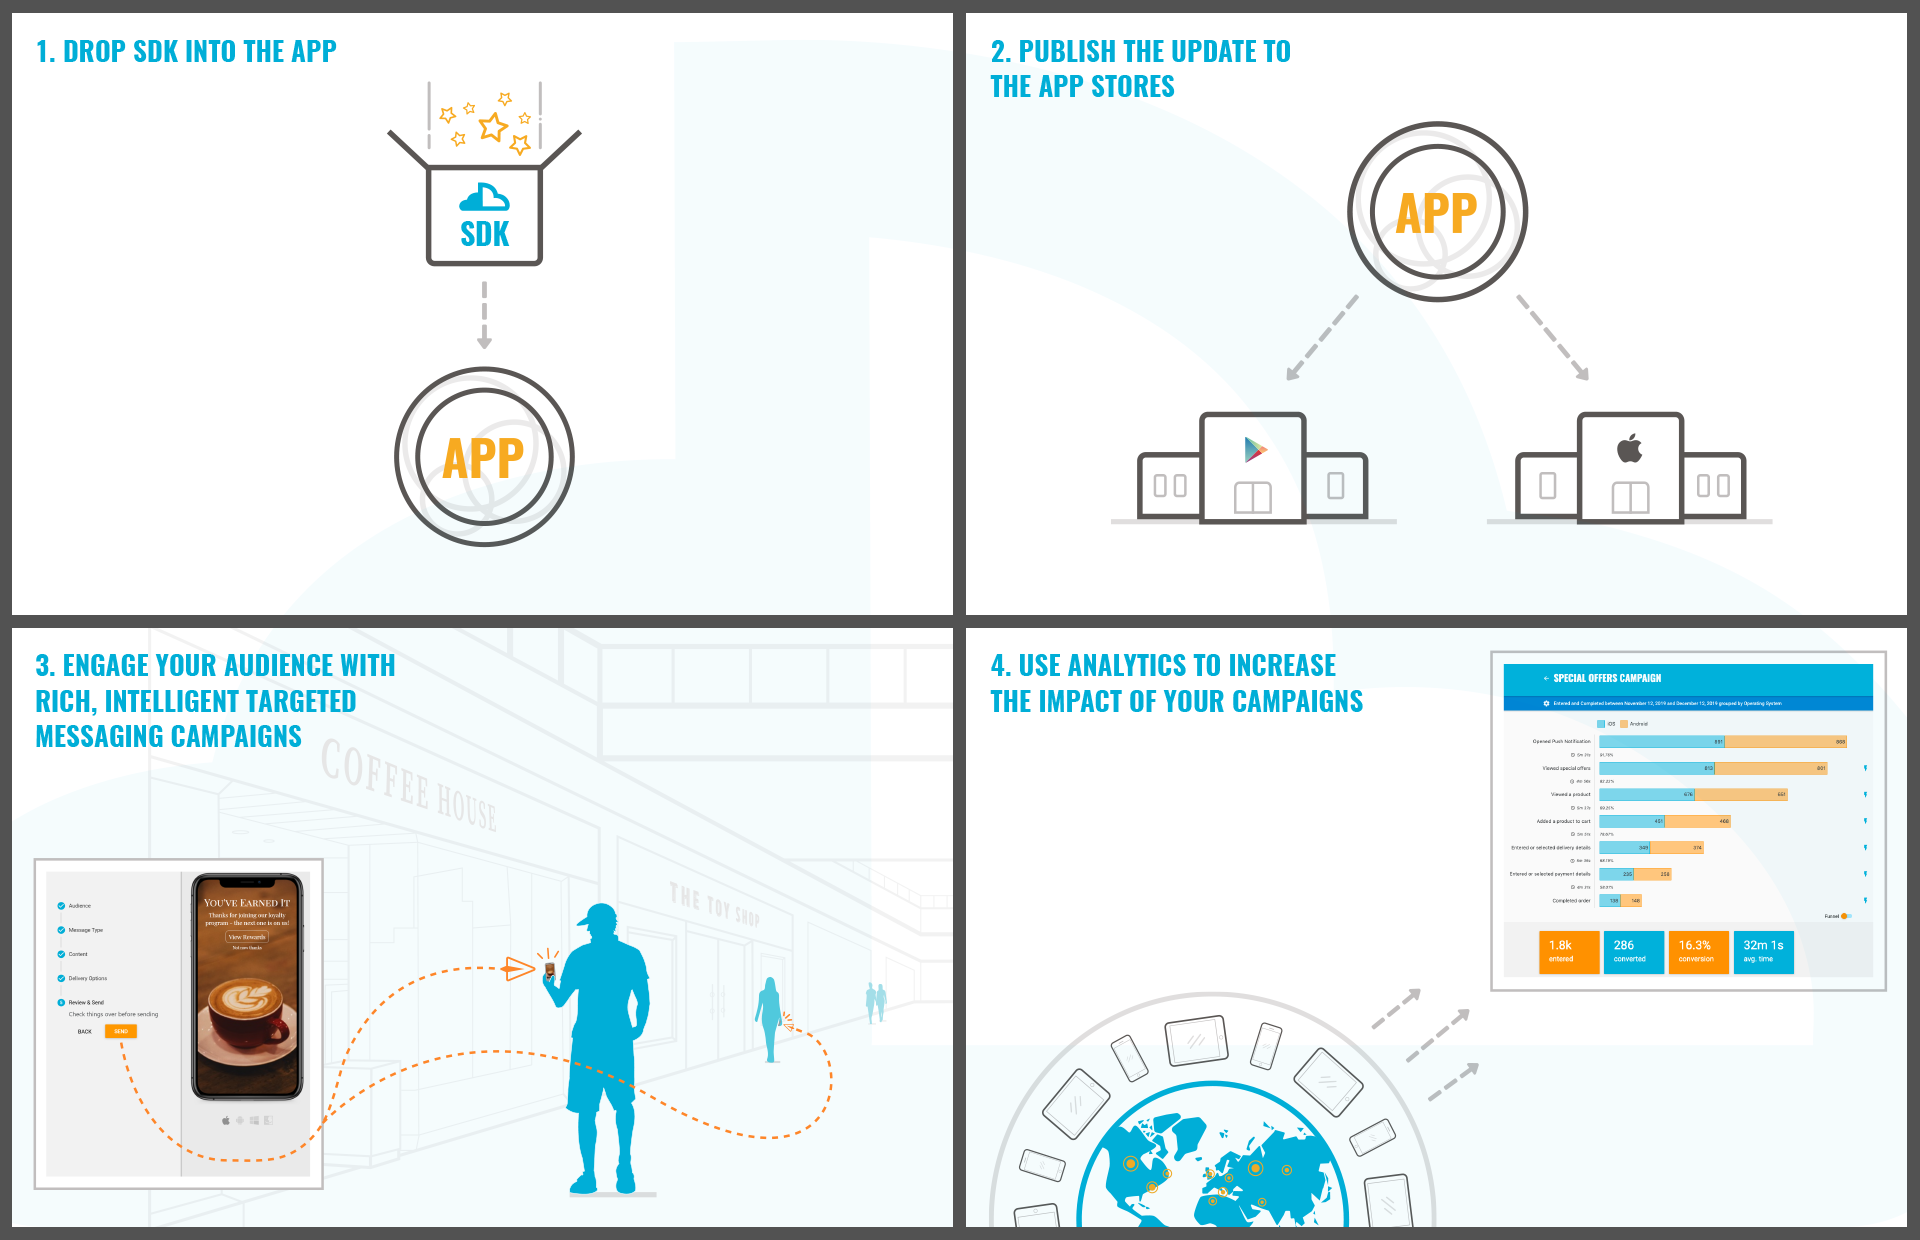
Integrate into your app
So you've explored the demo, tested the companion app and have now decided to integrate Kumulos into your app - great! This guide will walk you through everything you need to do to get up and running with a fully featured Analytics and Messaging app, and should only take you a few hours per platform.
Before you begin, don't forget to invite any other developers to your Kumulos account who will be working on this with you.
Setting up your Console
Create a Project
To get started, create a client. Kumulos groups your apps under clients, usually the name of the company you are building the app for, this helps keep the console organized.
Once you are in the client dashboard click the primary action button to open the create app wizard.
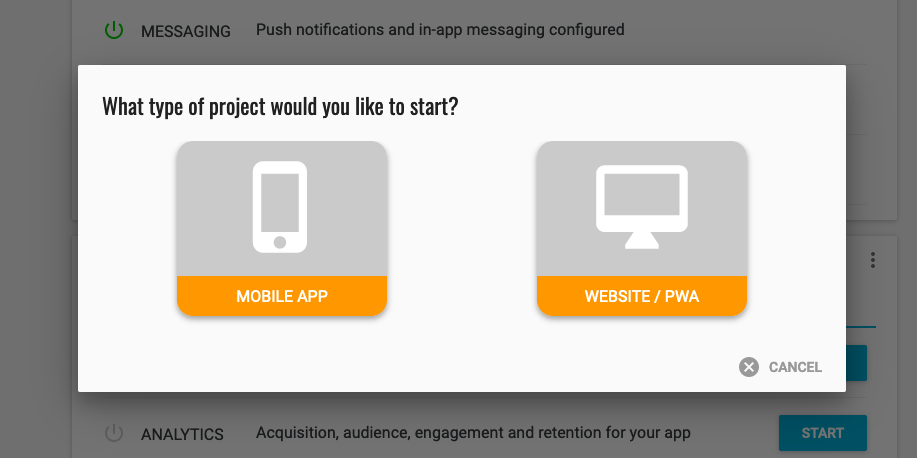
Select mobile app, and enter your app name. Optionally to help find the app later in the console you can add an app icon. When prompted for which features you would like to use click "Messaging" and wait for the wizard to finish.
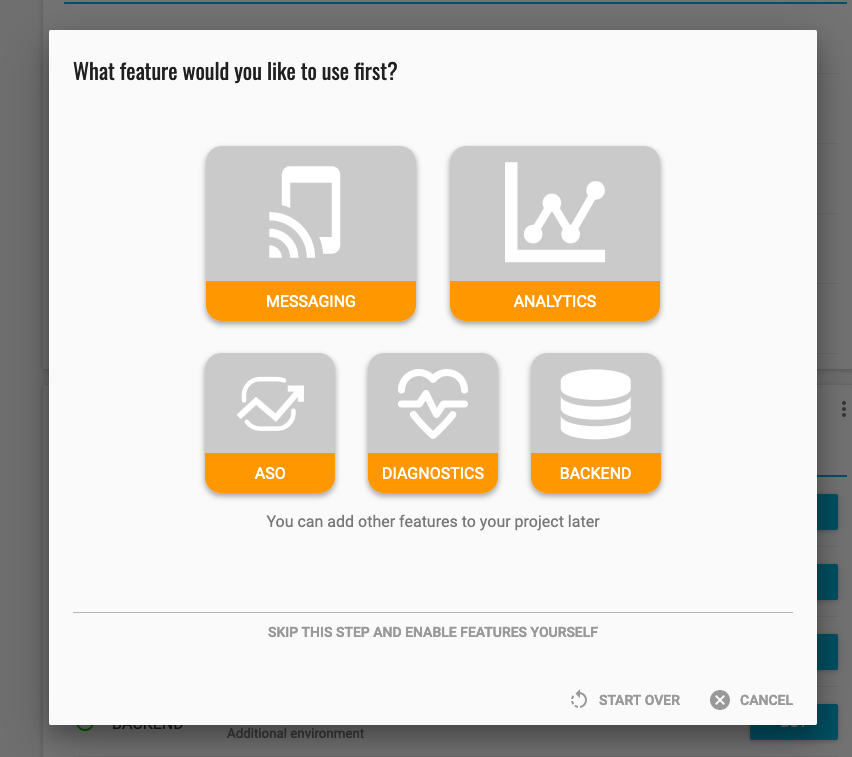
You will be redirected to the configuration screen for push notifications, these will be configured in the next step.
Configure Push Gateways
In order to send push notifications to iOS and/or Android devices you must configure the Apple Push Notification Service (APNS) and/or Firebase Cloud Messaging (FCM) and upload your push certificate to Kumulos.
APNs Configuration
In order to generate a P8 key for Apple services first access your account at https://developer.apple.com/ and select 'Certificates, Identifiers & Profiles', then select 'Keys' on the left.
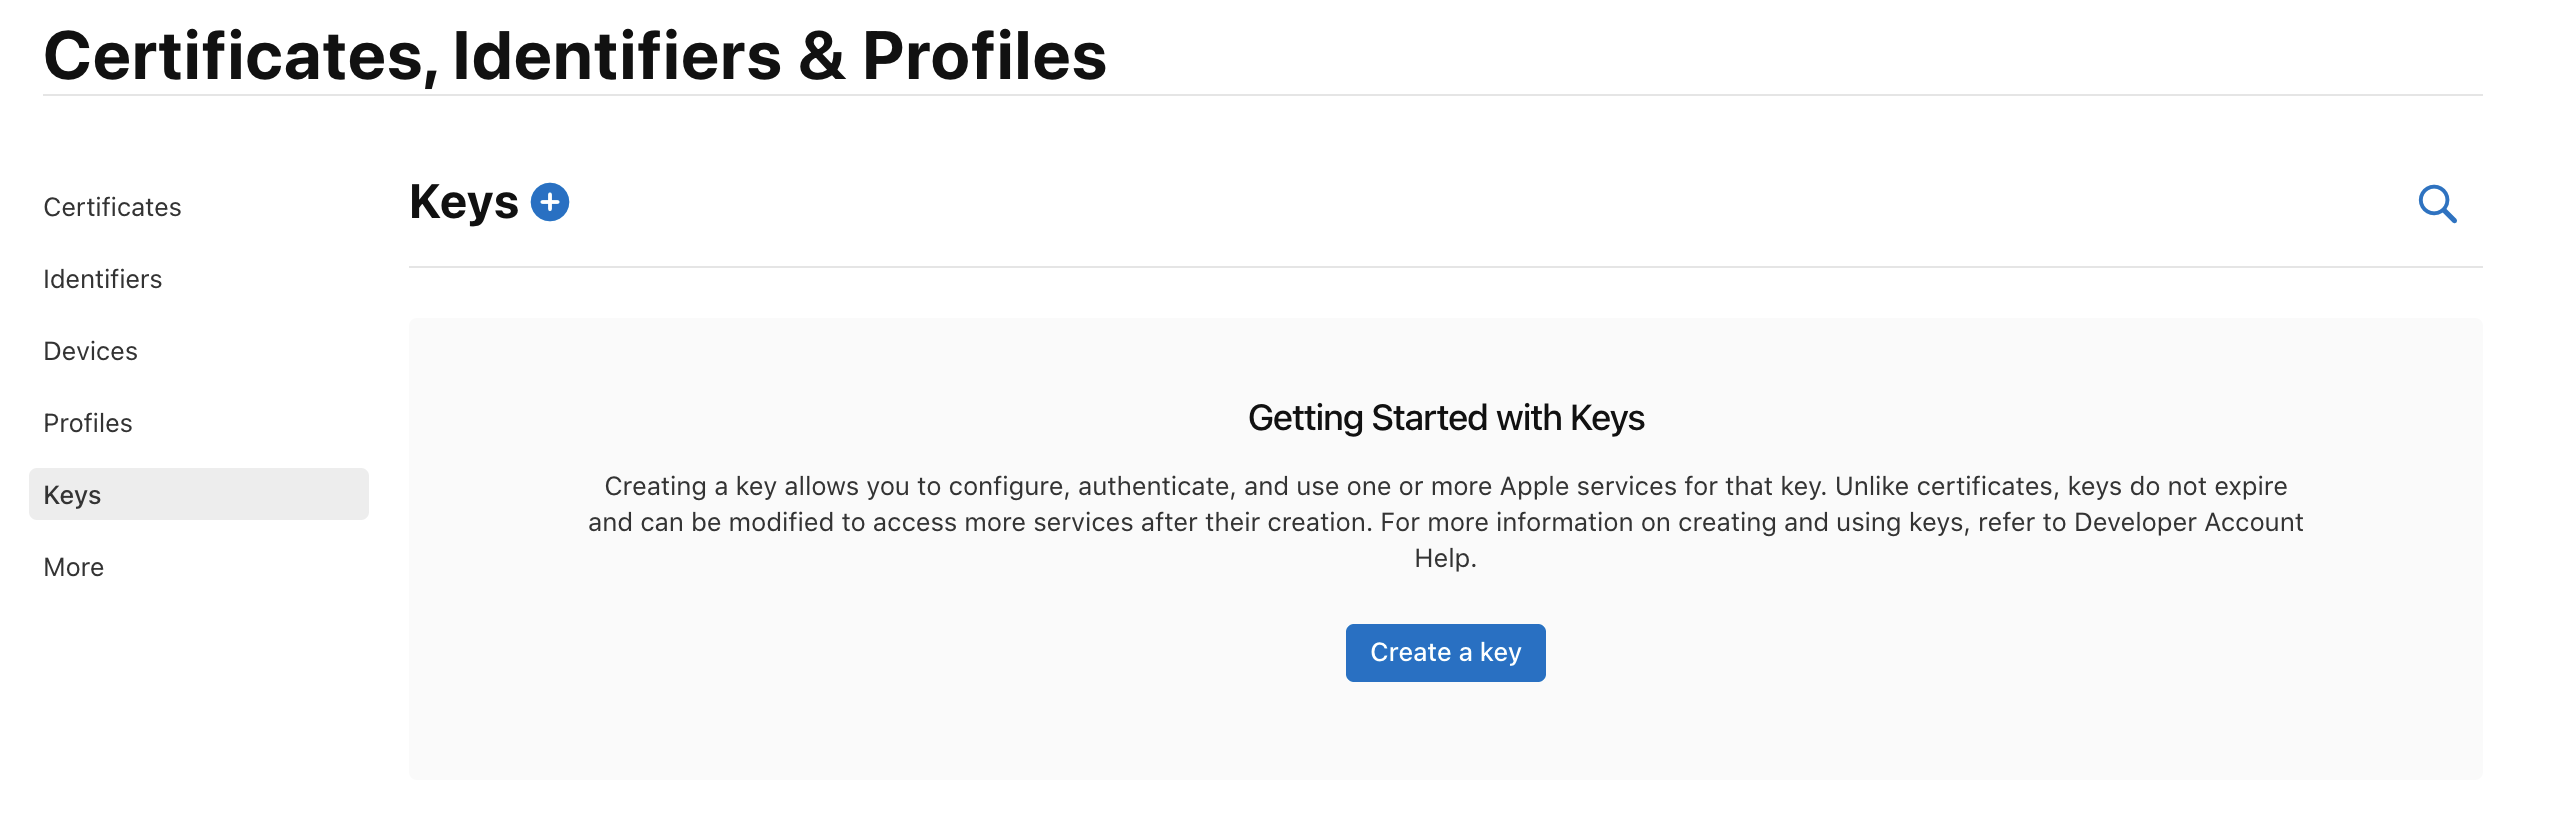
Select 'Create a Key' and on the form 'Register a New Key' enter a meaningful name such as 'APNS Access Key' and check the 'Enable' checkbox for 'Apple Push Notifications service (APNs)', click 'Continue'.
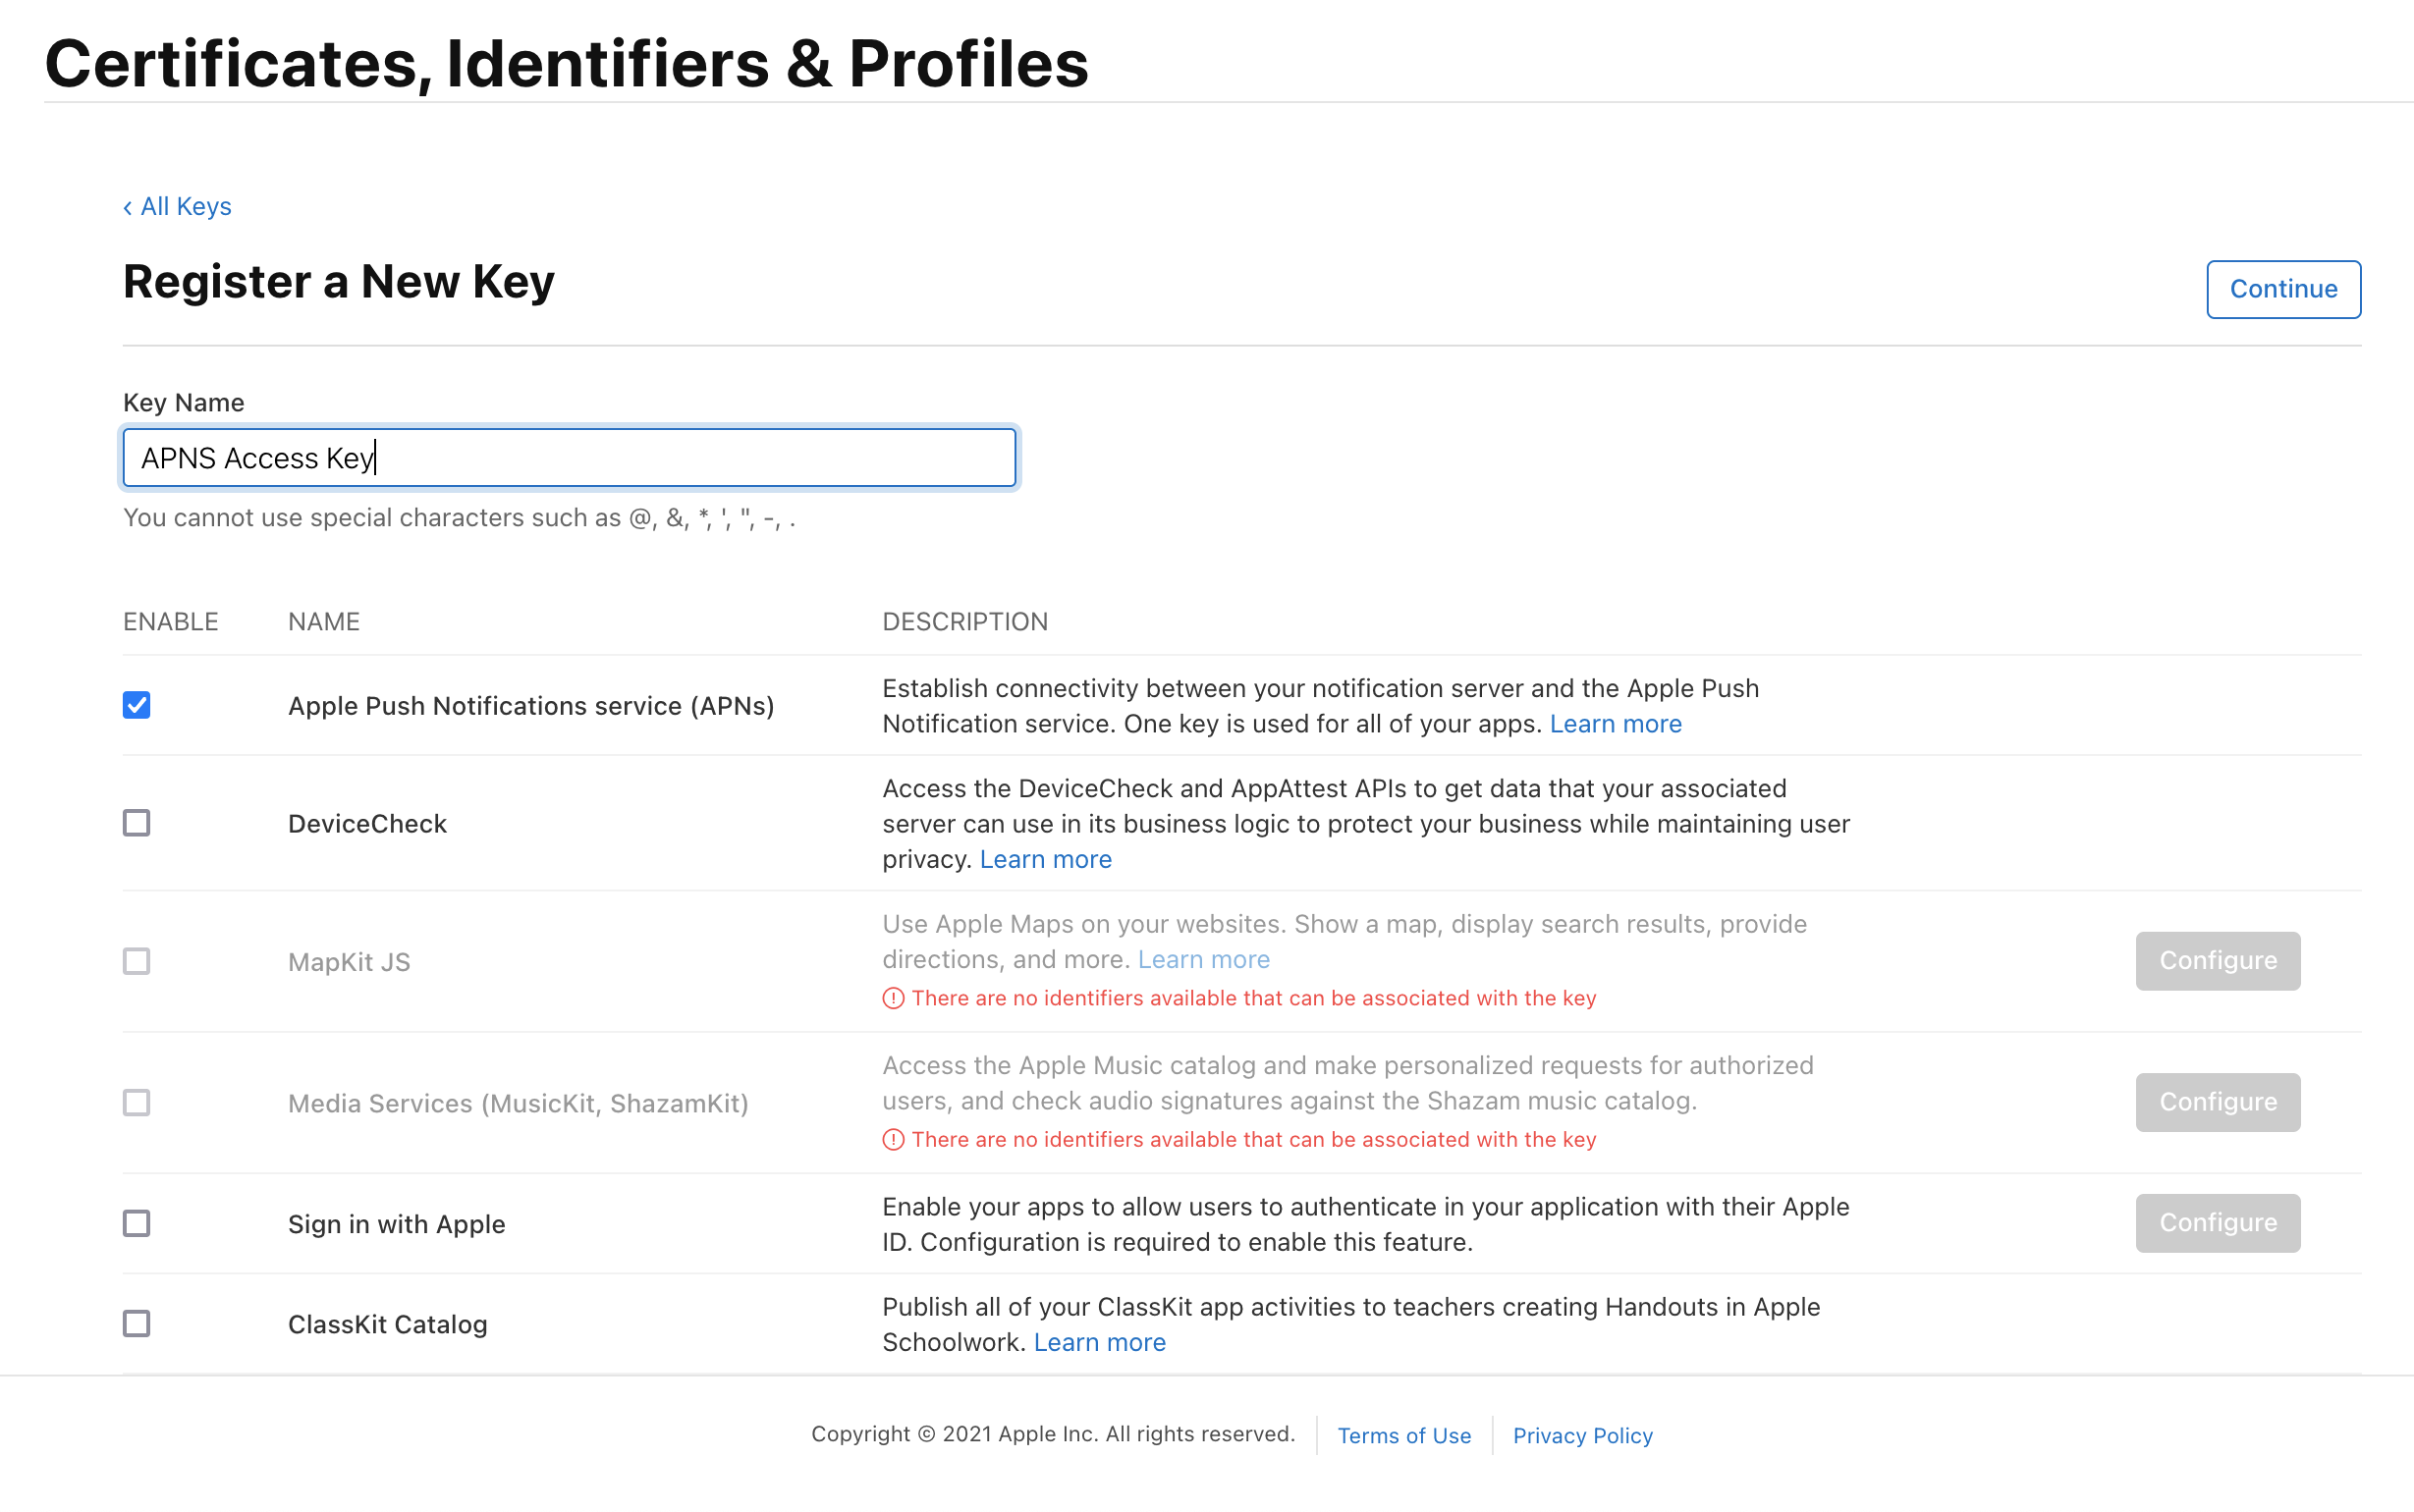
On the confirmation screen double check the APNs enablement is set then click 'Register'
On the final screen take note of your KeyID and download the key. Note that you can only download the key once, if lost the key must be revoked and re-created.
Downloading the key will save a .p8 file with the access credentials.
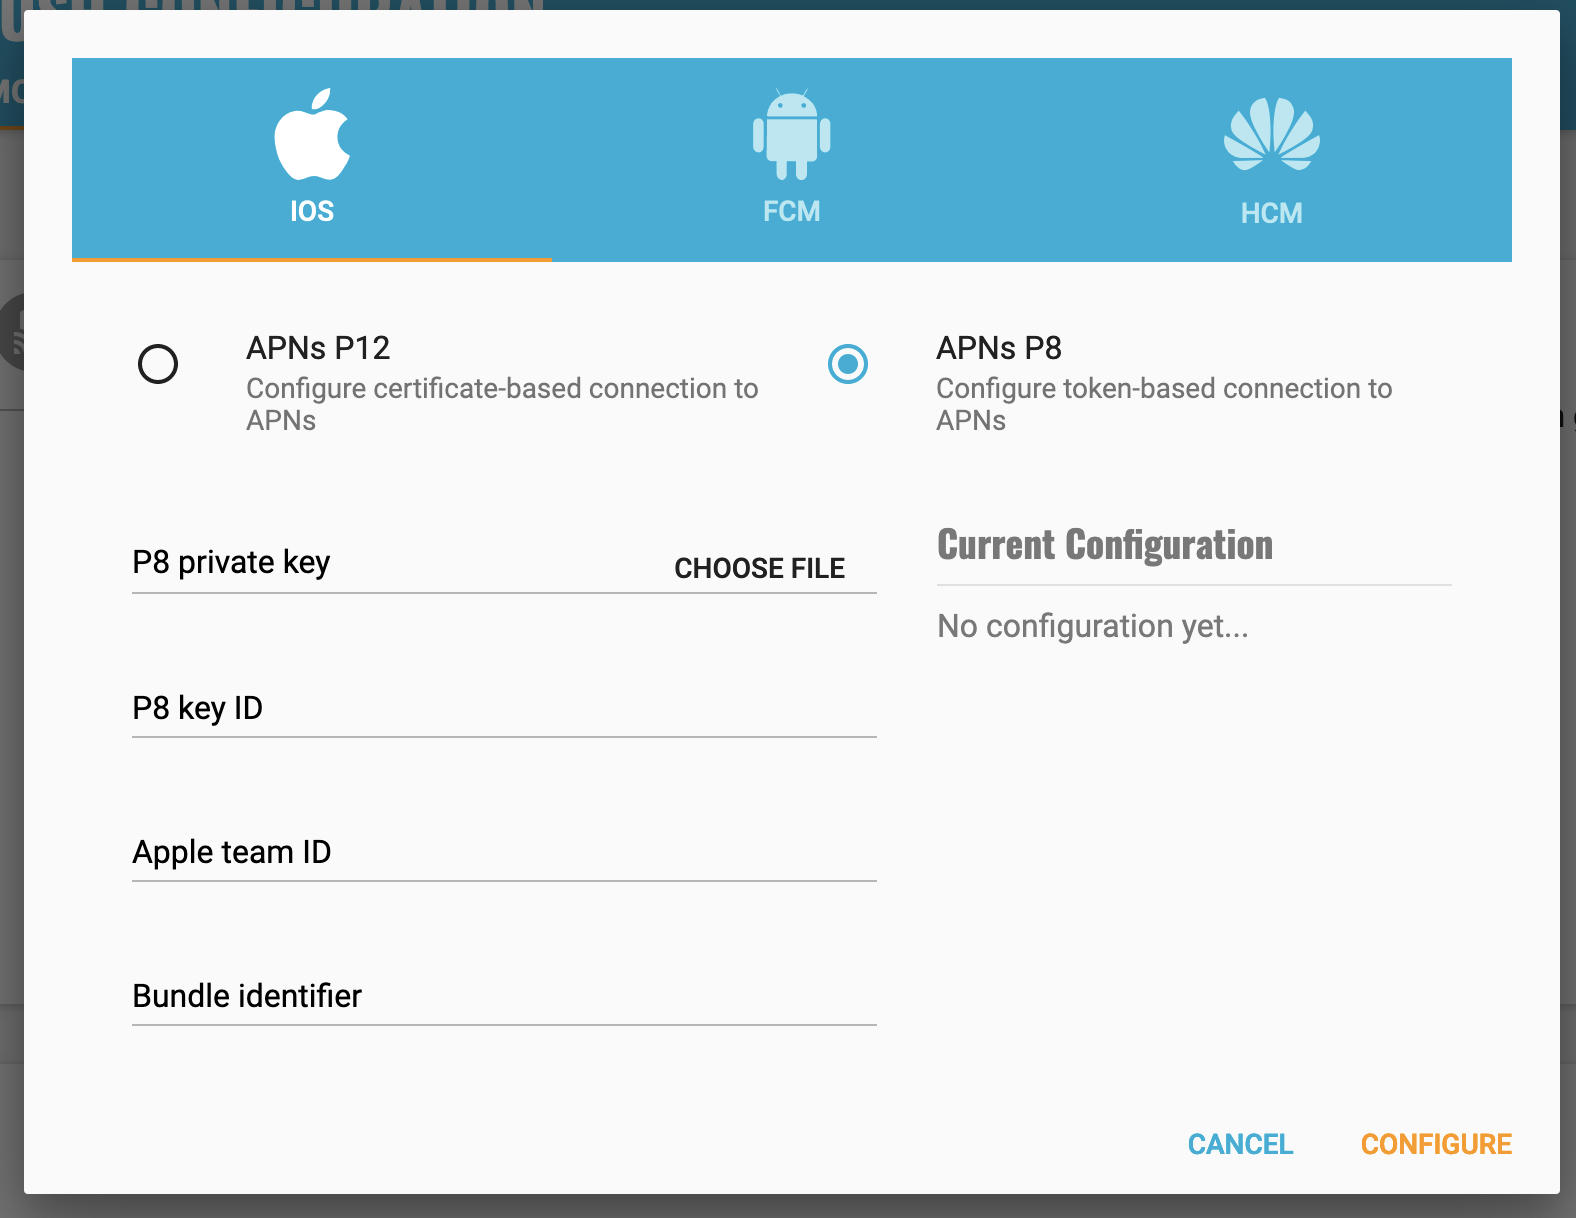
You now have all the details to configure your Kumulos App, expand 'Messaging' in the left menu, select 'Configuration' and click the cog next to the Apple icon. Select APNs P8 and select your file, enter your other details and click 'Configure'.
FCM Configuration
In order to enable push notifications for Android with Kumulos, you'll need to set up an FCM project and configure push for your app. These steps are shown in the following video guide.
Enabling Push Notifications for Android
Upload to Kumulos
Now, in Kumulos, open 'Messaging' in the left-hand menu, click CONFIGURE NOW and then click the cog icon next to the platform you would like to configure to open the dialog where you can enter the required information to send notifications to iOS devices via APNS and/or Android devices via FCM.
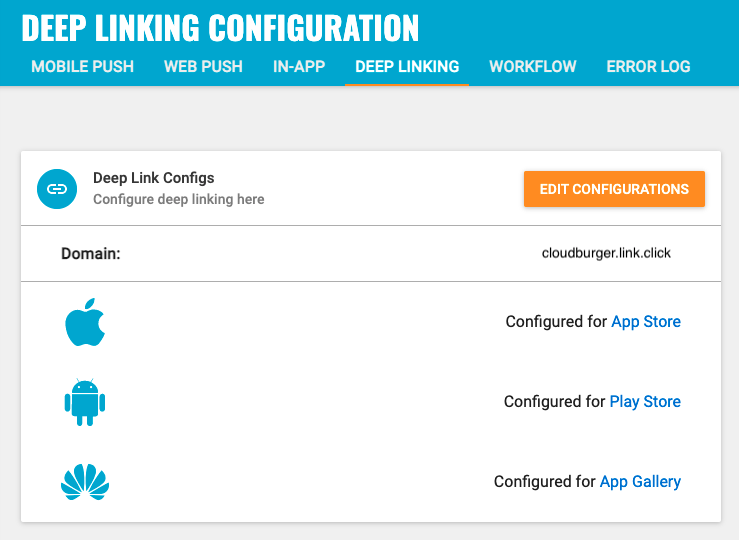
Configure Deferred Deep Linking
To use Deferred Deep Linking and/or Web-to-App banners, you need to configure three things:
- The subdomain you want to use e.g. cloudburger.lnk.click
- The URLs for your app listing in the App Store and Play Store (used if your app is not installed)
- iOS and Android platform specific settings (so the operating system will open your app)
Select your app, expand 'Deferred Deep Linking', then click 'Configuration' to start.
Subdomain
Enter the subdomain (of the lnk.click domain) that you want to use for your deep links.
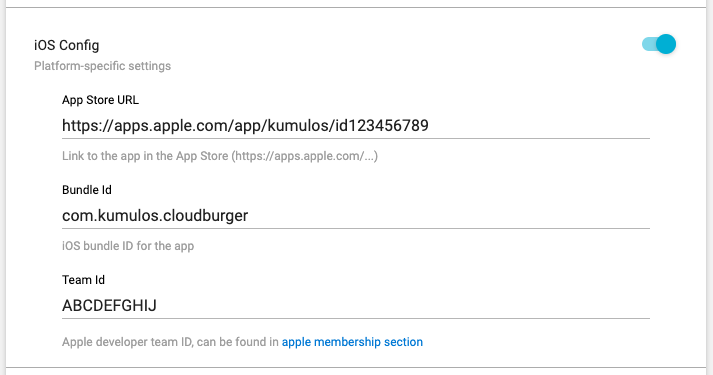
Platform Settings
iOS
To use Deferred Deep Linking with your iOS app, toggle the switch next to iOS Config on. Enter the URL to your app in the App Store, the Bundle ID for your app and your Apple Developer Account Team ID (which can be found in the Apple Membership Section).
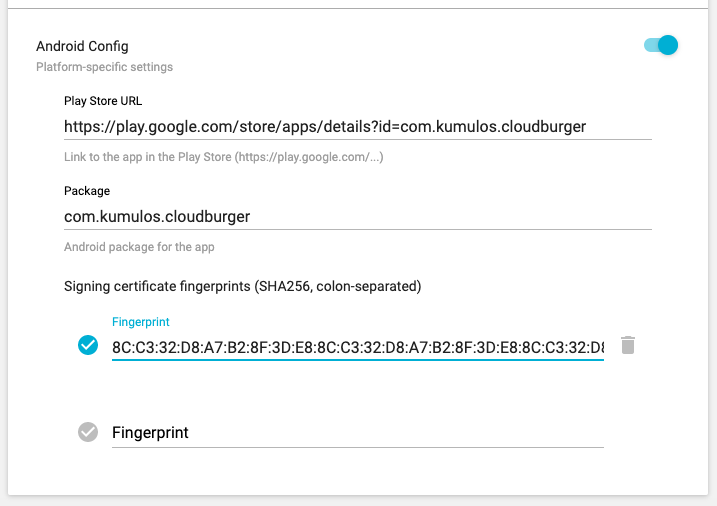
Android
To use Deferred Deep Linking with your Android app, toggle the switch next to Android Config on. Enter the URL to your app in the Play Store, the Package for your app and the colon-separated, SHA256 signing certificate fingerprint(s).
Note that if you are publishing to Google Play and app signing by Google Play is enabled, you need to add two SHA256 fingerprints: one obtained from signing APK locally and one obtained from Google Play console. Fingerprints are necessary for deep linking into your app without showing a disambiguation dialog.
Add to your mobile app
Integration
Kumulos has a number of mobile SDKs. All of our SDKs are hosted on GitHub and can be added to your project using the appropriate package manager for that language.
Integrate the SDK
The Swift SDK is distributed through all the major package managers.
Add the following line to your app's target in your Podfile:
pod 'KumulosSdkSwift', '~> 10.0'
Run pod install to install your dependencies.
Add the following line to your Cartfile:
github "Kumulos/KumulosSdkSwift" ~> 10.0
carthage update to install your dependencies then follow the Carthage integration steps to link the framework with your project.
Also link your project against:
- SystemConfiguration.framework
- MessageUI.framework (for iOS projects)
- libc++
- libz
And add the -ObjC linker flag to 'Other Linker Flags' under 'Build Settings'.
N.B. make sure to link the dynamic KSCrash.framework from the Carthage build, and not the one under Static/
In Xcode add a package dependency by selecting:
File > Swift Packages > Add Package Dependency
Choose this repository URL for the package repository and 10.0 for the version where prompted.
Add a Notification Service extension
When sending a push notification you can attach a picture or action buttons to it. They will show on iOS 10+ devices.
The notification will expand upon swiping the notification on devices supporting 3D Touch. In order to enable this functionality you need to add a Notification Service Extension to your application.
If using CocoaPods, add the following to your Podfile and run pod install.
target 'KumulosNotificationServiceExtension' do
  pod 'KumulosSdkSwiftExtension', '~> 10.0'
end
Then replace the contents of NotificationService.swift with the following lines:
import UserNotifications
import KumulosSDKExtension

class NotificationService: UNNotificationServiceExtension {
    override func didReceive(_ request: UNNotificationRequest, withContentHandler contentHandler: @escaping (UNNotificationContent) -> Void) {
        KumulosNotificationService.didReceive(request, withContentHandler: contentHandler)
    }
}
Kumulos' helper function automatically adds picture attachments and buttons to the notification content. You can modify the content before calling didReceive or replace the implementation with your own.
Configure your app capabilities and entitlements
In your app project settings use the "+ capability" button to add the App Groups, Background Modes and Push Notifications capabilities.
In your Notification Extension use the "+ capability" button to add the App Groups capability.
In both projects the App Groups capability should be configured to share the same group, following the convention: group.{your.bundle.identifier}.kumulos.
In your app project the Background Modes should have the "Remote Notifications" mode checked.
The Objective-C SDK is distributed though all the major package managers.
Add the following line to your app's target in your Podfile:
pod 'KumulosSdkObjectiveC', '~> 5.0'
Run pod install to install your dependencies.
Add the following line to your Cartfile:
github "Kumulos/KumulosSdkObjectiveC" ~> 5.0
Run carthage update to install your dependencies then follow the Carthage integration steps to link the framework with your project.
Please also ensure you link your project against:
- SystemConfiguration.framework
- MessageUI.framework (for iOS projects)
- libc++
- libz
Add a Notification Service extension
When sending a push notification you can attach a picture or action buttons to it. They will show on iOS 10+ devices.
The notification will expand upon swiping the notification on devices supporting 3D Touch. In order to enable this functionality you need to add a Notification Service Extension to your application.
If using CocoaPods, add the following to your Podfile and run pod install.
target 'KumulosNotificationServiceExtension' do
  pod 'KumulosSdkObjectiveCExtension', '5.0.0'
end
Then replace the contents of NotificationService.m with the following lines:
#import "NotificationService.h"
#import <KumulosSDKExtension/KumulosNotificationService.h>

@interface NotificationService ()
@end

@implementation NotificationService
- (void)didReceiveNotificationRequest:(UNNotificationRequest *)request withContentHandler:(void (^)(UNNotificationContent * _Nonnull))contentHandler {
  [KumulosNotificationService didReceiveNotificationRequest:request withContentHandler: contentHandler];
}
@end
Kumulos' helper function automatically adds picture attachments and buttons to the notification content. You can modify the content before calling didReceive or replace the implementation with your own.
Configure your app capabilities and entitlements
In your app project settings use the "+ capability" button to add the App Groups, Background Modes and Push Notifications capabilities.
In your Notification Extension use the "+ capability" button to add the App Groups capability.
In both projects the App Groups capability should be configured to share the same group, following the convention: group.{your.bundle.identifier}.kumulos.
In your app project the Background Modes should have the "Remote Notifications" mode checked.
Add the Firebase components to your app as shown below.
In the root build.gradle, ensure the Google repository is enabled and the google-services plugin is on the classpath:
buildscript {
    // ...
    dependencies {
        // ...
        classpath 'com.google.gms:google-services:4.3.8' // google-services plugin
    }
}

allprojects {
    // ...
    repositories {
        google() // Google's Maven repository
        // ...
    }
}
The Kumulos libraries are distributed through JCenter. To install the libraries, edit your app's build.gradle file to add the following:
- Exclude conflicting meta data files from the build
- Declare source & target compile options
- Add the Kumulos library dependencies
- Add the Firebase core SDK
- Apply the google-services plugin
A sample build.gradle can be seen below.
android {
    // Exclude duplicate files from the build
    packagingOptions {
        exclude 'META-INF/NOTICE'
        exclude 'META-INF/ASL2.0'
        exclude 'META-INF/LICENSE'
    }

    compileOptions {
        sourceCompatibility JavaVersion.VERSION_1_8
        targetCompatibility JavaVersion.VERSION_1_8
    }
}

apply plugin: 'com.android.application'

dependencies {
    // Kumulos debug & release libraries
    debugImplementation 'com.kumulos.android:kumulos-android-debug:15.0.0'
    releaseImplementation 'com.kumulos.android:kumulos-android-release:15.0.0'
    // Add library dependency for Kumulos to retrieve FCM push tokens
    implementation platform('com.google.firebase:firebase-bom:28.2.0')
    implementation 'com.google.firebase:firebase-messaging'
}

// ADD THIS AT THE BOTTOM
apply plugin: 'com.google.gms.google-services'
The debugImplementation will have logging enabled with a tag matching com.kumulos.*. When running in debug mode, the log messages should be visible in LogCat.
Run a Gradle sync to install the Kumulos libraries and build your project.
Download the google-services.json file from your Firebase app 'General' settings, and add it to your app/ folder.
Now you can add the Kumulos FirebaseMessagingService and PushBroadcastReceiver to your AndroidManifest.xml.
<?xml version="1.0" encoding="utf-8"?>
<manifest xmlns:android="http://schemas.android.com/apk/res/android"
    package="com.example">

    <!-- Optionally add the wake lock permission to stop the CPU from sleeping when a message is received -->
    <!-- <uses-permission android:name="android.permission.WAKE_LOCK" /> -->
    <!-- Optionally add the boot completed permission to allow periodic tasks to persist across phone reboots -->
    <!-- <uses-permission android:name="android.permission.RECEIVE_BOOT_COMPLETED" /> -->

  <!-- Set the android:name to your custom Application class -->
    <application
        android:name=".ExampleApp"
        android:allowBackup="true"
        android:icon="@mipmap/ic_launcher"
        android:label="@string/app_name"
        android:supportsRtl="true"
        android:theme="@style/AppTheme">
        ...
        </application>

        ...

        <!-- Kumulos FCM handler -->
        <service android:name="com.kumulos.android.FirebaseMessagingService" android:exported="false">
            <intent-filter>
                <action android:name="com.google.firebase.MESSAGING_EVENT" />
            </intent-filter>
        </service>

        <!-- Kumulos Push receiver -->
        <receiver android:name="com.kumulos.android.PushBroadcastReceiver" android:exported="false">
            <intent-filter>
                <action android:name="com.kumulos.push.RECEIVED" />
                <action android:name="com.kumulos.push.OPENED" />
                <action android:name="com.kumulos.push.DISMISSED" />
                <action android:name="com.kumulos.push.BUTTON_CLICKED" />
            </intent-filter>
        </receiver>
    </application>

</manifest>
Prerequisites
- iOS plugin installation requires CocoaPods (
sudo gem install cocoapods) - The plugin depends on Promises. Ensure you have a suitable promise polyfill available in your app runtime if required
cordova plugin add cordova-plugin-kumulos-sdk
Add https://*.kumulos.com to the Content-Security-Policy meta tag in your app, for example in www/index.html:
<meta http-equiv="Content-Security-Policy" content="default-src 'self' data: gap: https://ssl.gstatic.com 'unsafe-eval'; style-src 'self' 'unsafe-inline'; media-src *; img-src 'self' data: content:; connect-src 'self' https://*.kumulos.com;">
ionic cordova plugin add cordova-plugin-kumulos-sdk
Next, add the Kumulos type definitions to your tsconfig.json file:
{
  "files": [
    "node_modules/cordova-plugin-kumulos-sdk/index.d.ts"
  ],
}
If you are using Ionic V4 and you're receiving a compiling error
ERROR in /src/*.ts, you will also need to add"include": ["src/**/*.ts"],into yourtsconfig.jsonfile.
You may also need to add connect-src 'self' https://*.kumulos.com; to the Content-Security-Policy meta tag in your app in www/index.html if there is one present.
iOS Push Notifications
- Check the
Push Notificationscapability in your Xcode project - Check
Background Modescapability.Remote NotificationsandBackground fetchmust be enabled
Notifications will expand upon swiping the notification on devices supporting 3D Touch. In order to enable this functionality you need open your iOS project located in platforms/ios in Xcode and add a Notification Service Extension to your application.
Make sure to correctly set up signing for the extension target.
Add the following to the Podfile generated by Cordova and run pod install.
target 'KumulosNotificationServiceExtension' do
  pod 'KumulosSdkObjectiveCExtension', '4.7.0'
end
Note the Podfile generated by Cordova may get overwritten if you install other plugins with pod dependencies. If this happens add the above lines and run
pod installagain.
Then replace the contents of NotificationService.m with the following lines:
#import "NotificationService.h"
#import <KumulosSDKExtension/KumulosNotificationService.h>

@interface NotificationService ()
@end

@implementation NotificationService
- (void)didReceiveNotificationRequest:(UNNotificationRequest *)request withContentHandler:(void (^)(UNNotificationContent * _Nonnull))contentHandler {
  [KumulosNotificationService didReceiveNotificationRequest:request withContentHandler: contentHandler];
}
@end
For push delivery tracking and badges to work correctly you need to
- Add App Groups capability to your App and Notification Service Extension targets
- Set group to
group.{your.bundle.identifier}.kumulosfor both targets
Note that due to iOS limitations badge is not set when app is in the foreground
Android Push Notifications
- Download the
google-services.jsonand add it to your project's root directory
npm install cordova-plugin-kumulos-sdk@latest
Next, add the Kumulos type definitions to your tsconfig.json file:
{
  "files": [
    "node_modules/cordova-plugin-kumulos-sdk/index.d.ts"
  ],
}
Android
npx cap add android(adds android project)- To fix support library issues (if any), do
npm install jetifierandnpx jetify npx cap sync android(updates dependencies, copies web assets)- add
kumulos.xmltoandroid/app/src/main/res/valueswith contents
<?xml version="1.0" encoding="utf-8"?>
<resources xmlns:tools="http://schemas.android.com/tools">
    <string name="kumulos_api_key" tools:ignore="TypographyDashes">YOUR_API_KEY</string>
    <string name="kumulos_secret_key" tools:ignore="TypographyDashes">YOUR_SECRET_KEY</string>
    <bool name="kumulos_enable_crash_reporting">false</bool>
    <string name="kumulos_in_app_consent_strategy" tools:ignore="TypographyDashes">auto-enroll</string>
</resources>
If dependencies are not found, in AndroidStudio you need to invalidate cache and restart.
Troubleshooting for other common issues can be found in Capacitor docs
- Download the
google-services.jsonand add it to your project's android/app directory
iOS
npx cap add ios(adds ios project)npx cap sync ios(updates dependencies, copies web assets)- Edit contents of
ios/capacitor-cordova-ios-plugins/resources/kumulos.plistfilling values as below
<?xml version="1.0" encoding="UTF-8"?>
<!DOCTYPE plist PUBLIC "-//Apple//DTD PLIST 1.0//EN" "http://www.apple.com/DTDs/PropertyList-1.0.dtd">
<plist version="1.0">
<dict>
  <key>apiKey</key>
  <string>API_KEY</string>
  <key>secretKey</key>
  <string>SECRET_KEY</string>
  <key>enableCrashReporting</key>
  <false/>
  <key>inAppConsentStrategy</key>
  <string>auto-enroll</string>
</dict>
</plist>
Note, after every
npx cap sync iosvalues in thekumulos.plistabove get overwritten, so, you need to set them again.
- Check the
Push Notificationscapability in your Xcode project - Check
Background Modescapability.Remote NotificationsandBackground fetchmust be enabled
Notifications will expand upon swiping the notification on devices supporting 3D Touch. In order to enable this functionality you need open your iOS project located in platforms/ios in Xcode and add a Notification Service Extension to your application.
Make sure to correctly set up signing for the extension target.
Add the following to the Podfile generated by Cordova and run pod install.
target 'KumulosNotificationServiceExtension' do
  pod 'KumulosSdkObjectiveCExtension', '4.7.0'
end
Note the Podfile generated by Cordova may get overwritten if you install other plugins with pod dependencies. If this happens add the above lines and run
pod installagain.
Then replace the contents of NotificationService.m with the following lines:
#import "NotificationService.h"
#import <KumulosSDKExtension/KumulosNotificationService.h>

@interface NotificationService ()
@end

@implementation NotificationService
- (void)didReceiveNotificationRequest:(UNNotificationRequest *)request withContentHandler:(void (^)(UNNotificationContent * _Nonnull))contentHandler {
  [KumulosNotificationService didReceiveNotificationRequest:request withContentHandler: contentHandler];
}
@end
For push delivery tracking and badges to work correctly you need to
- Add App Groups capability to your App and Notification Service Extension targets
- Set group to
group.{your.bundle.identifier}.kumulosfor both targets
Note that due to iOS limitations badge is not set when app is in the foreground
The Kumulos React Native module requires native features so should be installed in an ejected project.
To install & link the project, run the following commands:
npm install kumulos-react-native --save
pod install --project-directory=ios
Manual linking steps are required for each platform.
Android Linking Steps
To complete the linking process for Android, you need to ensure your project uses the following versions for tools & libraries:
- Gradle plugin v3.1.3 or greater
- Build tools v23.0.3 or greater
- Support library v27.+
Place the google-services.json created during the introduction in your project's android/app directory.
In addition, you must add the following to your android/build.gradle file:
android {
    // ...
    dependencies {
        classpath 'com.google.gms:google-services:4.2.0'
    }
}
and to your android/app/build.gradle file:
android {
    // ...
    packagingOptions {
        exclude 'META-INF/NOTICE'
        exclude 'META-INF/ASL2.0'
        exclude 'META-INF/LICENSE'
    }

    // ADD THIS AT THE BOTTOM
    apply plugin: 'com.google.gms.google-services'
}
iOS Project Configuration
The notification will expand upon swiping the notification on devices supporting 3D Touch. In order to enable this functionality you need open your iOS project in Xcode and add a Notification Service Extension to your application.
Add a Notification Service extension
When sending a push notification you can attach a picture or action buttons to it. They will show on iOS 10+ devices.
The notification will expand upon swiping the notification on devices supporting 3D Touch. In order to enable this functionality you need to add a Notification Service Extension to your application.
Add the following to the Podfile generated by React Native and run pod install.
target 'KumulosNotificationServiceExtension' do
  pod 'KumulosSdkObjectiveCExtension', '4.7.0'
end
The template for the project will have created a file named NotificationService.m automatically, replace its content with the following lines:
#import "NotificationService.h"
#import <KumulosSDKExtension/KumulosNotificationService.h>

@interface NotificationService ()
@end

@implementation NotificationService
- (void)didReceiveNotificationRequest:(UNNotificationRequest *)request withContentHandler:(void (^)(UNNotificationContent * _Nonnull))contentHandler {
  [KumulosNotificationService didReceiveNotificationRequest:request withContentHandler: contentHandler];
}
@end
The Kumulos SDK helper functions will automatically add picture attachments and buttons to the notification content.
Configure your app capabilities and entitlements
In your app project settings use the "+ capability" button to add the App Groups, Background Modes and Push Notifications capabilities.
In your Notification Extension use the "+ capability" button to add the App Groups capability.
In both projects the App Groups capability should be configured to share the same group, following the convention: group.{your.bundle.identifier}.kumulos.
In your app project the Background Modes should have the "Remote Notifications" mode checked.
Add the SDK package
The Xamarin SDK is distributed as a Nuget package via the nuget.org repository, in your Visual Studio project select Add Packages and search for Com.Kumulos, select the package and click 'Add Packages'.
It is possible to add the Com.Kumulos NuGet package only to your Xamarin Forms project, it will then be available via the abstraction layer to your iOS and Android projects, however for the Android project it is advisable to add the package again so that it can manage its dependencies for Firebase Messaging automatically.
Configure push for Android
The next step is to add the google-services.json file to the root directory of your android project:
- Copy google-services.json to the project folder.
- Add google-services.json to the app project (click Show All Files in the Solution Explorer, right click google-services.json, then select Include in Project).
- Select google-services.json in the Solution Explorer window.
- In the Properties pane, set the Build Action to GoogleServicesJson.
- Right click packages, then select 'Add Google Play Service...'
- Select 'Firebase - Messaging', click 'Add Packages'
This process will automatically update your AndroidManifest.xml file as part of your project build.
In order for pushes to be handled by your registered receiver you must add a reference to your android manifest, inside the Application section.
<application android:label="MyApp.Android">
...
<service android:name="com.kumulos.android.FirebaseMessagingService">
    <intent-filter>
        <action android:name="com.google.firebase.MESSAGING_EVENT" />
    </intent-filter>
</service>
...
</application>
Next, you must create an instance of PushBroadcastReceiver, with the appropriate attributes for Xamarin to link it at build time.
using Android.App;
using Android.Content;
using Com.Kumulos.Android;

namespace FormsApp.Droid
{
    [BroadcastReceiver(Enabled = true, Exported = false)]
    [IntentFilter(new[] { ActionPushReceived, ActionPushOpened })]
    public class MyPushReciever : PushBroadcastReceiver
    {
    }
}
Configure push for iOS
In order to support images and action buttons in push notifications, along with delivery receipts the Kumulos SDK ships a Notification Service Extension, this must be added to your Xamarin project in order to render images in the notification center.
Recent versions of Visual Studio have introduced a bug where the Notification Extension Service will only work correctly when you run in Release mode. If you follow the following integration guide and images are not appearing in your push notifications, please make sure you are running in Release mode.
- Right click on your project solution and click Add -> Add New Project
- Click iOS -> Extension -> Notification Service Extension and select Next
- Enter the name KumulosServiceExtension and click Next
Note: The Bundle ID for this extension should be the same as the Bundle ID for your main application with .KumulosServiceExtension on the end. For example, if your primary application's Bundle ID is com.example.test, the Bundle ID for your extension should be com.example.test.KumulosServiceExtension.
- Click Create to add the extension service to your project.
- Right click on Packages for your new KumulosServiceExtension and select Add Packages...
- Enter Com.Kumulos.Extension and press "Add Package".
- Open your extension's Info.plist file, and ensure the deployment target is iOS 10.0 or higher, lower versions of iOS do not support extensions.
Visual studio should have created a file called NotificationService.cs in the KumulosServiceExtension project automatically. Replace the file's contents with
using System;
using Com.Kumulos;
using Foundation;
using UserNotifications;

namespace [yournamespace]
{
    [Register("NotificationService")]
    public class NotificationService : UNNotificationServiceExtension
    {
        protected NotificationService(IntPtr handle) : base(handle)
        {
            // Note: this .ctor should not contain any initialization logic.
        }

        public override void DidReceiveNotificationRequest(UNNotificationRequest request, Action<UNNotificationContent> contentHandler)
        {
            NotificationServiceExtension.Current.DidReceiveNotificationRequest(request, contentHandler);
        }
    }
}
You must also configure your projects to share an App group, so that the service extension and app can share information.
- Update your Entitlements.plist in both the app project and service extension project. Check the
Enable App Groupsentitlement, and in the App Groups box which appears enter an item forgroup.[your-app-bundle].kumulos
The Kumulos SDK will automatically manage delivery receipts, along with downloading and adding images and dynamically creating action buttons for your push notifications.
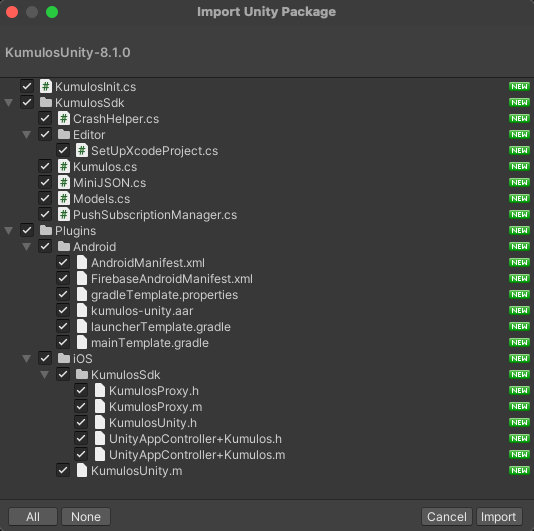
To get started, download the Unity package from GitHub and import it into your project.
Android
Next, you need to import the FirebaseMessaging package. You only need it for android, so, when importing untick iOS related plugin files located in Plugins/iOS/Firebase (including Firebase static libraries may result in iOS build errors). Additionally, if Android Studio suggests to enable Android Auto-resolution, choose 'Disable'. Otherwise it may load Firebase dependencies as jars, and classes from jars may conflict with Kumulos gradle dependencies. Sync your project.
Next, add the google-service.json file to your Assets folder.
When you have configured FCM, you need to adjust the Kumulos Gradle template (Plugins/Android/mainTemplate.gradle) file, uncommenting the dependency line as shown below:
// TODO: Uncomment the following line if using FCM for push notifications
implementation 'com.google.android.gms:play-services-gcm:17.0.0'
After you installed Firebase messaging package, remove
Assets/Plugins/Android/AndroidManifest.xmland renameAssets/Plugins/Android/FirebaseAndroidManifest.xmltoAndroidManifest.xml.FirebaseAndroidManifest.xmlcontains deletedAndroidManifest.xmlcorrectly merged with Firebase manifest. Renamed file should be set as Main Manifest in player settings.Note that you may need to fix errors in Firebase module's
build.gradleandFirebase/AndroidManifest.xml. Follow suggestions given by Android Studio.
iOS
Notifications will expand upon swiping the notification on devices supporting 3D Touch. In order to enable this functionality you need open your iOS project in Xcode and add a Notification Service Extension to your application.
Make sure to correctly set up signing for the extension target.
Then replace the contents of NotificationService.m with the following lines:
#import "NotificationService.h"
#import <KumulosNotificationService.h>

@interface NotificationService ()
@end

@implementation NotificationService
- (void)didReceiveNotificationRequest:(UNNotificationRequest *)request withContentHandler:(void (^)(UNNotificationContent * _Nonnull))contentHandler {
  [KumulosNotificationService didReceiveNotificationRequest:request withContentHandler: contentHandler];
}
@end
Next, make the following modifications to the Notification Extension target:
- Add
libKumulosSDKExtension.ashipped with KumulosSDKUnity to$(PROJECT_DIR). Set target membership of the library. It must be a member of the Notification Extension target. - In Build Settings, Search Paths add
$(PROJECT_DIR)/Libraries/Plugins/iOS/KumulosSdkto Header Search Paths - In Build Settings, Architectures make sure that valid architectures are selected. For example,
Standard architectures - $(ARCHS_STANDARD) - in Build Settings, Other Linker Flags make sure that
-ObjCflag is present
Supporting push delivery tracking and badges
For push delivery tracking and badges to work correctly you need to:
- Set up a Notification Service Extension as described above
- Add the App Groups capability to your App and Notification Service Extension targets
- Set the group to
group.{your.bundle.identifier}.kumulosfor both targets
Note that due to iOS limitations badge is not set when app is in the foreground
Add the following dependency to your pubspec.yaml and run pub install:
dependencies:
  kumulos_sdk_flutter: 1.2.1
Add the following to your android/app/build.gradle file:
android {
    // ...
    packagingOptions {
        exclude 'META-INF/NOTICE'
        exclude 'META-INF/ASL2.0'
        exclude 'META-INF/LICENSE'
    }

    dependencies {
        // Add firebase-messaging dep using BoM to get compatible version
        // of Android FCM push gateway library for Kumulos to retrieve
        // FCM push tokens.
        implementation platform('com.google.firebase:firebase-bom:28.2.0')
        implementation 'com.google.firebase:firebase-messaging'
    }

    apply plugin: 'com.google.gms.google-services'
}
Initialization
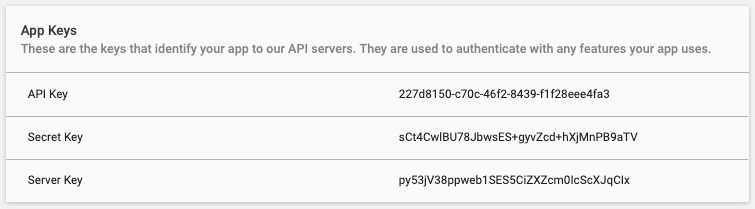
To initialize the SDK, you will need your app's API Key and Secret Key. Click on the app in your console and you will see this at the bottom of the dashboard.
Use these credentials to initialize the SDK early in your application startup as shown below.
Initialize the SDK
import UIKit
import KumulosSDK

@UIApplicationMain
class AppDelegate: UIResponder, UIApplicationDelegate {

  var window: UIWindow?

  func application(application: UIApplication, didFinishLaunchingWithOptions launchOptions: [NSObject: AnyObject]?) -> Bool {

    let builder = KSConfigBuilder(apiKey: "your-api-key", secretKey: "your-secret-key")
    .enableInAppMessaging(inAppConsentStrategy: InAppConsentStrategy.AutoEnroll)

    Kumulos.initialize(config: builder.build())

    // Override point for customization after application launch.
    return true
  }
}
@import KumulosSDK;
...
KSConfig *config = [KSConfig configWithAPIKey:@"YOUR_API_KEY" andSecretKey:@"YOUR_SECRET_KEY"];
[config enableInAppMessaging:KSInAppConsentStrategyAutoEnroll];
[Kumulos initializeWithConfig:config];
package com.example;

import android.app.Application;
import com.kumulos.android.Kumulos;
import com.kumulos.android.KumulosConfig;

public class ExampleApp extends Application {

    @Override
    public void onCreate() {
        super.onCreate();

        KumulosConfig config = new KumulosConfig.Builder("YOUR_API_KEY", "YOUR_SECRET_KEY")
         .enableInAppMessaging(KumulosConfig.InAppConsentStrategy.AUTO_ENROLL)
        .build();
        Kumulos.initialize(this, config);
    }
}
To set up the SDK for your Kumulos app, you must create a kumulos.json file in your project root with Kumulos configuration:
{
    "apiKey": "YOUR_API_KEY",
    "secretKey": "YOUR_SECRET_KEY",
    "inAppConsentStrategy": "auto-enroll"
}
Next, in your main app javascript (for example, www/index.js), add the JavaScript:
document.addEventListener('deviceready', function () {
    if (typeof Kumulos === 'undefined') {
      console.info('Kumulos plugin not found, assuming browser environment & skipping init...');
      return;
    }

    Kumulos.initialize({
        apiKey: 'YOUR_API_KEY',
        secretKey: 'YOUR_SECRET_KEY'
    });
}, false);
In your main app javascript (for example, www/index.js), add the JavaScript:
document.addEventListener('deviceready', function () {
    if (typeof Kumulos === 'undefined') {
      console.info('Kumulos plugin not found, assuming browser environment & skipping init...');
      return;
    }

    Kumulos.initialize({
        apiKey: 'YOUR_API_KEY',
        secretKey: 'YOUR_SECRET_KEY'
    });
}, false);
In your ios/AppDelegate.m application:didFinishLaunchingWithOptions: method:
#import <KumulosReactNative/KumulosReactNative.h>
...
KSConfig* kumulosConfig = [KSConfig
  configWithAPIKey:@"YOUR_API_KEY"
  andSecretKey:@"YOUR_SECRET_KEY"];
[kumulosConfig enableInAppMessaging:KSInAppConsentStrategyAutoEnroll];
[KumulosReactNative initializeWithConfig:kumulosConfig];
In your android/app/src/main/java/MainApplication.java onCreate method:
import com.kumulos.android.KumulosConfig;
import com.kumulos.reactnative.KumulosReactNative;
...
KumulosConfig.Builder kumulosConfig = new KumulosConfig.Builder("YOUR_API_KEY", "YOUR_SECRET_KEY");
kumulosConfig.enableInAppMessaging(KumulosConfig.InAppConsentStrategy.AUTO_ENROLL);
KumulosReactNative.initialize(this, kumulosConfig);
Finally, in your App.js:
import Kumulos from 'kumulos-react-native';

Kumulos.initialize({
    apiKey: 'YOUR_API_KEY',
    secretKey: 'YOUR_SECRET_KEY'
});
iOS
The initialization should be performed early in your FinishedLaunching method in AppDelegate.cs
using Com.Kumulos;
using Com.Kumulos.Abstractions;

...

Kumulos.CurrentConfig.AddKeys("YOUR_API_KEY", "YOUR_SECRET_KEY")
    .EnableInAppMessaging(InAppConsentStrategy.AutoEnroll);

Kumulos.Current.Initialize(Kumulos.CurrentConfig);
Android
Initialization should be performed by overriding the MainApplication class and adding extra initialization after the framework OnCreate method has completed.
using System;
using Android.App;
using Com.Kumulos;
using Com.Kumulos.Abstractions;

namespace TestApp.Droid
{
    [Application]
    public class MainApplication : Application
    {
        public MainApplication(IntPtr javaReference, Android.Runtime.JniHandleOwnership transfer) : base(javaReference, transfer)
        {
        }

        public override void OnCreate()
        {
            base.OnCreate();

            Kumulos.CurrentConfig.AddKeys("YOUR_API_KEY", "YOUR_SECRET_KEY")
                .EnableInAppMessaging(InAppConsentStrategy.AutoEnroll);

            Kumulos.Current.Initialize(Kumulos.CurrentConfig);
        }
    }
}
C-Sharp
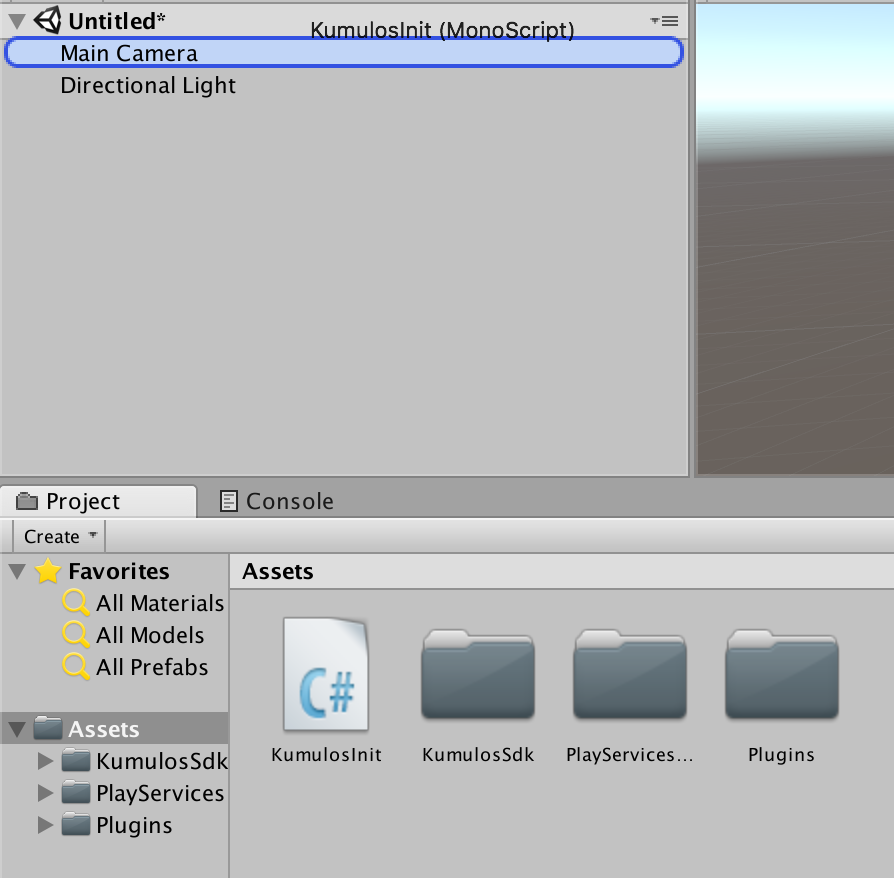
Attach the KumulosInit script to your main scene's camera object by dragging it from the Assets browser to the Main camera.
In the provided KumulosInit behavior, edit the config object to set up your credentials:
var config = (new Config.Builder("YOUR_API_KEY", "YOUR_SECRET_KEY"))
    .Build();

Kumulos.Initialize(config);
Android
For Android builds, it is necessary to export the Gradle project with the provided custom Gradle template file (ensure this file is selected in the Android player settings).
Note that if you are using Kumulos Unity SDK 7.0.0 and above there are 2 template files:
mainTemplate.gradleandlauncherTemplate.gradle. If you are using SDK 8.0.0 and above there is alsogradleTemplate.propertiesfile. These files should be selected in player settings.
On the player settings, tick the "Export project" box to save the Android project to your preferred location.
Once exported, open the project in Android Studio to continue initialization.
Add a MainApplication.java class to the project's main java sources package:
import android.app.Application;

import com.kumulos.android.KumulosConfig;
import com.kumulos.android.unity.KumulosUnity;

public class MainApplication extends Application {

    @Override
    public void onCreate() {
        super.onCreate();

        KumulosConfig.Builder kumulosConfig = new KumulosConfig.Builder("YOUR_API_KEY", "YOUR_SECRET_KEY");
        kumulosConfig.enableInAppMessaging(KumulosConfig.InAppConsentStrategy.AUTO_ENROLL);
        KumulosUnity.initialize(this, kumulosConfig);
    }
}
Make sure this class is referenced from
android:name=".MainApplication"property of the<application />tag in theAndroidManifest.xml.
iOS
For iOS, you need to add credentials to the Assets/Plugins/iOS/KumulosUnity.m file as follows:
#import "KumulosSdk/KumulosUnity.h"

@implementation KumulosUnity

+ (KSConfig*) buildConfig {
    KSConfig* kumulosConfig = [KSConfig configWithAPIKey:@"YOUR_API_KEY" andSecretKey:@"YOUR_SECRET_KEY"];
    [kumulosConfig enableInAppMessaging:KSInAppConsentStrategyAutoEnroll];                              ik

    return kumulosConfig;
}

@end
Create a kumulos.json file in your project's root directory with Kumulos configuration:
{
    "apiKey": "YOUR_API_KEY",
    "secretKey": "YOUR_SECRET_KEY",
    "inAppConsentStrategy": "auto-enroll",
    "enableDeferredDeepLinking": true
}
Declare the asset in your pubspec.yaml:
assets:
  - kumulos.json
This will auto-enroll all users to receive in-app messages. If you want to let your users opt-in to receive in-app messages, you can change the consent strategy during SDK initialization to make opt-in explicit and then call the SDK helper to manage consent as shown in the integration guide for each SDK.
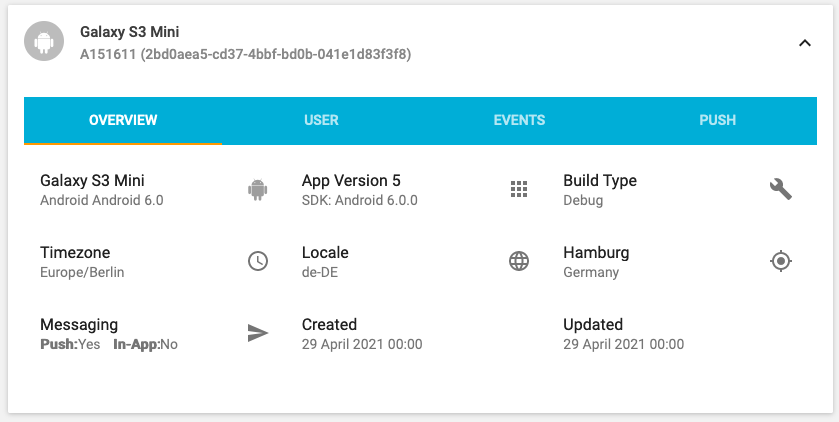
When you now run your app on a simulator or install your app on a device, Analytics data will be sent to Kumulos. To check that the SDK has been initialized correctly, click on the Installs tab. This shows the most recent installs of your app (platform, device model and installation id).
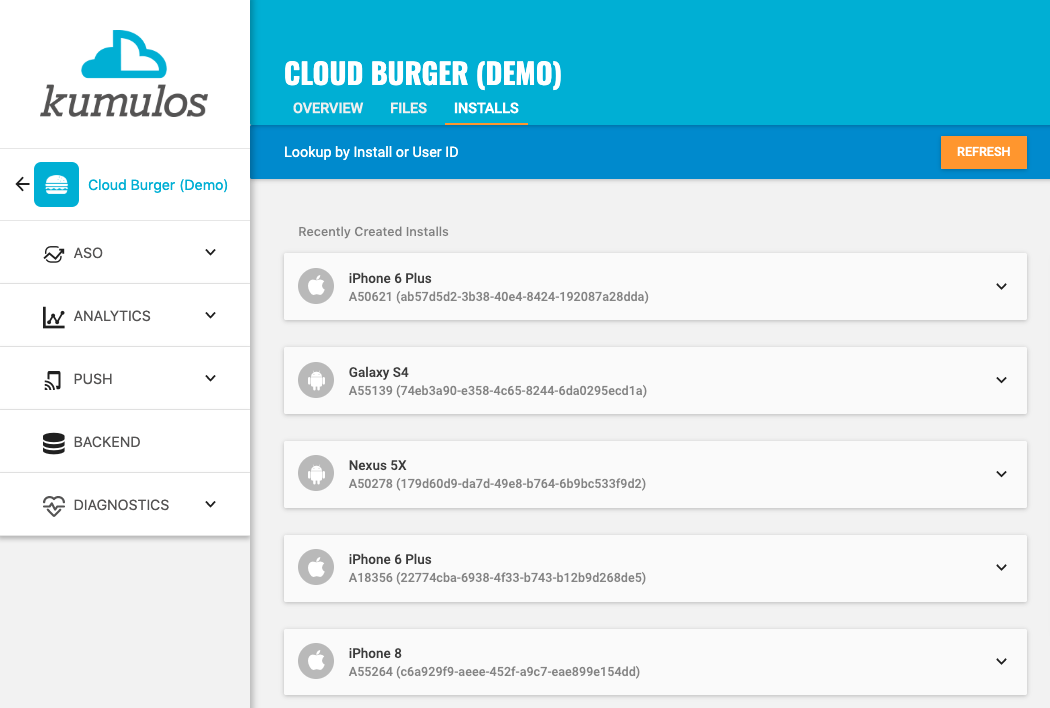
Click on any install to see more information. The Overview tab shows more details about the installation including app version, when the app was installed, the approximate location (to help identify test devices and installs) and the locale being used.
Push Notifications
When you consider it appropriate, you can register the user for push notifications.
On iOS, this method will prompt the user about sending remote notifications, so you should consider applying a permission priming UX pattern to prepare the user for this step.
Alternatively, you can use a Kumulos in-app message to prompt the user to accept push notifications at a later time.
Whilst you can handle this yourself, Kumulos provides a convenience method:
Register for Push Notifications
Kumulos.pushRequestDeviceToken()
[Kumulos.shared pushRequestDeviceToken];
Kumulos.pushRequestDeviceToken(context);
Kumulos.pushRegister();
Kumulos.pushRequestToken();
Kumulos.Current.RegisterForRemoteNotifications();
Kumulos.Shared.PushRegister();
Kumulos.pushRequestToken();
When adding Kumulos to an existing app, we suggest registering for push as soon as the app is opened for the first time after update.
Deferred Deep Linking
To integrate deep linking into your project, you have to complete the following steps.
Integrate Deferred Deep Linking
If your app doesn't use scenes, add to your AppDelegate.swift:
func application(_ application: UIApplication, continue userActivity: NSUserActivity, restorationHandler: @escaping ([UIUserActivityRestoring]?) -> Void) -> Bool {
    return Kumulos.application(application, continue: userActivity, restorationHandler: restorationHandler)
}
If your app uses scenes: add to SceneDelegate.swift:
func scene(_ scene: UIScene, willConnectTo session: UISceneSession, options connectionOptions: UIScene.ConnectionOptions) {
    guard let _ = (scene as? UIWindowScene) else { return }

    // Deep links from cold starts
    if let userActivity = connectionOptions.userActivities.first {
        Kumulos.scene(scene, continue: userActivity)
    }
}

func scene(_ scene: UIScene, continue userActivity: NSUserActivity) {
    Kumulos.scene(scene, continue: userActivity)
}
Configure a deep link handler:
let cfg = KSConfigBuilder(apiKey:"API_KEY", secretKey: "SECRET_KEY")
    .enableDeepLinking({ (resolution) in
        print("Deep link resolution result: \(resolution)")
    })
    .build()
Kumulos.initialize(config: cfg)
Finally, you need to associate a domain with your app. Note that the subdomain you specify here should match the one you specified on the deep link configuration page on Kumulos Dashboard.
- Add the Associated Domains capability to your main app target
- Set 'domains' to
applinks:{yourSubdomain}.lnk.click

If your app doesn't use scenes, add to your AppDelegate.m:
- (BOOL)application:(UIApplication *)application continueUserActivity:(NSUserActivity *)userActivity restorationHandler:(void (^)(NSArray<id<UIUserActivityRestoring>> *restorableObjects))restorationHandler {
    return [Kumulos application:application continueUserActivity:userActivity restorationHandler:restorationHandler];
}
If your app uses scenes: add to SceneDelegate.m:
- (void) scene:(UIScene *)scene continueUserActivity:(NSUserActivity *)userActivity {
    [Kumulos scene:scene continueUserActivity: userActivity];
}

- (void)scene:(UIScene *)scene willConnectToSession:(UISceneSession *)session options:(UISceneConnectionOptions *)connectionOptions{
    if(![scene isKindOfClass:[UIWindowScene class]]){
        return;
    }

    // Deep links from cold starts
    NSUserActivity* userActivity = [[[connectionOptions userActivities] allObjects] firstObject];
    if (userActivity){
        [Kumulos scene:scene continueUserActivity: userActivity];
    }
}
Configure a deep link handler:
KSConfig *config = [KSConfig configWithAPIKey:@"API_KEY" andSecretKey:@"SECRET_KEY"];
[config enableDeepLinking:^(KSDeepLinkResolution resolution, NSURL* url, KSDeepLink* deepLink) {
    switch (resolution) {
            case KSDeepLinkResolutionLinkMatched:
                NSLog(@"deep link matched");
                break;
            default:
                break;
    }
}];
[Kumulos initializeWithConfig:config];
Finally, you need to associate a domain with your app. Note that the subdomain you specify here should match the one you specified on the deep link configuration page on Kumulos Dashboard.
- Add the Associated Domains capability to your main app target
- Set 'domains' to
applinks:{yourSubdomain}.lnk.click
Add an intent filter to your main activity:
<intent-filter android:label="deepLabel" android:autoVerify="true">
    <action android:name="android.intent.action.VIEW" />
    <category android:name="android.intent.category.DEFAULT" />
    <category android:name="android.intent.category.BROWSABLE" />
    <!-- Specify which URIs should be matched. Note, domain should be .lnk.click -->
    <data android:scheme="https" android:host="subdomain.lnk.click"/>
</intent-filter>
Note that the subdomain you specify above should match the one you specified on the deep link configuration page on the Kumulos Dashboard.
Note that setting
android:autoVerify="true"will verify ownership of the domain, so, instead of offering a list of apps to select from your app will open automatically. No further actions are needed to enable this.
Add following overrides to the main activity:
@Override
protected void onCreate(Bundle savedInstanceState) {
    super.onCreate(savedInstanceState);
    Kumulos.seeIntent(this, getIntent(), savedInstanceState);
}

@Override
public void onWindowFocusChanged(boolean hasFocus) {
    super.onWindowFocusChanged(hasFocus);
    Kumulos.seeInputFocus(this, hasFocus);
}

/*
* If the main activity in AndroidManifest has android:launchMode="singleTop", add following lines as well.
* It is advisable to have launch mode single top, as otherwise app link will create another copy of the
* activity on top of the stack if activity is already running.
*/

//@Override
//protected void onNewIntent(Intent intent) {
//    super.onNewIntent(intent);
//    Kumulos.seeIntent(this, intent);
//}
Configure a deep link handler:
KumulosConfig config = new KumulosConfig.Builder(BuildConfig.K_API_KEY, BuildConfig.K_SECRET_KEY)
                .enableDeepLinking(null, new MyDeferredDeepLinkHandler())
                .build();
Kumulos.initialize(this, config);
A stub implementation of the handler could be as follows:
public class MyDeferredDeepLinkHandler implements DeferredDeepLinkHandlerInterface {
    void handle(Context context, DeferredDeepLinkHelper.DeepLinkResolution resolution, String link, @Nullable DeferredDeepLinkHelper.DeepLink data){
    //- Inspect the data payload and run code as needed.
}
}
Configure a deep link handler:
import Kumulos, {DeepLinkResolution} from 'kumulos-react-native';

Kumulos.initialize({
    apiKey: 'YOUR_API_KEY',
    secretKey: 'YOUR_SECRET_KEY',
    ...
    deepLinkHandler: (resolution, link, data) => {
    // Called when a user taps a deep-link which brings user to the app
    switch(resolution){
        case DeepLinkResolution.LinkMatched:
        console.log(data);
    }
    },
});
Configuration & Setup - iOS:
If your app doesn't use scenes, add to your AppDelegate.m:
- (BOOL)application:(UIApplication *)application continueUserActivity:(NSUserActivity *)userActivity restorationHandler:(void (^)(NSArray<id<UIUserActivityRestoring>> *restorableObjects))restorationHandler {
    return [Kumulos application:application continueUserActivity:userActivity restorationHandler:restorationHandler];
}
If your app uses scenes: add to SceneDelegate.m:
- (void) scene:(UIScene *)scene continueUserActivity:(NSUserActivity *)userActivity {
    [Kumulos scene:scene continueUserActivity: userActivity];
}

- (void)scene:(UIScene *)scene willConnectToSession:(UISceneSession *)session options:(UISceneConnectionOptions *)connectionOptions{
    if(![scene isKindOfClass:[UIWindowScene class]]){
        return;
    }

    // Deep links from cold starts
    NSUserActivity* userActivity = [[[connectionOptions userActivities] allObjects] firstObject];
    if (userActivity){
        [Kumulos scene:scene continueUserActivity: userActivity];
    }
}
Finally, you need to associate a domain with your app. Note that the subdomain you specify here should match the one you specified on the deep link configuration page on Kumulos Dashboard.
- Add the Associated Domains capability to your main app target
- Set 'domains' to
applinks:{yourSubdomain}.lnk.click
Configuration & Setup - Android:
Add an intent filter to your main activity:
<intent-filter android:label="deepLabel" android:autoVerify="true">
    <action android:name="android.intent.action.VIEW" />
    <category android:name="android.intent.category.DEFAULT" />
    <category android:name="android.intent.category.BROWSABLE" />
    <!-- Specify which URIs should be matched. Note, domain should be .lnk.click -->
    <data android:scheme="https" android:host="subdomain.lnk.click"/>
</intent-filter>
Note that the subdomain you specify above should match the one you specified on the deep link configuration page on the Kumulos Dashboard.
Note that setting
android:autoVerify="true"will verify ownership of the domain, so, instead of offering a list of apps to select from your app will open automatically. No further actions are needed to enable this.
Add following overrides to the main activity:
@Override
protected void onCreate(Bundle savedInstanceState) {
    super.onCreate(savedInstanceState);
    Kumulos.seeIntent(this, getIntent(), savedInstanceState);
}

@Override
public void onWindowFocusChanged(boolean hasFocus) {
    super.onWindowFocusChanged(hasFocus);
    Kumulos.seeInputFocus(this, hasFocus);
}

/*
* If the main activity in AndroidManifest has android:launchMode="singleTop", add following lines as well.
* It is advisable to have launch mode single top, as otherwise app link will create another copy of the
* activity on top of the stack if activity is already running.
*/

//@Override
//protected void onNewIntent(Intent intent) {
//    super.onNewIntent(intent);
//    Kumulos.seeIntent(this, intent);
//}
Configure a deep link handler:
import 'package:kumulos_sdk_flutter/kumulos.dart';

Kumulos.setEventHandlers(
    ...
    deepLinkHandler: (outcome) {
    switch (outcome.resolution) {
        case KumulosDeepLinkResolution.LinkMatched:
        // Inspect the outcome.linkData and navigate the user
        // to the deep link content
        break;
        default:
        // Handle generic non-match case
        break;
    }
    }
);
Configuration & Setup - iOS:
You need to associate a domain with your app. Note that the subdomain you specify here should match the one you specified on the deep link configuration page on Kumulos Dashboard.
- Add the Associated Domains capability to your main app target
- Set 'domains' to
applinks:{yourSubdomain}.lnk.click
Configuration & Setup - Android:
Add an intent filter to your main activity in the AndroidManifest.xml:
<intent-filter android:label="deepLabel" android:autoVerify="true">
    <action android:name="android.intent.action.VIEW" />
    <category android:name="android.intent.category.DEFAULT" />
    <category android:name="android.intent.category.BROWSABLE" />
    <!-- Specify which URIs should be matched. Note, domain should be .lnk.click -->
    <data android:scheme="https" android:host="subdomain.lnk.click"/>
</intent-filter>
Note that the subdomain you specify above should match the one you specified on the deep link configuration page on the Kumulos Dashboard.
Note that setting
android:autoVerify="true"will verify ownership of the domain, so, instead of offering a list of apps to select from your app will open automatically. No further actions are needed to enable this.
Add following overrides to the `MainActivity.java``:
@Override
protected void onCreate(Bundle savedInstanceState) {
    super.onCreate(savedInstanceState);
    Kumulos.seeIntent(this, getIntent(), savedInstanceState);
}

@Override
public void onWindowFocusChanged(boolean hasFocus) {
    super.onWindowFocusChanged(hasFocus);
    Kumulos.seeInputFocus(this, hasFocus);
}

@Override
protected void onNewIntent(Intent intent) {
super.onNewIntent(intent);
Kumulos.seeIntent(this, intent);
}
User Association
If your app has user based authentication, then Kumulos allows associating an anonymized user identifier with the current installation ID (for example for targeting via Push API. You can optionally associate a collection of attributes with the user, which can be used to create audience segments. Each Kumulos SDK provides a helper method to associate users.
Associate Users
Kumulos.associateUserWithInstall(userIdentifier: "unique-user-identifier", attributes: [
    "name": "Shawn" as AnyObject,
    "age": 25 as AnyObject
])
[Kumulos.shared associateUserWithInstall:@"unique-user-identifier" attributes:@{
    @"name": "Shawn",
    @"age": 25
}];
JSONObject attributes = new JSONObject();
props.put("name", "Shawn");
props.put("age", 25);

Kumulos.associateUserWithInstall(context, "unique-user-id", attributes);
Kumulos.associateUserWithInstall("unique-user-id", {
    "name": "Shawn",
    "age": 25
});
Kumulos.associateUserWithInstall("unique-user-id", {
    "name": "Shawn",
    "age": 25
});
Kumulos.associateUserWithInstall("unique-user-id", {
    "name": "Shawn",
    "age": 25
});
var attributes = new Dictionary<string, object>
{
    { "name", "Shawn },
    { "age", 25 }
};

Kumulos.Current.AssociateUserWithInstall("unique-user-id", attributes);
var attributes = new Dictionary<string, object>();
attributes.Add("name", "Shawn");
attributes.Add("age", 25);

Kumulos.Shared.AssociateUserWithInstall("unique-user-id", attributes);
Kumulos.associateUserWithInstall(identifier: 'unique-user-id', attributes: {
    'name': 'Shawn',
    'age': 25
});
When adding Kumulos to an existing app, we suggest calling
associateUserWithInstallwhen a new user signs up, an existing user logs in AND when the app is opened for the first time after update (for users who are already logged in to the app). As this method is idempotent, it may be simpler to just call this method every time the app is opened.
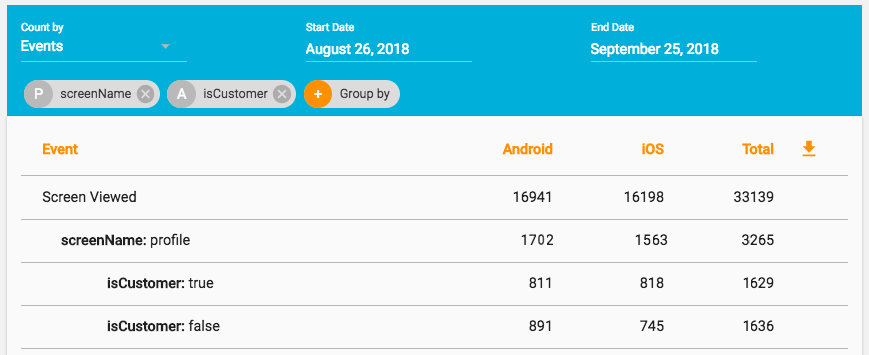
Tracking Analytics Events
Analytics events can be used as triggers to fire automation rules (e.g. to trigger a notification), as steps in a funnel to track conversion through key user journeys in your app or simply to answer questions on how the app is being used. For example: What is the most viewed screen? Which product category is most popular? How does this vary between customers and non-customers? Etc.
Each Kumulos SDK provides a helper method to track analytics events. For example: to track an event when someone purchases a product, including the product identifier as a property:
Track Analytics Events
Kumulos.trackEvent(eventType: "product.purchased", properties: [
    "productId": 404
])
[Kumulos.shared trackEvent:@"product.purchased" withProperties:@{
    @"productId": 404
}];
JSONObject props = new JSONObject();
props.put("productId", 404);

Kumulos.trackEvent(context, "product.purchased", props);
Kumulos.trackEvent('product.purchased', {
  productId: 404
});
Kumulos.trackEvent('product.purchased', {
  productId: 404
});
Kumulos.trackEvent('product.purchased', {
  productId: 404
});
var props = new Dictionary<string, object>
{
  { "productId", 404 }
};

Kumulos.Current.TrackEvent("product.purchased", props);
var props = new Dictionary<string, object>();
props.Add("productId", "404");
Kumulos.Shared.TrackEvent("product.purchased", props);
Kumulos.trackEvent(eventType: 'product.purchased', properties: {
    'productId': 404
});
Event tracking is available offline as all events are persisted locally before being synced to the server in batches in the background.
A similar method
trackEventImmediatelywill immediately start an event sync rather than waiting for the next time the app is backgrounded.
Which analytics events you should track will depend on the use case of the app. However, we would recommend tracking all steps through the first launch / onboarding flow including, any signup and user registration events. We would also recommend tracking any purchase or subscription events and an event for each screen in the app (so you can see how the app is being used).
Submit to Stores
You are now ready to submit your app or update to the stores for approval. Ensure you have added all of the features you are using to your Kumulos subscription first to avoid your app being rejected.
On the App Dashboard, click Buy next to any feature and you will be asked to confirm that you wish to add the feature to your subscription. At the same time, you can also add any other features currently being trialled by checking the appropriate box.
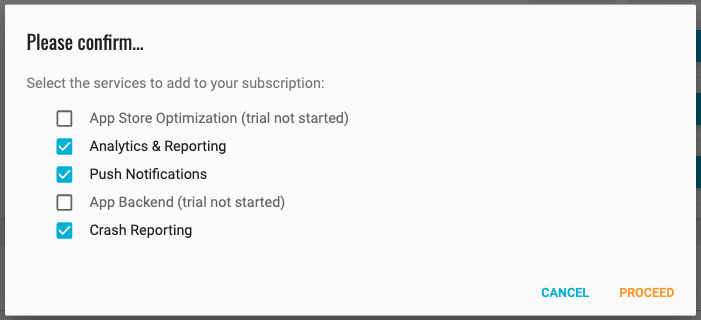
Check all the features in use and click Proceed. If this is the first feature you have bought, you will need to create a billing subscription by adding payment card details.
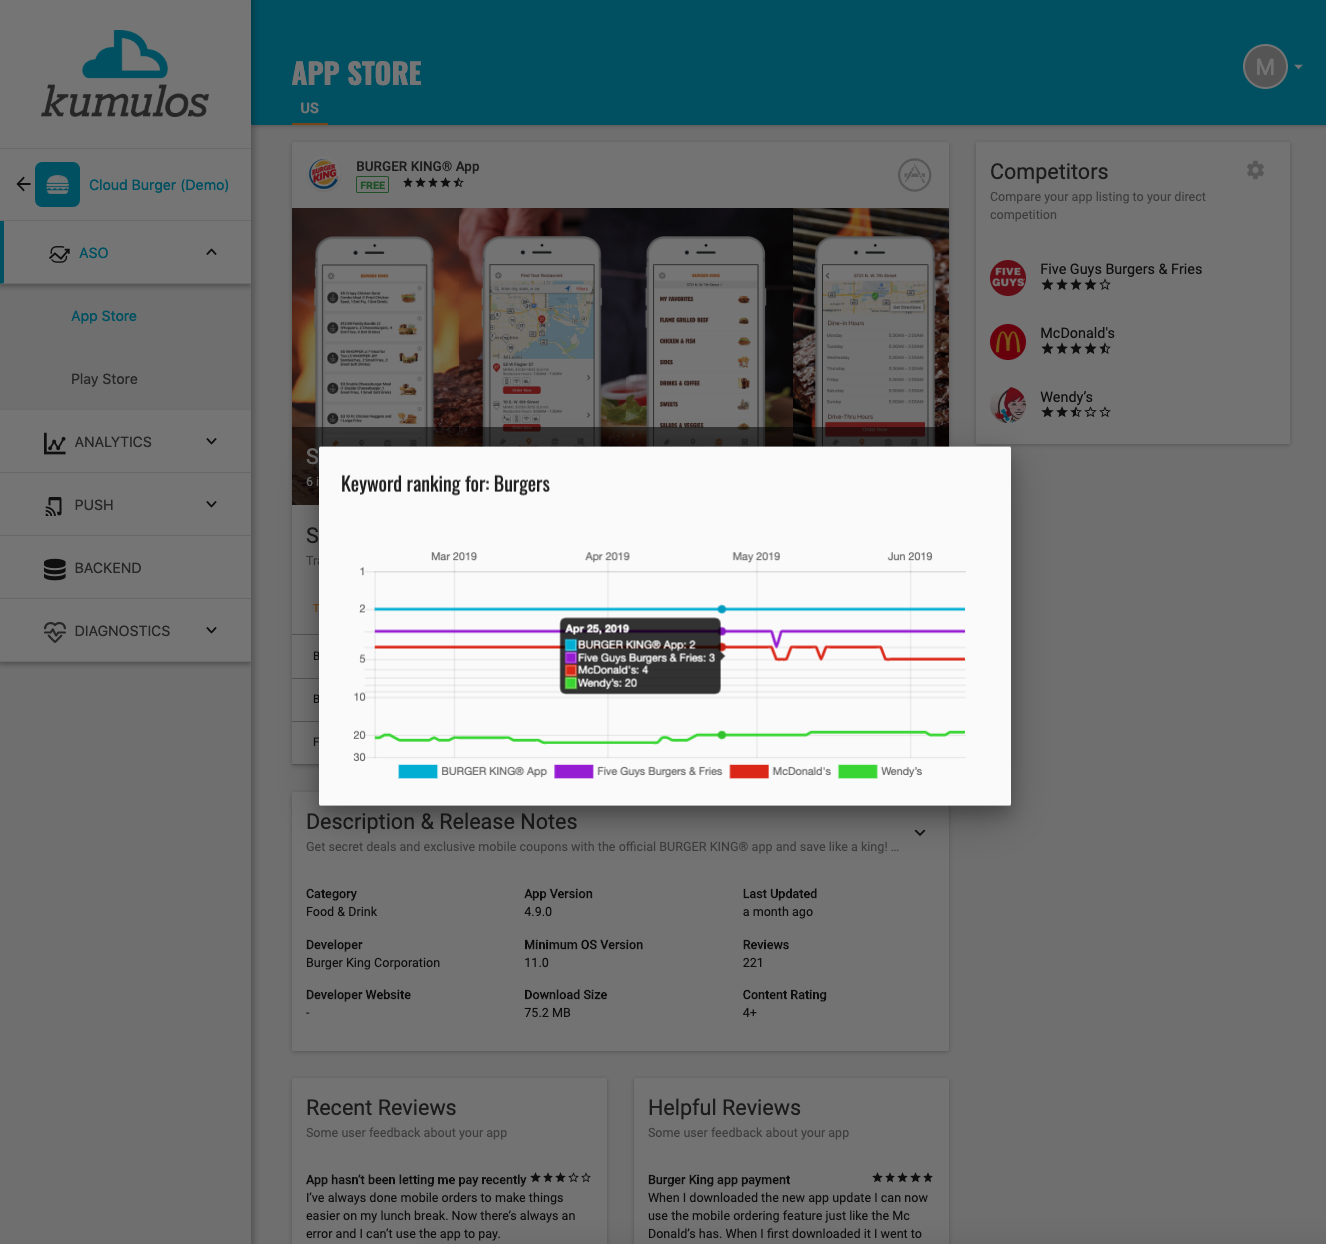
Once the app has been approved, use App Store Optimization to:
- Track where your app ranks in search results versus competitive apps
- View volume, contention and ranking over time for different search terms
- Compare your App Store listing and Google Play Store listing side-by-side
- Compare your listing to that of competitive apps and top apps in category
- View the most recent and also most helpful reviews
Advanced Features
Please also refer to our complete SDK Reference for further information about enabling features such as Crash reporting, Geofence and Bluetooth based location tracking, or handling interactions with action buttons and notifications.