Website & PWA
Integration
Kumulos provides an SDK to ease the integration of the Kumulos Analytics and Push Notification features into your web project. This guide provides an overview of setting up the SDK for your project and sample usage.
Project Setup
The Kumulos libraries are distributed through a CDN or NPM. For both integrations, you will need your Kumulos API key and secret key which can be found on the app dashboard in Kumulos' control panel. For configuring web push, you will also need the VAPID public key from the web push configuration dialog.
Note that in order to use web push notifications, your site must be served over HTTPS.
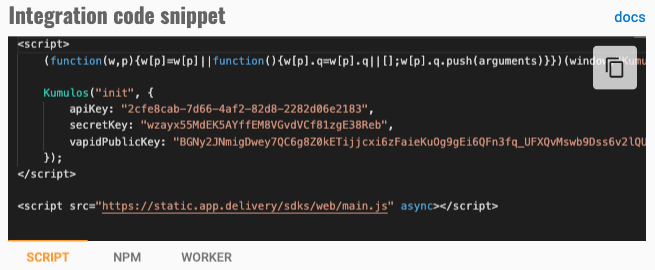
Website/CMS Projects using CDN
If you are integrating Kumulos into a WordPress Site, please see the video in our WordPess Setup Guide below. Otherwise, select the app, expand 'Messaging' in the left menu, click 'Configuration' and then the cog next to the web icon.
Click the copy icon to copy the code snippet (that includes your Kumulos API key, secret key and VAPID public key) and paste this into the <head> tag.
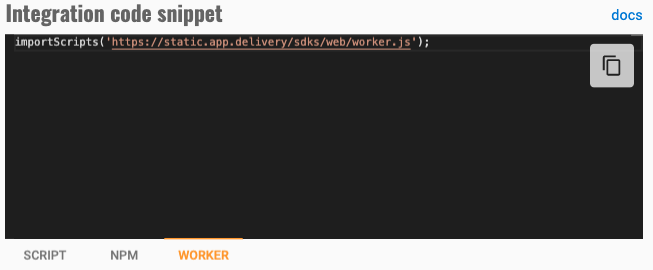
Next, host a service worker at https://your-domain.com/worker.js with the code snippet copied from the 'worker' tab of the web push configuration dialog:
PWA/SPA Projects using NPM
Start by adding the package dependency to your project:
npm install --save @kumulos/web
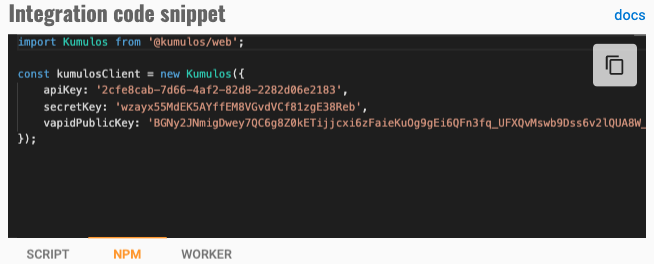
Initialization
After installation, import and initialize the SDK in your application code using the code snippet from the 'NPM' tab of the web push configuration dialog:
Next, host a service worker at https://your-domain.com/worker.js with the code snippet copied from the 'worker' tab of the web push configuration dialog:
Configuring Service Worker Location
If you want to host the service worker file at a different path on your domain, you can configure the path during initialization as follows:
Kumulos('init', {
    apiKey: 'YOUR_API_KEY',
    secretKey: 'YOUR_SECRET_KEY',
    vapidPublicKey: 'YOUR_VAPID_KEY',
    serviceWorkerPath: '/wp-content/themes/your-theme/assets/sw.js'
});
Checking Integration
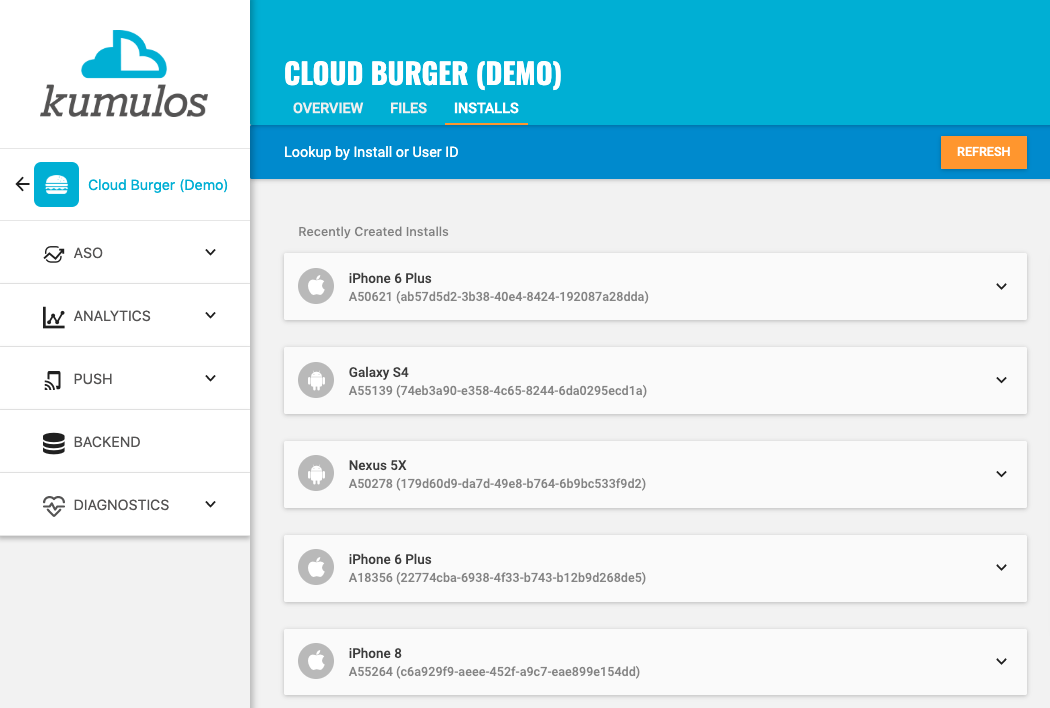
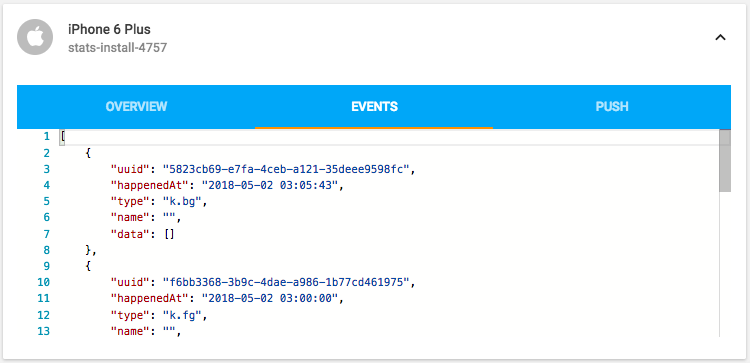
When you run visit your web project in a browser, you can check that the SDK has been initialized correctly by selecting the app and clicking the Installs tab to see the ten most recent installs of your project. Click on any install to see more information.
If you experience any difficulties integrating an SDK or initializing the Kumulos client, please don't hesitate to contact support who are standing by to help!
Installation ID
When initialized for the first time, the Kumulos SDK will create a unique identifier for the web installation that initialized the SDK.
This identifier can be used to target push notifications to a specific device through KScript or the Push Notifications API.
In order to retrieve this installation ID, simply access the method.
For website projects:
Kumulos(function (client) {
    client.getInstallId().then(function (installId) {
        // Use the install ID for something
    });
});
For PWA projects:
const installId = await kumulosClient.getInstallId();
Once you have the installation ID, you can send it to your web backend to be used later for push targeting. For more information about push targeting, please see the KScript Documentation or push notification documentation as appropriate.
Analytics
Kumulos provides concise and easy to consume analytics & reporting features. By initializing the SDK, you automatically get engagement reporting and page view events out the box.
Event Tracking
Kumulos allows you to track custom analytics events that can be used as a trigger to fire automation rules (e.g. to trigger a push notification) or as steps in a funnel to track conversion through key user journeys in your project.

To track a custom analytics event, use the trackEvent method.
For website projects:
Kumulos('trackEvent', 'product.purchased', {
    productId: 404
});
For PWA projects:
kumulosClient.trackEvent('product.purchased', {
    productId: 404
});
Each event and its properties must be less than 250 KiB in size for the event to be tracked.
Checking Events from your Project
When you test your project, you can check that the SDK is recording events correctly by selecting the app and clicking the Installs tab to see the ten most recent installs of your project. Click on any install and then click on the Events tab.
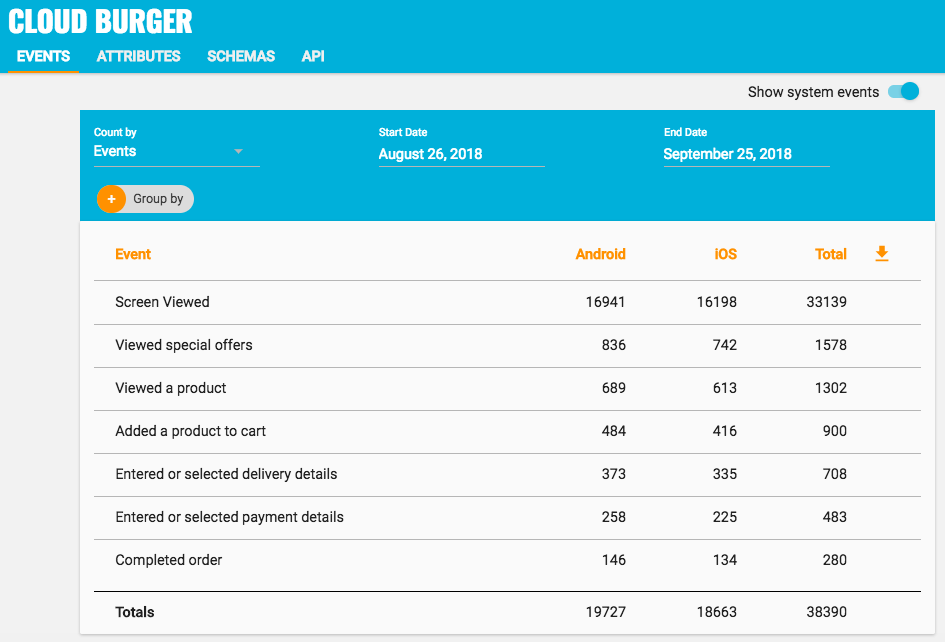
Alternatively, to see counts of all analytics events, including system events such as opened a push notification, recorded by installs of the app in the last 30 days, expand 'Analytics' and click 'Explore' in the left menu.
Page View Events
For website projects, the Kumulos SDK automatically gathers page view events which include the following properties:
- page title (e.g.
Checkout) - path (e.g.
/blogs/super-cool-announcement) - query parameters (e.g.
utm=your_campaign)
For PWA projects, you can track page view events as follows by hooking into your SPA router. For example (using the history module):
import { createBrowserHistory } from 'history';
import Kumulos from '@kumulos/web';

const kumulosClient = new Kumulos({...});
const history = createHistory();

history.listen(location => {
    let query = undefined;
    const qs = location.search;

    if (qs.length > 0) {
        query = qs
            .substring(1)
            .split('&')
            .map(vars => vars.split('='))
            .map(pairs => pairs.map(decodeURIComponent))
            .reduce((q, pair) => ({ ...q, [pair[0]]: pair[1] }), {});
    }

    kumulosClient.trackEvent('k.pageViewed', {
        title: 'your page title',
        path: location.pathname,
        query
    });
});
User Association
Kumulos allows associating a user identifier with the current installation ID. This user identifier is useful for performing analytics aggregations & analyses at the user level, for example, funnels completed by users across multiple devices. You can also optionally associate a collection of attributes with the user.
To associate the current app installation with a user, you can use the helper method as shown below.
For website projects:
Kumulos('associateUser', 'unique-user-id');
For PWA projects:
kumulosClient.associateUser('unique-user-id');
User association is time-aware, so say two different users log in to the app, their user IDs will be associated with the same install for the time between subsequent calls to the helper method. For example:
Kumulos('associateUser', 'Bob');
// This event will belong to Bob
Kumulos('trackEvent', 'product.purchased');
Kumulos('associateUser', 'Alice');
// This event will belong to Alice
Kumulos('trackEvent', 'product.purchased');
Attributes
You can optionally associate a collection of attributes with the user for targeting, personalization or attribution. To associate attributes with the user, pass a collection into the helper method as shown.
Kumulos('associateUser', 'unique-user-id', {
    name: 'Shawn',
    age: 25
});
The collection of attributes for a given user must be less than 250 KiB in size.
If you do not have a user identifier, use the installation ID generated by the Kumulos SDK.
Messaging & Push Notifications
Kumulos provides powerful multi-channel messaging services to reach your users. By initializing the SDK you can quickly and easily receive push notifications to re-engage your users and keep them up to date.
Configuration & Setup
To integrate into your web project, you have to complete the following steps:
- Enable Push in the Kumulos Agency Console
- Integrate the SDK components with your web project
- Register to receive push notifications from your website or PWA
Registering for Web Push Notifications
In order to send push notifications to your users, you have to request permission to send them notifications. This section outlines how to request permission using the Kumulos Soft Prompts (recommended), or requesting permission directly from a widget of your choosing.
Using Soft Prompts
The soft prompt mechanism offers the user a method to indicate intent to opt in to notifications prior to being asked for the native browser permission. Soft prompts follow best-practices for user experience and will stay up to date with current browser requirements.
You can configure the soft prompts in the SDK with the pushPrompts option during initialization, passing either 'auto' (default), or an object describing the prompts.
In the case of 'auto', the prompt configuration will be managed from the Kumulos Console's web-push configuration page.
Auto Resubscribe
If you have previously used another web push notification system, then by default users who have previously subscribed for web push notifications from the previous system, will automatically be resubscribed to receive web push notifications from Kumulos on their next site visit with no interaction necessary.
Advanced
Setting prompts in code
Alternatively, you can specify the prompts in the code directly:
Kumulos('init', {
    apiKey: 'YOUR_API_KEY',
    secretKey: 'YOUR_SECRET_KEY',
    vapidPublicKey: 'YOUR_VAPID_KEY',
    pushPrompts: {
        'my-bell-prompt': {
            type: 'bell',
            trigger: {
                event: 'k.pageViewed',
                afterSeconds: 3,
                filters: [
                    ['path', 'in', ['/', '/blog/*']],
                ]
            },
            labels: {
                tooltip: {
                    subscribe: 'Get the latest updates!'
                }
            },
            colors: {
                bell: {
                    bg: '#fa0',
                    fg: '#fff'
                }
            },
            position: 'bottom-left'
        }
    }
});
The above example defines a bell prompt which will show to the user on the home and blog pages, after three seconds of being on the page.
Prompt configuration follows the following interfaces:
type FilterOperator = 'in';
type FilterValue = number | boolean | string | string[];
type PropFilter = [string,FilterOperator,FilterValue];

interface PromptTrigger {
    event: string;
    afterSeconds?: number;
    filters?: PropFilter[];
}

interface BellPromptConfig {
    type: 'bell';
    trigger: PromptTrigger;
    labels?: {
        tooltip?: {
            subscribe?: string;
        };
    };
    colors?: {
        bell?: {
            bg?: string;
            fg?: string;
        };
    };
    position: 'bottom-left' | 'bottom-right';
}
Request Directly
To prompt your user for permission directly, you can use the pushRegister method. This will ask the user to accept notifications, and then subscribe them if they accept.
It is strongly recommended to prompt the user as a result of interaction on the page. Once a user blocks notifications, you cannot prompt them again using the browser's dialog so it's a good idea to ask them if they'd like update before calling the pushRegister method.
Future browser updates will likely make this mandatory for many browsers
In a website project:
Kumulos('pushRegister');
For a PWA project:
kumulosClient.pushRegister();
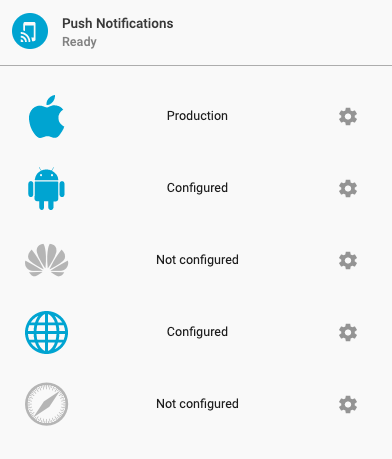
Safari Configuration
To support sending notifications to desktop Safari, configuration of the following items is necessary:
- Site URL
- Icon (square, >=512px)
- APNS certificate
To generate an APNS certificate, you need access to an Apple Developer account.
Generating a Safari Push Certificate
In the Apple Developer console, add a new identifier for your website.
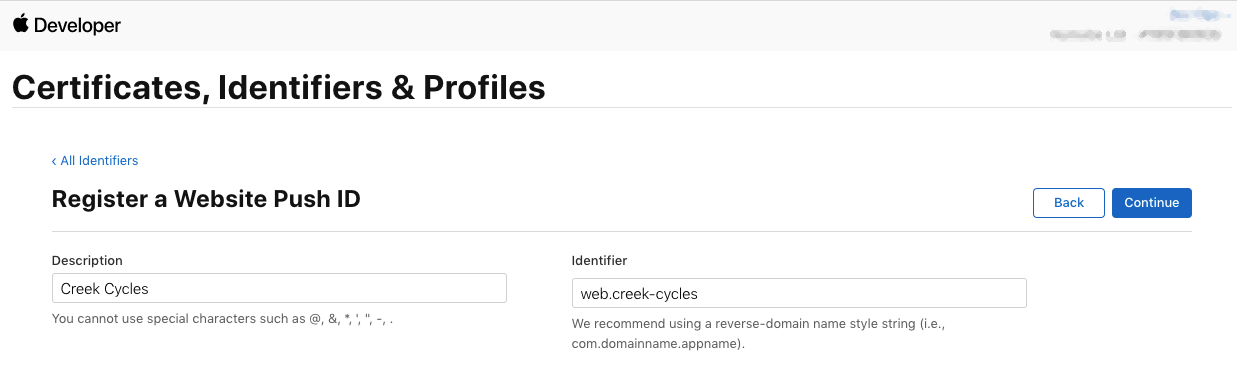
Next, navigate to the certificates list. From here, add a new certificate.
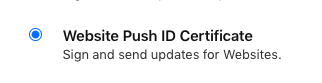
For the type of certificate, choose Services > Website Push ID Certificate:
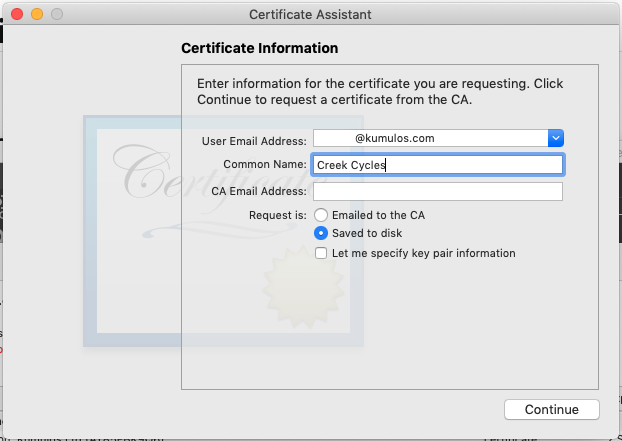
Generate a Certificate Signing Request (CSR) using the Keychain Access app:
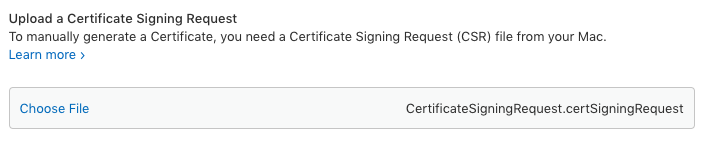
Upload the generated CSR into the developer console:
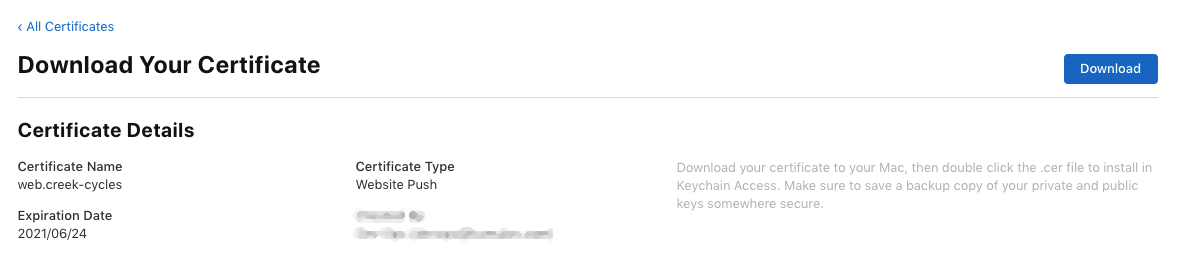
Download the issued certificate:
Once downloaded, open the certificate file to add it to your keychain.
Now export the certificate & private key from the Keychain access tool as a P12 file:
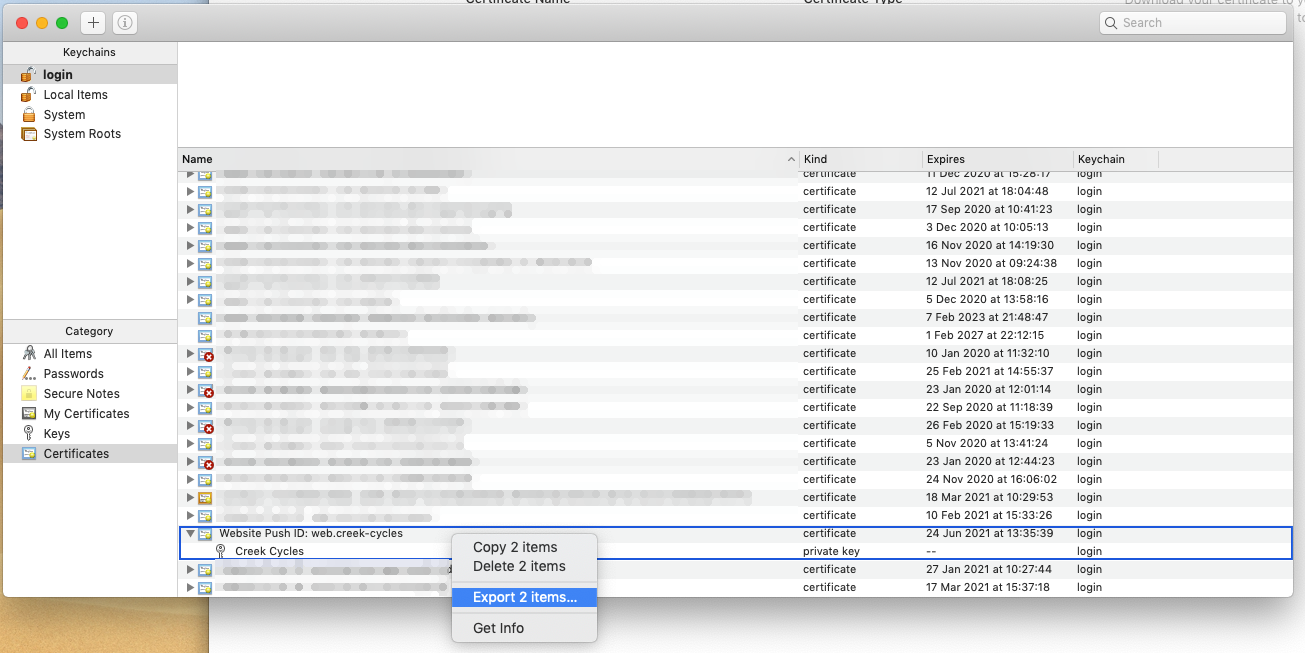
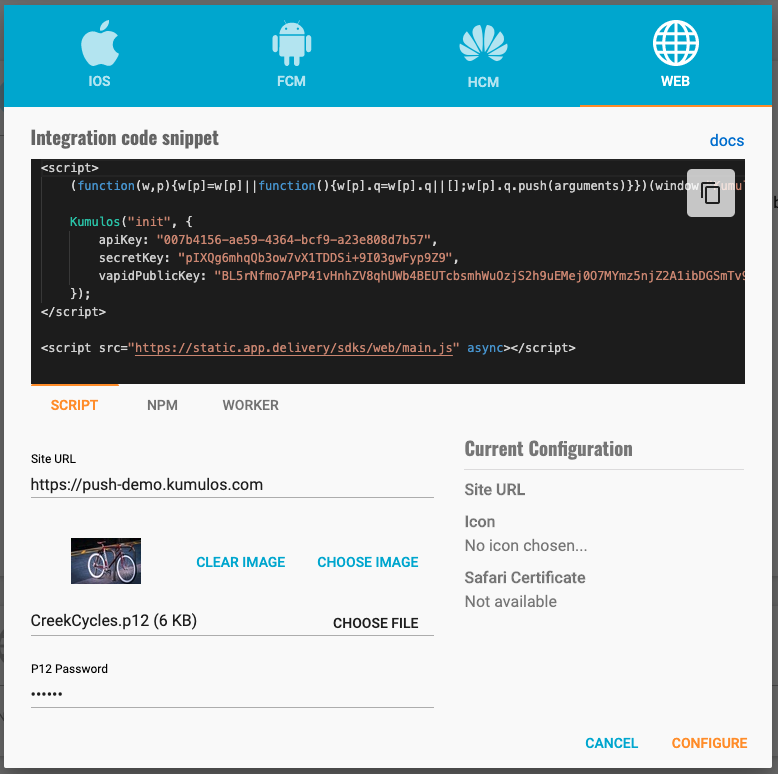
Finally, upload the certificate into the Kumulos Messaging Web Configuration modal, and fill in the site URL and icon fields:
Checking Integration Status
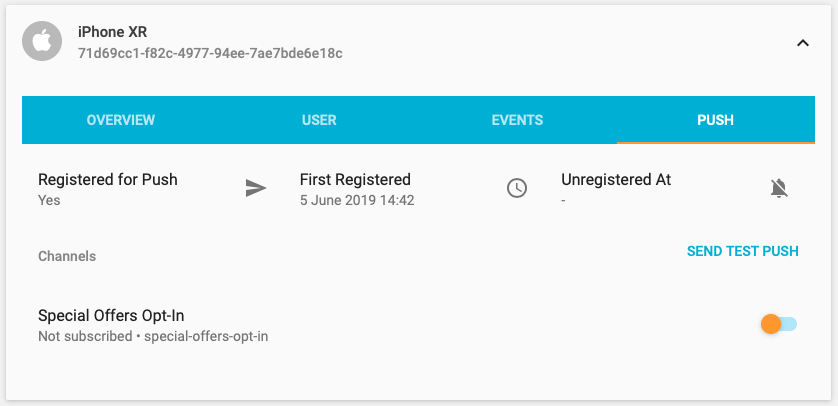
When you test your project, you can check that the integration has been successful using the install browser by selecting the app in the Kumulos Console and clicking the Installs tab to see the ten most recent installs of your project.
Click on an install, click the 'Push' tab and click Send Test Push.
If you do not receive the push notification, check the Error Log for any errors sending the push notification to the native push gateways. If you continue to experience problems, please don't hesitate to contact support who are standing by to help!
Handling Notification Events
The Kumulos SDK exposes two optional handlers for notification events. These handlers can be used to perform actions on your page in response to notification data and content.
To configure the handlers, pass functions to the initialization options:
new Kumulos({
    // ... other options
    onPushReceived: function (n) {
        console.log('Received: ', n);
    },
    onPushOpened: function (n) {
        console.log('Opened: ', n);
    }
});
Both handlers are optional.
onPushReceived will be triggered on all currently open tabs when any push notification is received from Kumulos.
onPushOpened will be triggered on the newly-opened tab after Kumulos has been initialized. Any other open tabs will not receive the open callback.
Note Safari is not supported due to lack of W3C push implementation.
Both handlers receive a notification object as their only argument, it has the following interface:
interface KumulosPushNotification {
    id: number;
    title: string;
    message: string;
    url?: string;
    iconUrl?: string;
    imageUrl?: string;
    data: {
        [key: string]: any;
    };
}
Channels
You can create and manage subscriptions to channels from the SDK. Channels allow you to send messaging content to certain interest groups.
All channel management is performed with an instance of the ChannelSubscriptionManager. The manager is available from an SDK client instance as follows.
For website projects:
Kumulos(function (kumulosClient) {
    var subscriptionManager = kumulosClient.getChannelSubscriptionManager();
});
For PWA projects:
const subscriptionManager = kumulosClient.getChannelSubscriptionManager();
All further examples will reference the subscription manager, which exposes the following interface:
interface Channel {
    uuid: string;
    name?: string;
    subscribed: Boolean;
    meta?: PropsObject | null;
}
interface ChannelSpec {
    uuid: string;
    subscribe: boolean;
    meta?: PropsObject | null;
    name?: string;
    showInPortal?: boolean;
}
interface ChannelSubscriptionManager {
    /**
     * Subscribes to the channels given by unique ID
     */
    subscribe(uuids: string[]): Promise<Response>;
    /**
     * Unsubscribes from the channels given by unique ID
     */
    unsubscribe(uuids: string[]): Promise<Response>;
    /**
     * Sets the current installations channel subscriptions to those given by unique ID.
     *
     * Any other subscriptions will be removed.
     */
    setSubscriptions(uuids: string[]): Promise<Response>;
    /**
     * Clears all of the existing installation's channel subscriptions
     */
    clearSubscriptions(): Promise<Response>;
    /**
     * Lists the channels available to this installation along with subscription status
     */
    listChannels(): Promise<Channel[]>;
    /**
     * Creates a push channel and optionally subscribes the current installation.
     *
     * Name is optional, but required if showInPortal is true.
     */
    createChannel(channelSpec: ChannelSpec): Promise<Channel>;
}
Channel visibility and metadata
Channel visibility and meta data can be controlled when they are created.
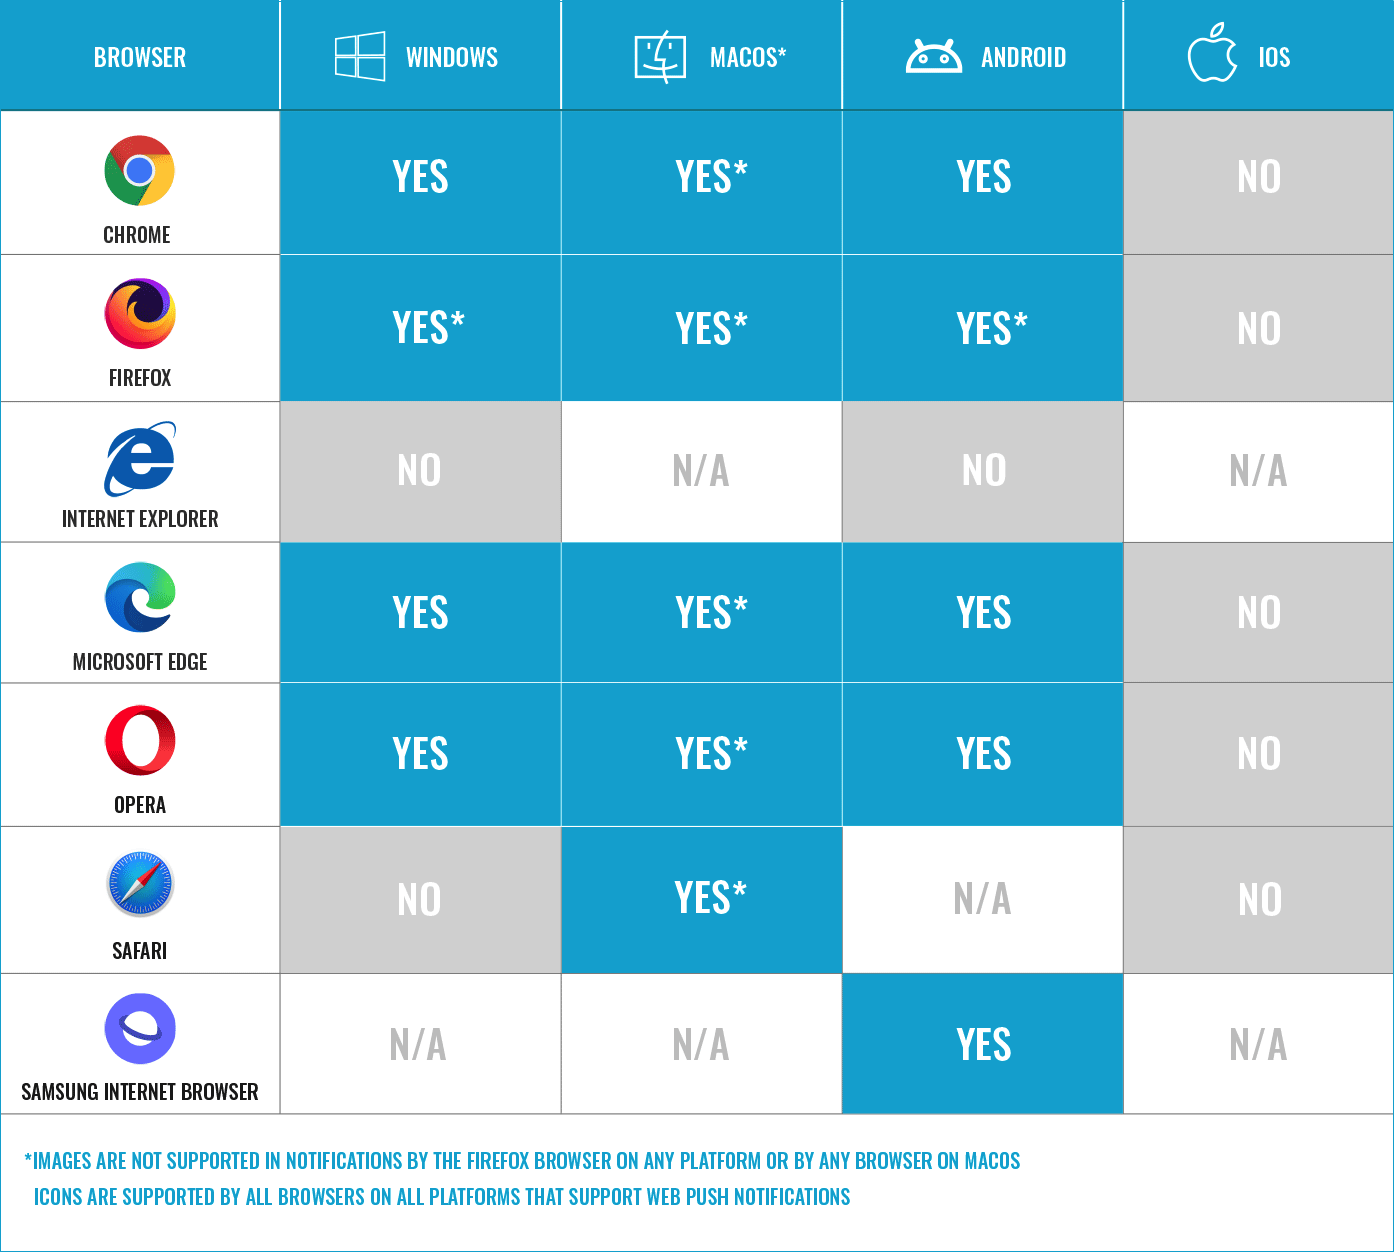
Browser Feature Support
The following table illustrates which web push features are supported by different browsers on different operating systems.
Web-to-App Banners
Web-to-App Banners allow you to direct website users to your mobile app using a Deferred Deep Link. These banners are configured in the Kumulos console, and show on your website when the configured condition is met.
In order to enable the banners feature for your website, you must:
- Configure Deferred Deep Linking for your app
- Complete the basic SDK integration steps as shown at the start of this guide
- Enable deferred deep linking support for the web SDK
Once the web SDK snippet has been included on your site, you simply need to enable the deferred deep linking feature in the web SDK initialization as follows:
Kumulos("init", {
    apiKey: "YOUR_API_KEY",
    secretKey: "YOUR_SECRET_KEY",
    vapidPublicKey: "YOUR_VAPID_KEY",
    // Add the features key with 'ddl' to enable web-to-app banners
    features: ['push', 'ddl']
});
Note when
featuresis not specified, the web SDK defaults to enabling the 'push' feature. You can also disable the push feature and only use web-to-app banners by passingfeatures: ['ddl'](this also makes thevapidPublicKeyoptional).
Once the feature has been enabled, you can configure Web-to-App Banners as shown in the user guide.
Troubleshooting
If you are having issues with elements of the SDK integration, and push prompts or web-to-app banners are not displaying on your site or push registration is not working, we advise that you check through the below sections for tips on how to troubleshoot the integration.
Snippet
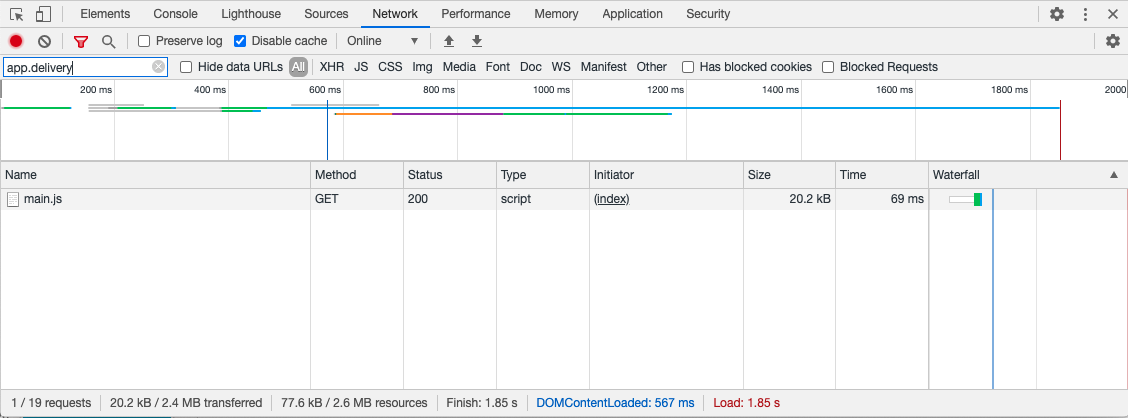
You can check the status of the snippet in your browser's development tools.
First, check the snippet included in the source code of the page. This requires the correct credentials (apiKey, secretKey, and vapidPublicKey)? Compare the code snippet to the snippets given in the integration section
You can view the SDK being initialised through developer tools of your browser. You can look for any error logs in the developer tools console, they may indicate integration problems.
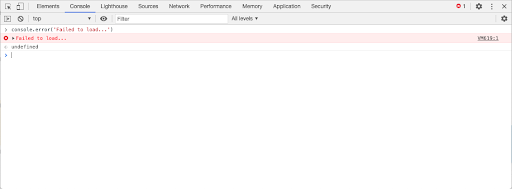
Otherwise you will see the bundle being loaded successfully with a 200 status in the network traffic tab of the developer tools.
Domain
Another element that can be checked is the domain of site and location of the ServiceWorker.
First the site needs to be served over HTTPS as opposed to HTTP. Next, ensure that the domain the snippet is present on matches the domain configured in Kumulos. The configuration can be checked in the Messaging area of the platform under Configuration on the console by clicking on the gear icon next to the web symbol.
If this is correct then check that the worker code is also hosted on the same domain as the integration target listed in Kumulos

If you are using subdomains, all integration & files must be part of the same subdomain.
ServiceWorker
The 'worker.js' file should be hosted at a /worker.js path. For example if your domain name was 'cloudburger.com', the 'worker.js' file should be hosted at https://cloudburger.com/worker.js and the content type should be 'application/javascript'
If your integration is unreliable it is advisable to check if there are any other ServiceWorker registrations being made on the same site.
If you have two ServiceWorkers running on the same site this will cause conflicts and inconsistencies in how the integration will operate because only one ServiceWorker may be active for a domain at a time (this is a limitation of the ServiceWorker specification, not Kumulos).
WordPress Setup Guide
The following video shows how to add Kumulos Web Notifications to your WordPress site.
Configuring Notifications for WordPress with Kumulos
The relevant code snippet for your functions.php is as follows:
<?php


function kumulos_init_web_push()
{
    echo <<<'END'
<script>
    (function(w,p){w[p]=w[p]||function(){w[p].q=w[p].q||[];w[p].q.push(arguments)}})(window,"Kumulos");

    Kumulos("init", {
        apiKey: "YOUR_API_KEY",
        secretKey: "YOUR_SECRET_KEY",
        vapidPublicKey: "YOUR_VAPID_KEY"
    });
</script>

<script src="https://static.app.delivery/sdks/web/main.js" async></script>
END;
}

add_action('wp_head', 'kumulos_init_web_push');>
Changelog
1.10.0
- Add support for probabilistic matching for Web-to-App banner handover to mobile SDKs
1.9.0
- Web prompt icons for Alerts and Banners are now driven from prompt configuration as opposed to pulling directly from the configured web platform icon.
1.8.1
- Support device safe area or "notch" on iPhone devices in Web-to-App banners
- Minor enhancement and fix to feature requirement checking where the SDK could potentially fail to initialise ddl feature if the push feature was unsupported on safari/iphone
1.8.0
- Add support for Web-to-App Banners
- Update dependencies for latest patches
1.7.2
- Fix DOMContentLoaded event edge case
1.7.1
- Add channel selection prompt support to allow users to subscribe to topics of interest during push registration
1.7.0
- Add banner style soft prompt feature
- Additional positioning & appearance options for alert prompt types
1.6.0
- Add alert style soft prompt feature
1.5.1, 1.5.2, 1.5.3, 1.5.4
- Update dependencies for latest patches
- Fix edge case with prompt trigger matching (1.5.3)
- Fix edge case with prompt rendering on some websites (1.5.4)
1.5.0
- Add notification event handlers for notification received and opened
1.4.0
- Safari push notifications support
- Allow subscribing to a channel from a soft prompt
1.3.1
- Fix soft prompt heading color
1.3.0
- Add configurable, optional interstitial page overlay shown when requesting native push permission
1.2.3
- Fix base64 URL variant encoding
1.2.2
- Render prompt UI using a portal
1.2.1
- Reduce cache time for prompt config to one hour
1.2.0
- Add auto resubscribe feature for migrating push subscriptions to Kumulos on next site visit
- Implement all filter operators for soft prompt triggers
1.1.0
- Add a configurable 'bell' soft prompt for push notifications
- Show push notifications until the user dismisses them
1.0.1
- Fix bug handling URL opening
1.0.0
- Initial release with support for web push notifications and analytics events