Web Push Notifications
Once you have integrated Kumulos into your website or PWA, you can send web push notifications from your agency console. Your client can also send push notifications from their client portal if you have enabled this for them.
This guide shows you how to send push notifications to users of your website (or PWA). If you also have native mobile apps, then you can follow the same process to send notifications to users across your website AND mobile apps at the same time. Alternatively, you can use segments to limit the audience to your website users only, for example.
To send a push notification from your agency console, click on the app and then select 'Messaging' from the left menu. Click the primary action button to display the Compose Message wizard that will walk you through five simple steps to sending a web push notification.
Configure Push Prompts
If you haven't already configured web push prompts, you can do this in the console under the 'Configuration' tab of Messaging. This will allow you to subscribe users to custom channels and allow further audience targeting when creating messages.
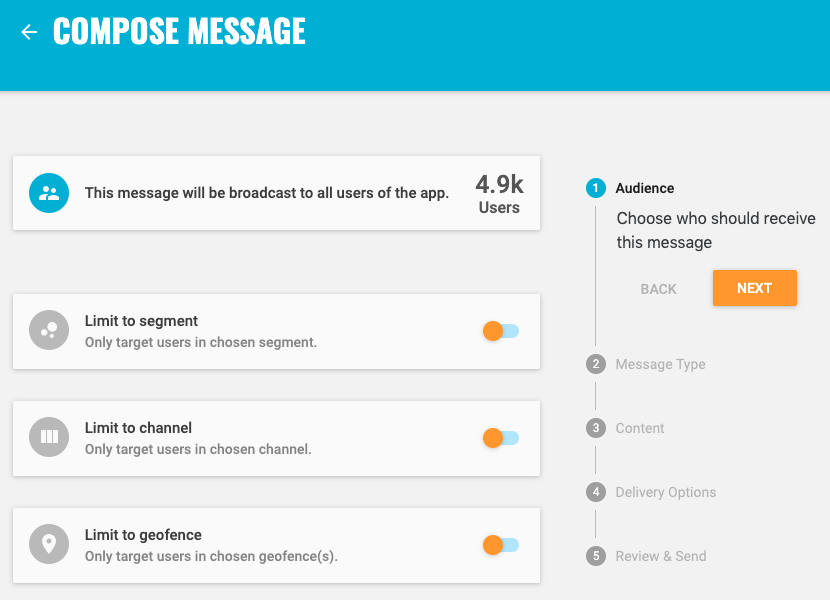
Audience
When creating a message, first choose the audience that you want to send the push notification to. You can send a broadcast to all installs subscribed to receive push notifications or target a specific segment, channel and/or geofence. As you select a segment, a channel and/or geofence(s), the wizard will tell you how many users will be targeted.

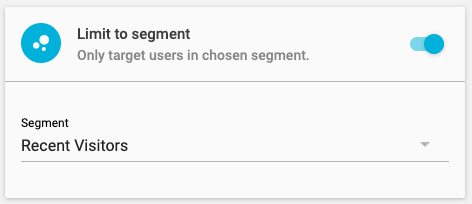
To send the notification to an audience segment, toggle 'Limit to segment' and select the segment from the drop-down list.
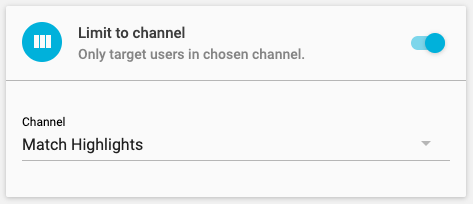
To send the notification to installs subscribed to a channel, toggle 'Limit to channel' and select the channel from the drop-down list.
If you select an audience segment and a channel, then an user must match all of the filters in the segment and be subscribed to the channel at the time the notification is scheduled to be sent in order for the notification to be sent to that user.
Click 'Next' when done.
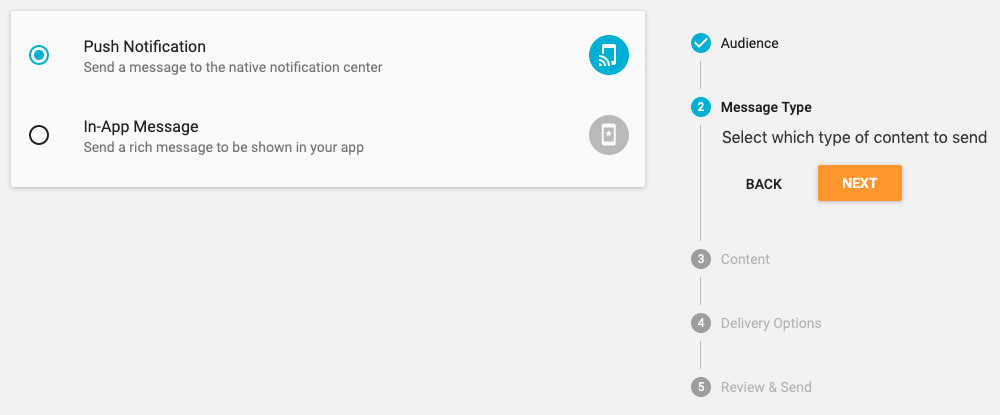
Message Type
When prompted which type of message you want to send, select 'Push Notification' and click 'Next'.
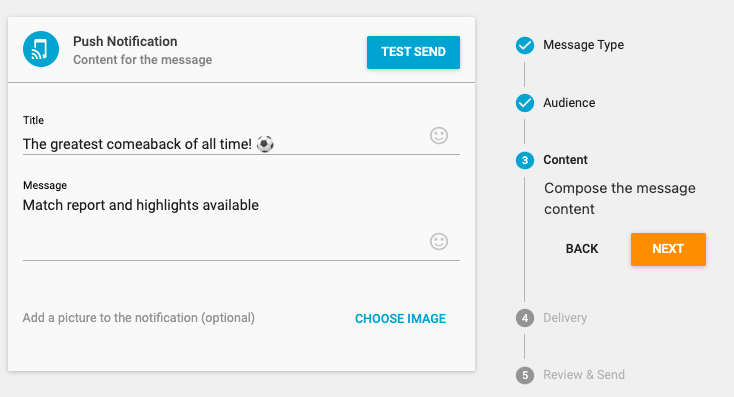
Content
Now, define the content of the notification. Use the emoji pickers to add emojis to your title and message as required.
Kumulos supports Emoji v4.0 / Unicode version 9.0 which is fully supported in the latest versions of Microsoft Windows and macOS. Older versions of Microsoft Windows and macOS may not support all emojis available. See Emojipedia for more details.
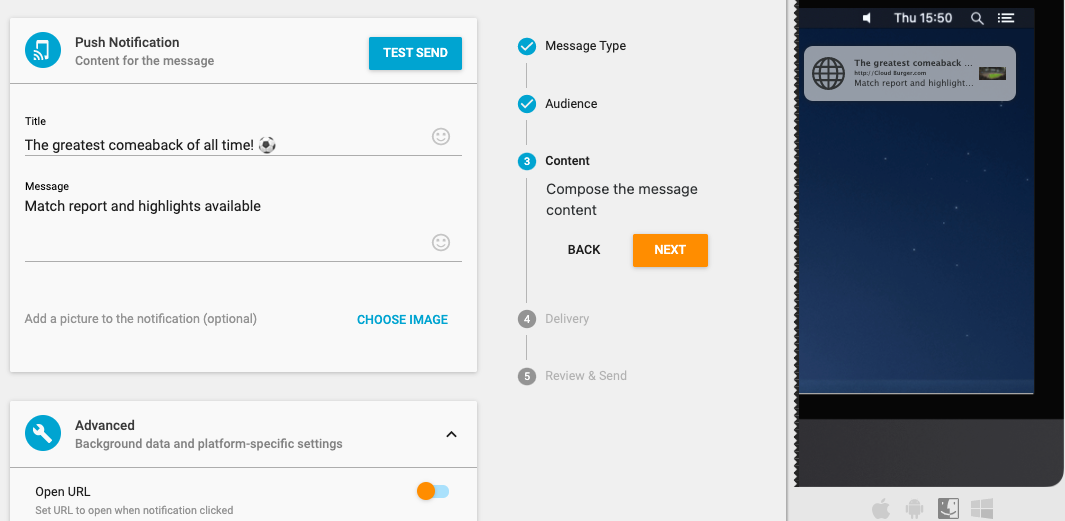
As you add content to the notification you can preview how this will look on a user's desktop.
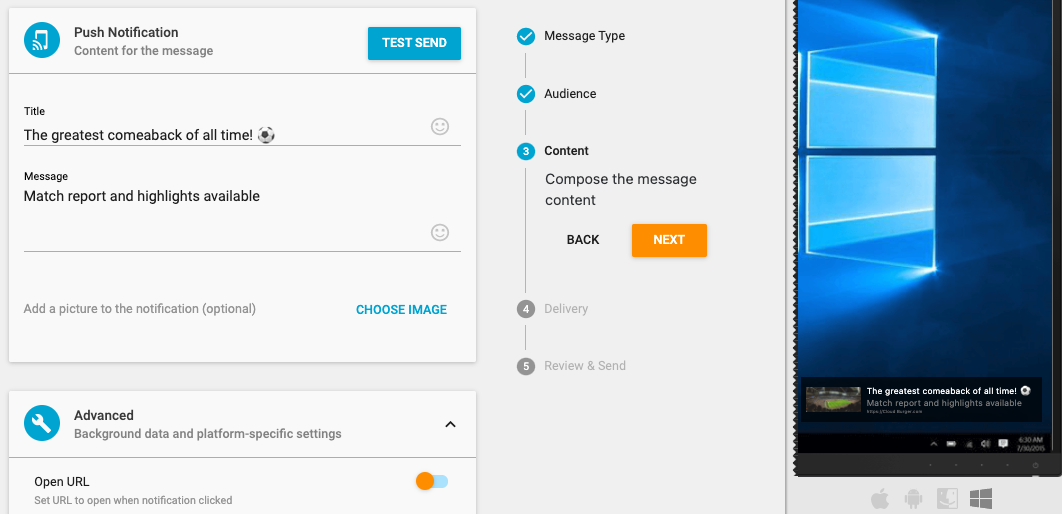
Click the Mac tab to see how the notification will look on an Apple Mac.
If you have added yourself and your team to the Testers channel, you can use the 'Test Send' button to send the push notification or to everyone in the Testers channel, to see how the message will appear on your own device, before sending to your audience.
Personalization
In your text, you can also add user attributes to personalize the message. Enclose user attributes in double braces and include a default value {{user.attributeName|default('defaultValue')}}. The defaultValue will be used if the attribute attributeName is not set for a given user.
Image
If you want to add a picture to your notification, click 'Choose Image' to open your Media Library. Here, you can upload a new image, select an image you have previously uploaded or search the Unsplash stock image library.
Please note that images are not supported by the Firefox browser on any platform or by any browser on macOS. Please see the web push notification browser support table for details.
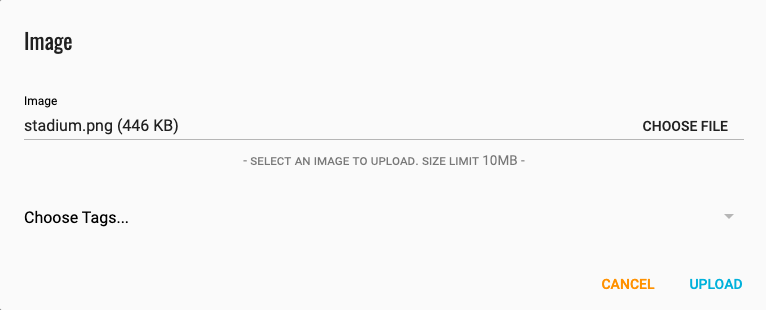
To upload a new image, click the upload primary action button. Click 'Choose File' to browse your computer and find the image. Select any tags to help you find the image later or to add a new tag, just start typing and click 'Create new tag'. Click 'Upload' to add the image to your media library and include this in your push notification.
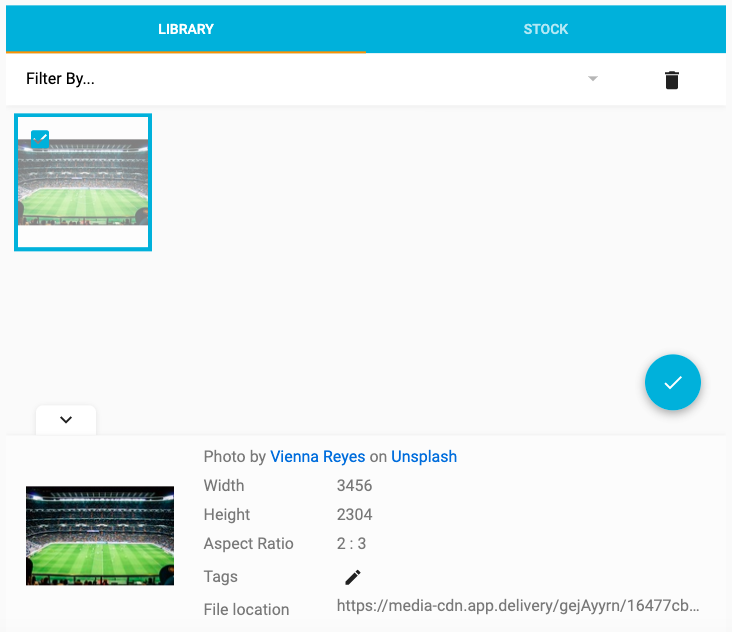
To use an image you have previously uploaded, simply select the image and click the tick primary action button. You can either scroll through your library or filter by the tags you have added previously.
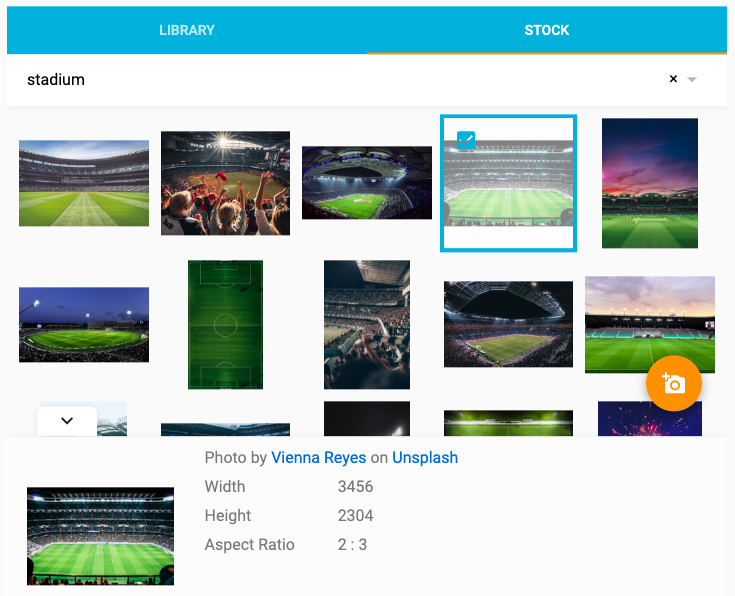
To use an image from the Unsplash stock image library, click the 'Stock' tab and enter one or more keywords in the search box. Scroll through the results and select an image to see more information about it. Once you have found the image, click the camera primary action button to add this image to your media library and include this in your push notification.
To remove the image from your push notification, click 'Clear Image'.
Advanced Options
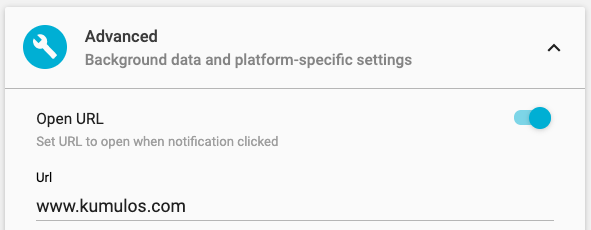
To open a URL, add a data payload, expand 'Advanced'.
Open a URL
To open a URL when the push notification is tapped by the user, toggle the "Open URL" switch and enter the URL you want to open.
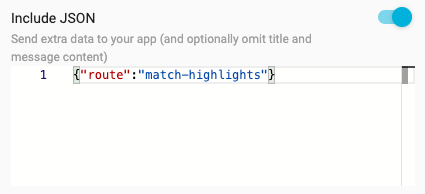
Data
To add an arbitrary meta-data object to the push notification, toggle the "Data" switch and enter a valid JSON object into the editor. Additional data can be consumed by the SDK, please refer to the integration guide for further information.
Icon
You can override the default icon for this notification by clicking CHOOSE IMAGE to open your media library. Here, you can upload a new icon or select an icon previously uploaded.
![]()
To upload a new icon, click the upload primary action button. Click 'Choose File' to browse your computer and find the icon. Select any tags to help you find the icon later or to add a new tag, just start typing and click 'Create new tag'. Click 'Upload' to add the icon to your media library and use this for the notification.
To use an icon you have previously uploaded, simply select the icon and click the tick primary action button. You can either scroll through your library or filter by the tags you have added previously.
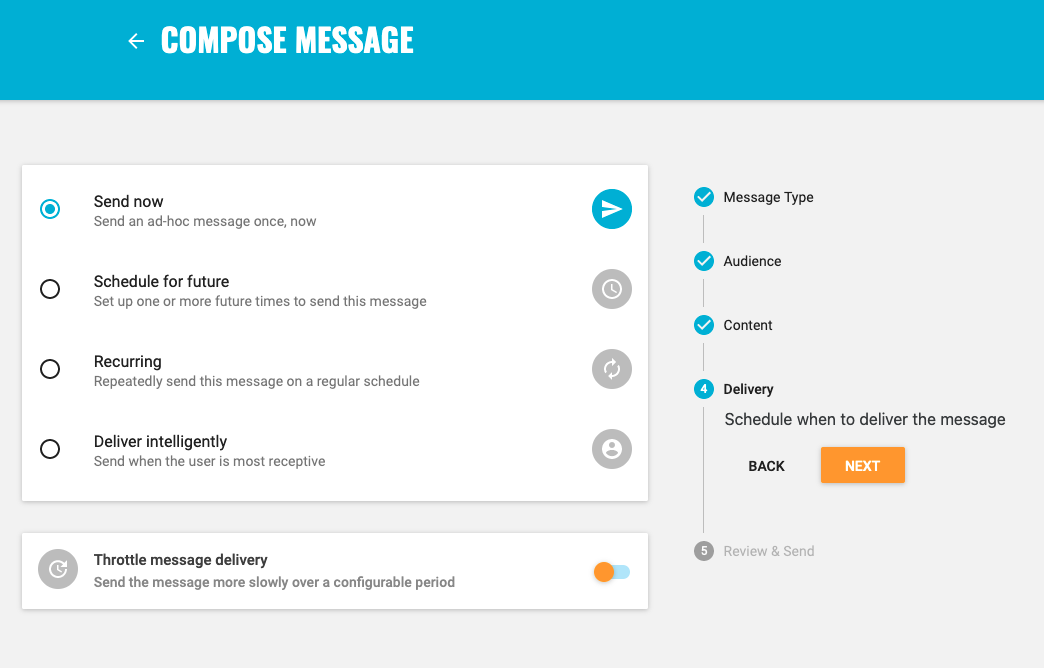
Delivery
Now decide when you want the message to be sent. You can:
- Send the message immediately, once now
- Schedule the message to be sent one or more times in the future
- Send the message repeatedly on a recurring schedule
- Deliver the message intelligently when each user is most receptive
- Throttle the delivery of the message, sending to the entire audience over a selected time window
Send now
If you want the message to be sent immediately, just click "Next".
Schedule for future
If you want to schedule a message in advance to be sent one or more times in the future, select "Schedule for future".
Choose the date and time you want the notification to be sent and click "Add Time".
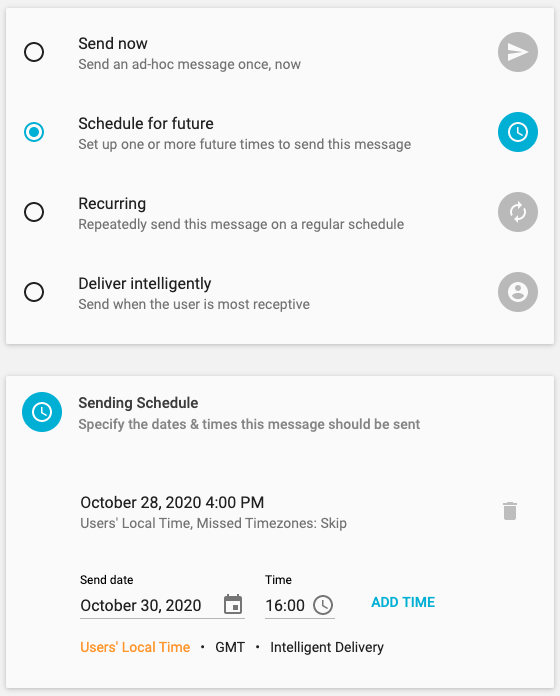
You can repeat this process to send the message again at other dates and times. To remove a date and time you have added, just click the trashcan icon. Click "Next" when done.
If you selected an audience segment, a channel and a geofence, then a user must match all the filters in the segment, be subscribed to the channel and be in the geofence at the time the message is scheduled to be sent in order for the message to be sent to that user.
Timezones
By default, the message will be sent at that date and time in the users' local timezone (according to the device on which the app is installed). If you want everyone to receive the message at exactly that same time, select your timezone before clicking "Add Time".
Alternatively, if you want to deliver the message when each user is most receptive, select "Intelligent Delivery" before clicking "Add Time". The message will then be delivered to each user at the time they most frequently use your app over the 24 hour period following the date and time you have specified.
If choosing to schedule the message to be sent in users' local timezone, what should Kumulos do for installs on devices for which this time has already passed? Should we "Skip" these installs or send at the same time, the "Next Day"?
For example: At 4pm on Christmas Eve, Marketing Mandy in New York decides to send a "Happy Christmas" notification to all of her customers at midnight on Christmas Day. However, for Surfer Steve in Sydney, that was already 6 hours ago. What should Kumulos do? In this example, Marketing Mandy should "Skip" Surfer Steve as a "Happy Christmas" notification on Boxing Day won't work.
Recurring
You can schedule the message to be sent on a repeating pattern by selecting "Recurring"
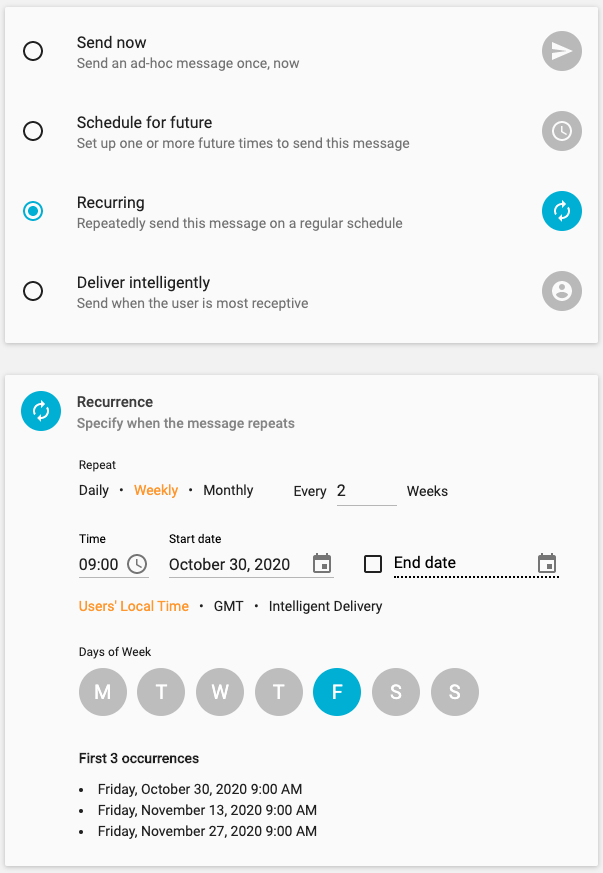
You can choose to repeat the message daily, weekly or monthly. For messages that repeat daily, specify on how many days the message should repeat.
For messages that repeat weekly, specify on how many weeks the message should repeat, and on which days of the week.
For messages that repeat monthly, specify on how many months the message should repeat, and on which days of the month (for example: the 26th day of the month, the fourth Friday of the month or the last Friday of the month etc).
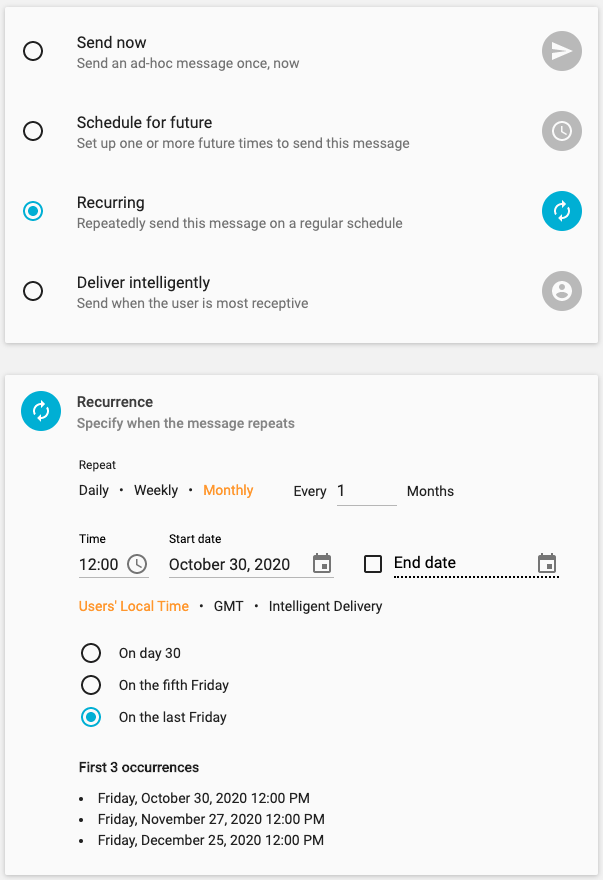
Enter the time the message should be sent (see note above about timezones), the start date when or after which first message should be sent and an optional end date after which no more messages will be sent. You can see the first three dates and times the message will be sent according to what you have entered above. Click "Next" when done.
We recommend you exercise caution and apply sensible audience targeting options when sending recurring messages to avoid over-communicating with your users, as this can lead to increased unsubscribes.
Intelligent Delivery
To deliver the message to each user when they will be most receptive, select "Deliver Intelligently".
Kumulos learns when each individual user uses your app (based on their sessions in the last 90 days) and gives you the option to deliver the message to each user when they will be most receptive, at the time they most frequently use your app. This maximizes the chance of each user interacting with the message to increase engagement.
If you select this option, Kumulos will deliver the message to each user over the next 24 hours.
Throttling
In order to ease pressure on back-end systems as a result of sending a message you can select to release your message to the audience with throttling applied. If you select this option you can configure a period from 1 - 24 hours for the message to be delivered to your audience in batches, completing at the end of the selected delivery window.
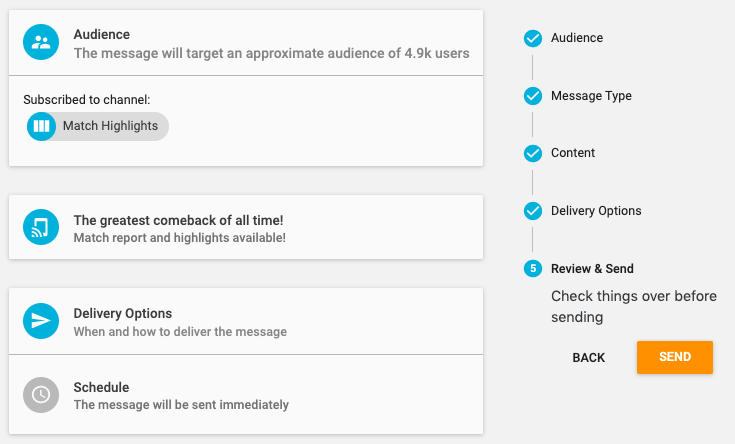
Review & Send
Lastly, review the audience, content and delivery options you have set. Click 'Back' if you want to make any changes, or click 'Send' to send or schedule the push notification.
The notification will now appear under 'Recently created messages' in your Messaging Dashboard.
You can also create automation rules to automatically send notifications on a trigger such as a custom analytics event like a form completion. Alternatively, you can send push notifications from an other backend system using the Messaging API.